by
by There’s a special satisfaction that comes from creating a truly functional and beautiful bag with your own hands. This detailed tutorial, inspired by the incredibly efficient “A few people know this is the easiest way to sew a bag!” video from Miarti – Reuse will guide you through crafting a sturdy, box-shaped zipper bag. This bag is perfect for carrying your essentials, organizing crafts, or even serving as a stylish lunch tote.
The brilliance of this design lies in its clever construction, which incorporates felt for incredible structure and a full zipper for maximum security. Get ready to learn a technique that makes sewing a professional-looking, durable bag surprisingly easy!
Why This Zipper Bag Will Become Your Go-To Project
This isn’t just any zippered pouch; it’s engineered for both resilience and elegance:
- Unmatched Durability: The use of felt as an inner layer provides exceptional structure, ensuring your bag stands tall and maintains its shape even when empty.
- Secure & Spacious: A full zipper closure keeps all your contents safely tucked away, while the boxy shape offers ample storage.
- Skill-Building Powerhouse: Master precision cutting, zipper installation, and working with multiple layers – all while creating a beautiful finished product.
- Customizable Charm: Choose your favorite denim prints and felt colors to create a bag that perfectly reflects your personal style.
- Efficient Construction: The video’s “easiest way” technique streamlines the process, making it a rewarding project even for those with intermediate sewing skills.
Materials You’ll Need:
Gathering your materials precisely is the first step to a successful and enjoyable sewing experience. The video demonstrates a vibrant color palette, encouraging you to choose fabrics that inspire you.
- Main Exterior Fabric (Denim Fabric): 1 piece, 68 cm x 48 cm. (Choose a sturdy denim, canvas, or heavy upholstery fabric for the exterior. The video uses a patterned denim-like fabric.)
- Lining Fabric (Felt): 1 piece, 66 cm x 46 cm. (The video uses a vibrant pink felt, crucial for structure.)
- Zipper: 1 piece, 45 cm long. (Choose a sturdy nylon coil zipper in a coordinating color.)
- Webbing Tape: 2 pieces, each 45 cm long. (For the handles. The video uses a bright green webbing tape.)
- Small Webbing Tabs: 2 pieces, each 10 cm long. (These are for the zipper ends.)
- Matching Thread: High-quality polyester thread that blends with your main fabric and zipper.
- Contrasting Thread (Optional): For decorative topstitching on the felt or quilting lines.
- Basic Sewing Tools:
- Sewing machine (a walking foot is helpful for thick layers)
- Denim needle (or a heavy-duty needle for your fabric)
- Zipper foot
- Sharp fabric scissors or rotary cutter and mat
- Ruler or measuring tape
- Fabric marker or tailor’s chalk
- Plenty of strong pins or fabric clips
- Iron and ironing board
- Lighter (for sealing webbing ends)
- Seam ripper (the indispensable friend of every sewist!)
Step-by-Step Tutorial: Crafting Your Structured Zipper Bag
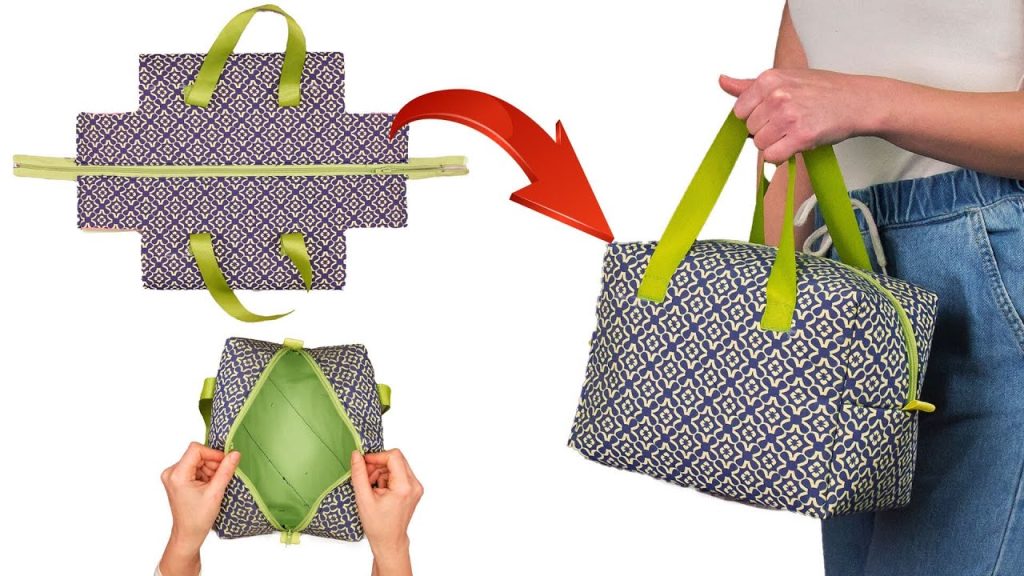
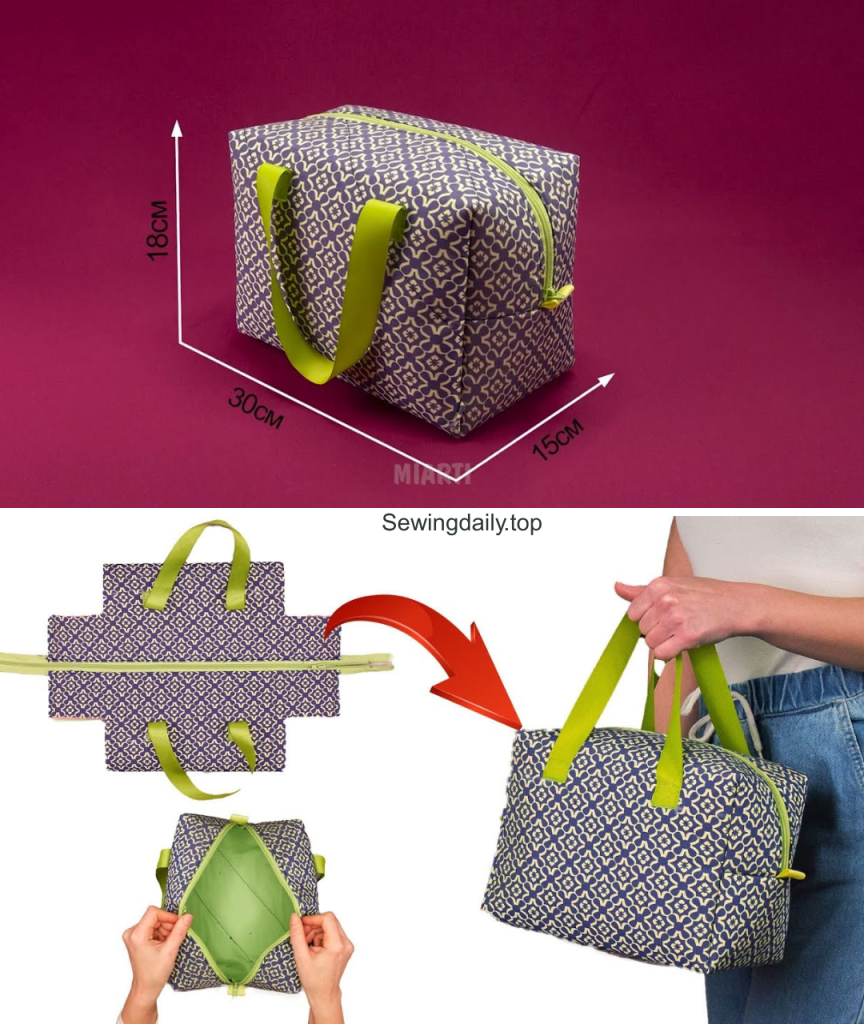
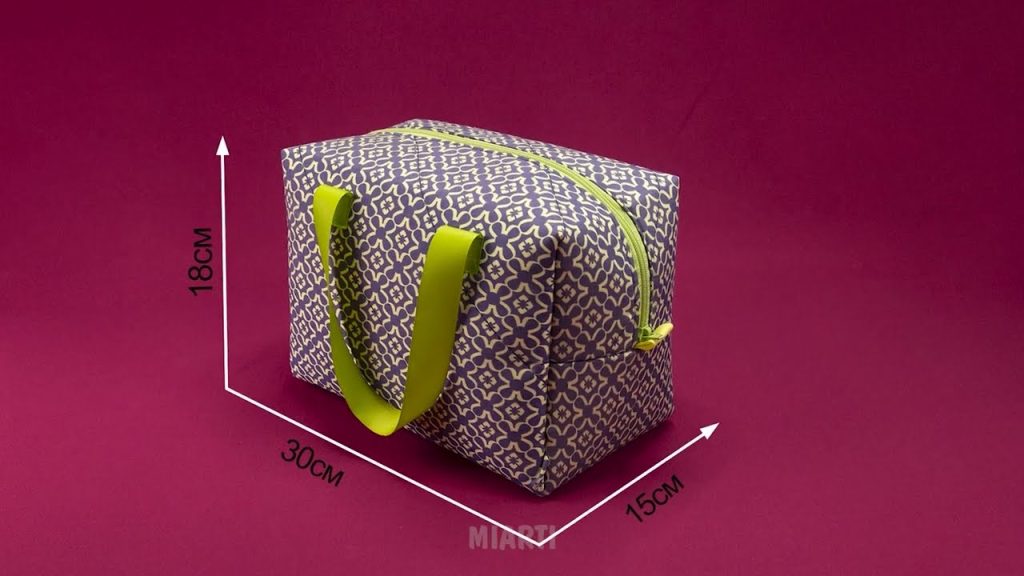
This tutorial will guide you through each stage, emphasizing the precise measurements and techniques from the video to ensure a beautifully structured and durable bag. The finished bag will measure approximately 30 cm long, 18 cm tall, and 15 cm wide. All seam allowances are 1 cm unless otherwise stated.
Phase 1: Preparing Your Main Fabric Layers
This initial phase builds the foundation of your bag’s unique structure.
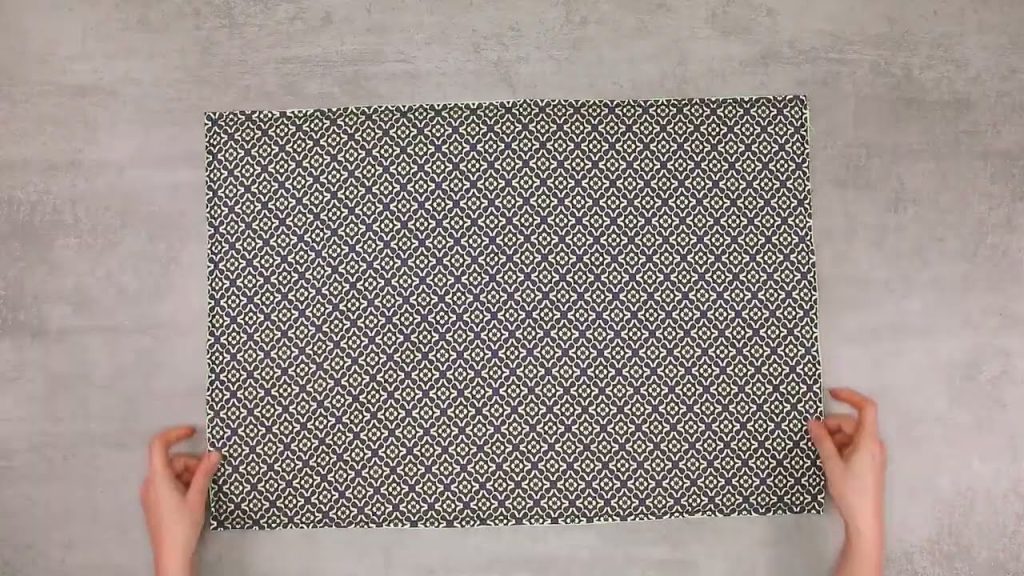
- Layer and Pin Fabric: Take your 68 cm x 48 cm main exterior fabric and lay it wrong side up. Center your 66 cm x 46 cm felt lining on top of it. Ensure there’s an even 1 cm border of the main fabric showing around all sides of the felt.
- Place your 68 cm x 48 cm patterned denim fabric (the video uses a patterned denim for the exterior layer) on top, right side up, sandwiching the felt between the two denim layers.
- Pin all three layers together securely around the edges and through the center to prevent shifting.
- Quilt the Layers (Optional, but recommended for stability): The video shows parallel diagonal lines stitched across the fabric sandwich. These lines can be drawn with a fabric marker. Stitch along these lines using a regular sewing foot and matching thread. This quilting secures the layers and adds extra durability.
Phase 2: Installing the Zipper
This method seamlessly integrates the zipper, creating a clean finish.
- Position Zipper: Lay your quilted fabric panel flat, with the exterior (patterned) side facing up. Position the 45 cm zipper face down along one of the 48 cm edges, aligning the zipper tape edge with the raw edge of the fabric. The zipper will be slightly shorter than the fabric width.
- Pin the zipper in place.
- Sew Zipper (First Side): Using your zipper foot, stitch the zipper to the fabric with a 1 cm seam allowance. Be careful not to sew over the metal stops of the zipper.
- Topstitch Zipper: Flip the fabric so the zipper is facing up. Press the seam open. Carefully topstitch along the fabric edge, 0.2 cm from the zipper teeth, through all layers (exterior fabric, zipper tape, felt). This helps the fabric lay flat and prevents it from getting caught in the zipper.
- Attach Second Side of Zipper: Bring the opposite 48 cm raw edge of your fabric panel up and align it with the remaining side of the zipper, right sides together. Pin in place.
- Sew Zipper (Second Side): Using your zipper foot, stitch this second side of the zipper with a 1 cm seam allowance.
- Topstitch Zipper (Second Side): Flip the fabric open again. Press and topstitch this second seam, 0.2 cm from the zipper teeth. You now have a tube of fabric with a zipper running down the middle.
Phase 3: Attaching the Webbing Tape and Tabs
This phase adds the strong handles and zipper-end tabs.
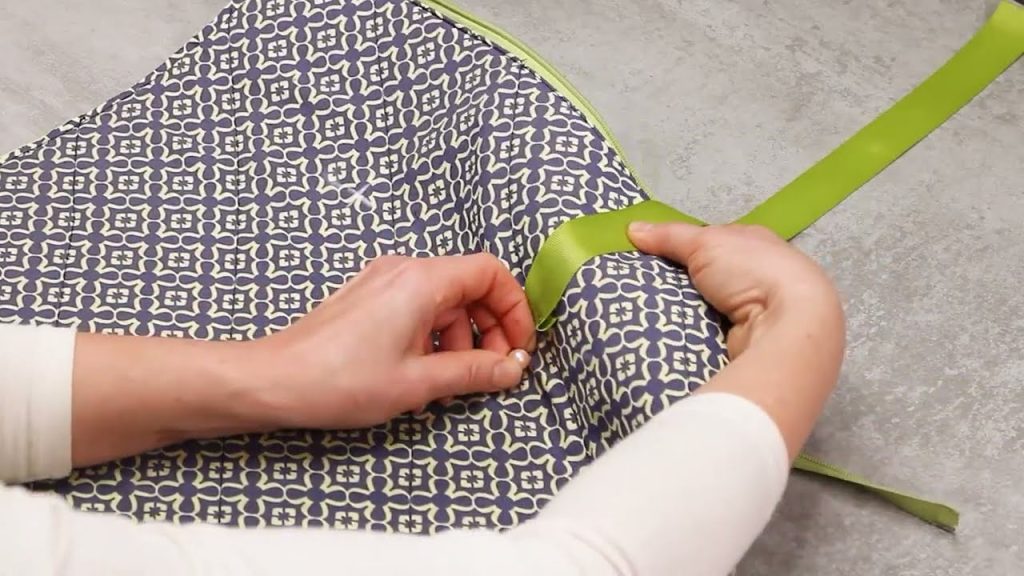
- Prepare Webbing Tape: Briefly melt the cut ends of your 45 cm webbing tape with a lighter to prevent fraying. (Be very careful with this step!)
- Mark Handle Placement: Lay the zippered tube flat with the zipper centered. Measure 10 cm down from the zipper on both sides. Place the webbing tape horizontally across the bag at this mark.
- Position Handles: Measure 15 cm in from each vertical side edge on both sides of the zipper to mark where the outer edges of your handles will attach. Pin the webbing tape in a loop to form the handles, tucking the raw ends under the webbing. Ensure the loops are even and not twisted. Repeat for the second handle.
- Attach Webbing Tabs: Take your 10 cm small webbing tabs. Fold each in half to create a loop. At each end of the main zipper, tuck one loop of webbing tape in, aligning the raw edges with the raw edges of the zipper ends. Pin in place.
- Baste Tabs and Handles: Stitch all the webbing tape (handles and tabs) in place with a 0.5 cm seam allowance. This temporarily secures them.
Phase 4: Shaping and Assembling the Bag
This is where your bag takes its final boxy shape.
- Open Zipper: Crucially, open your main zipper about halfway. This allows you to turn the bag right side out later.
- Mark Corner Cut-outs: On the plain (un-handled) side of your zippered tube, fold it in half so the zipper is at the top. Measure 8.5 cm from the fold (bottom) and 8.5 cm from the side edge. Draw an 8.5 cm x 8.5 cm square on each of the two bottom corners.
- Cut Corners: Cut out these two squares from the bottom corners of the fabric.
- Sew Side Seams: Fold the fabric so the right sides are together and the zipper is in the middle. Pin and stitch along the two side seams (where you just cut out the squares).
- Sew Bottom Corners: To create the boxy bottom, flatten each cut-out corner so the side seam meets the bottom fold. Pin across this new opening and stitch with a 1 cm seam allowance. Repeat for the other bottom corner. This creates the structured base of your bag.
- Trim Excess Zipper (Optional): If the zipper extends beyond the sewn side seams, you can trim the excess tape.
Phase 5: Finishing and Revealing Your Bag!
The most satisfying part – seeing your creation come to life.
- Turn Right Side Out: Reach into the partially open zipper and carefully push the entire bag through until it’s right side out.
- Shape and Press: Use your fingers or a blunt tool to push out all corners and seams to create a crisp, defined box shape. Give the entire bag a good press with your iron, especially along the zipper.
- Final Topstitching: For extra durability and a truly polished look, topstitch around the top edge of the bag, approximately 0.5 cm from the zipper. This secures all layers and reinforces the zipper.
Your incredibly sturdy, stylish, and functional Structured Zipper Bag is now complete! Take a moment to admire its impeccable shape and the professional finish you’ve achieved. This bag is ready to tackle any task, from carrying your lunch to organizing your crafting supplies, all while making a fashionable statement.
Enjoy the satisfaction of your handmade masterpiece!
Video tutorial: