by
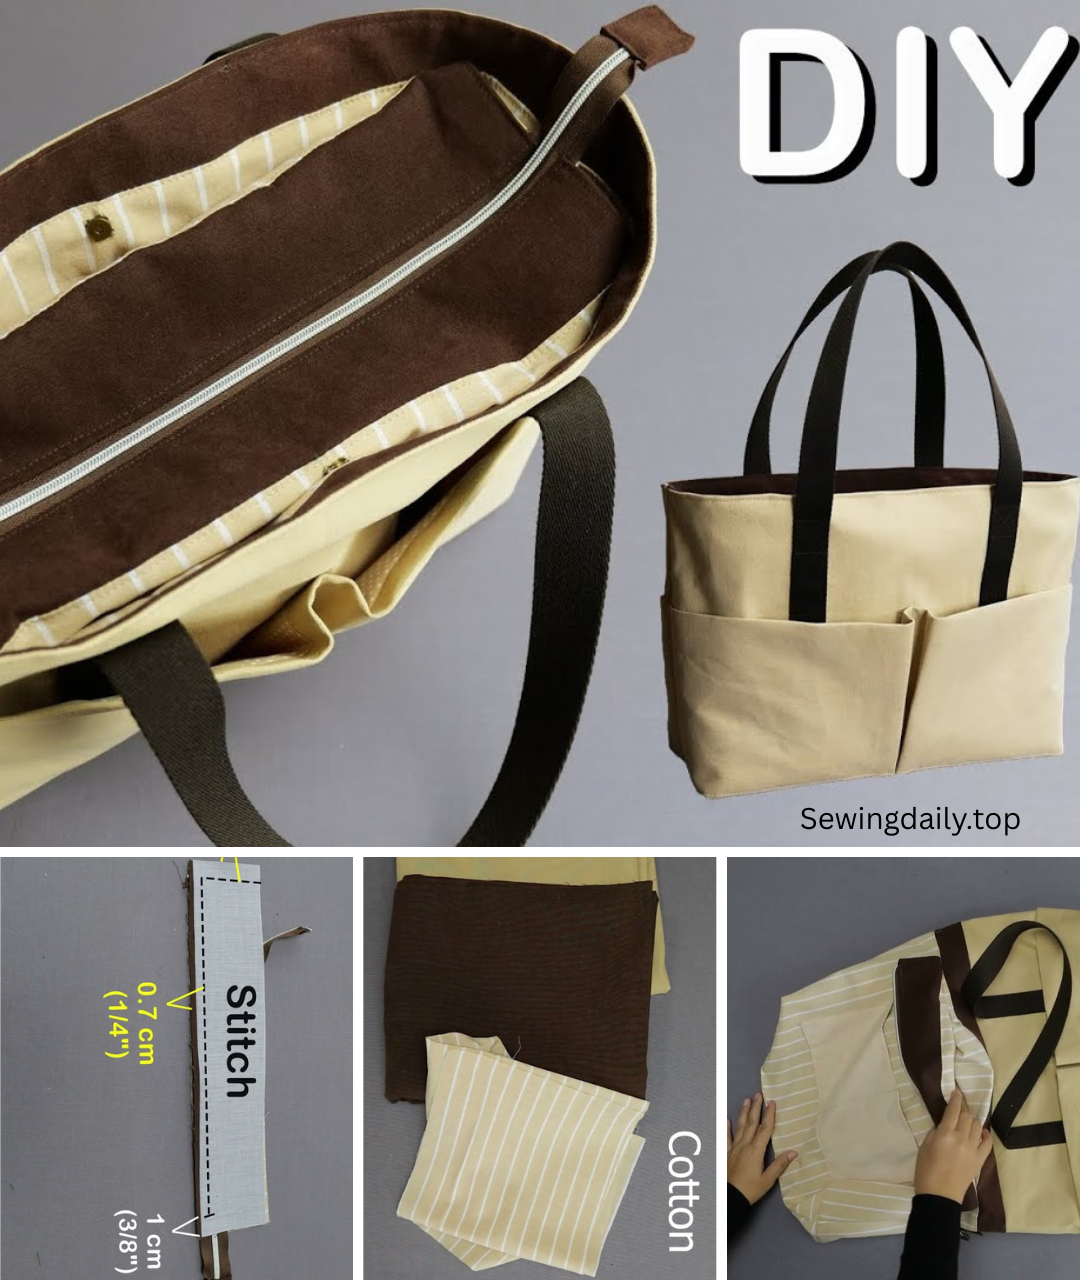
by Stitching Success: Your DIY Large Zipper Tote Bag with Multi-Pockets
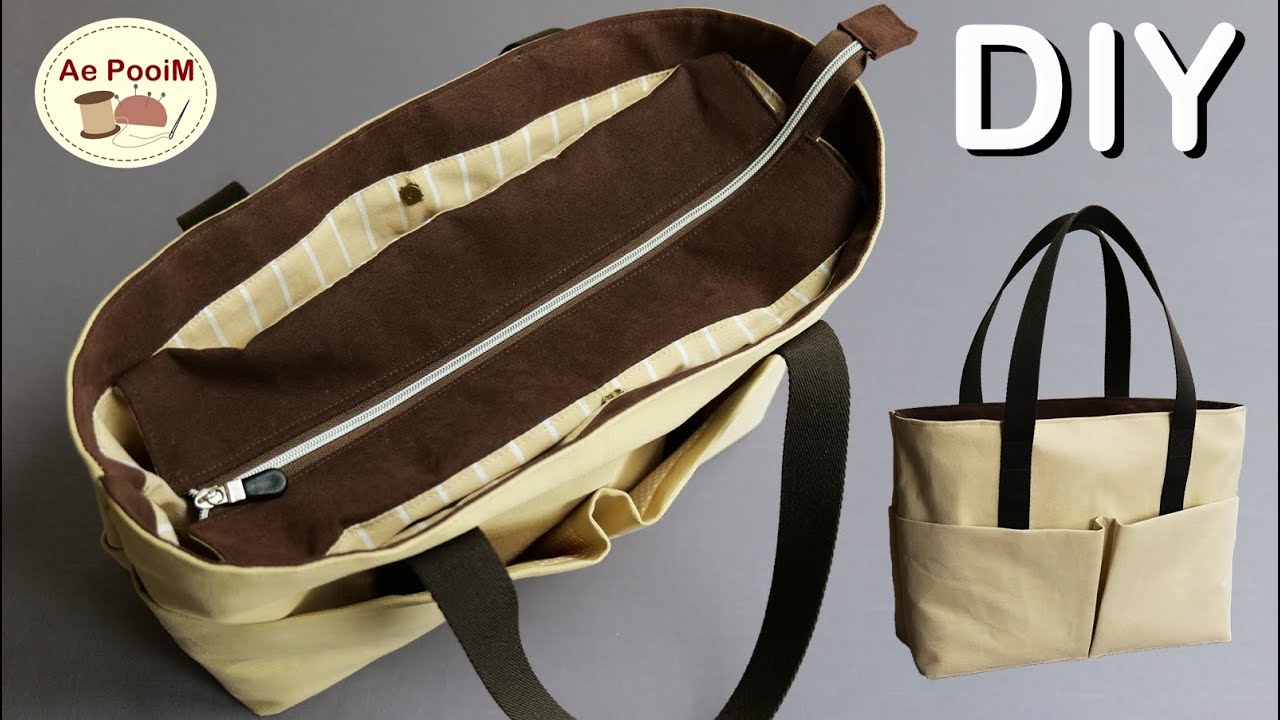
Tote bags are the workhorses of the bag world, and a large, zippered version with multiple pockets takes functionality to the next level. Imagine a place for everything – your laptop, water bottle, keys, and phone, all neatly organized within a stylish bag you made yourself. This detailed guide will walk you through creating a durable, versatile tote that’s perfect for all your daily hauling needs.
What You’ll Need:
Before diving into the sewing, gather all your materials. Having everything ready will make the process much smoother and more enjoyable.
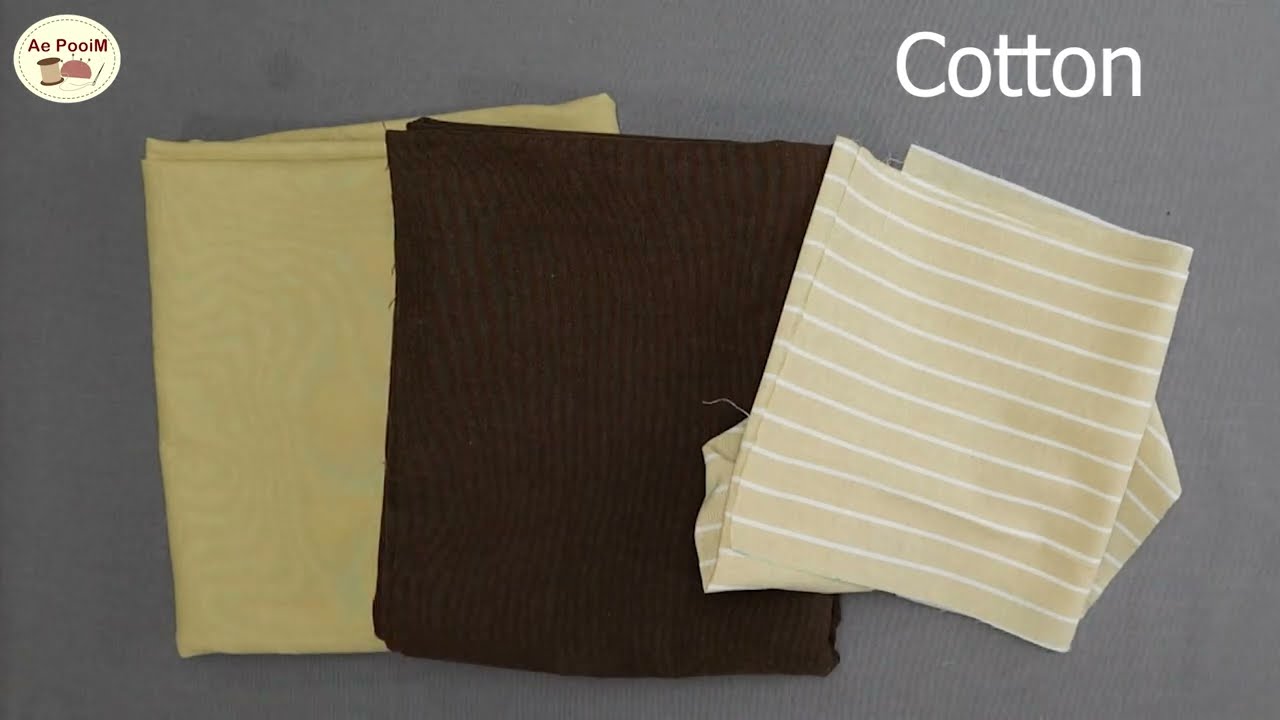
- Fabric:
- Main Exterior Fabric: 1 yard (0.9 meters) of heavy-duty fabric like canvas, duck cloth, denim, or upholstery fabric. Choose something durable and visually appealing.
- Lining Fabric: 1 yard (0.9 meters) of medium-weight woven fabric. Cotton broadcloth, quilting cotton, or even a contrasting canvas work well for a neat interior.
- Accent Fabric (Optional, for strap connectors or decorative pockets): 1/4 yard (0.23 meters) of a complementary fabric.
- Interfacing (Recommended for structure):
- Heavyweight Fusible Interfacing (e.g., Pellon SF101, Pellon 809 Decor-Bond, or Decovil Light): 1 yard (0.9 meters). This adds significant structure and durability to your bag.
- Hardware:
- D-rings (2): 1.5-inch (3.8 cm) internal diameter.
- Adjustable Strap Hardware (Optional, for a shoulder strap): Two 1.5-inch (3.8 cm) swivel clasps and one 1.5-inch (3.8 cm) slider buckle.
- Zippers:
- Main Zipper (for top closure): One 18-inch (45 cm) nylon coil or metal zipper. Adjust length to match your bag’s width.
- Interior Zipper Pocket (Optional): One 7-inch (18 cm) nylon coil zipper.
- Thread: All-purpose polyester thread that matches or complements your fabrics.
- Tools:
- Sewing machine with a zipper foot
- Fabric scissors or rotary cutter and mat
- Measuring tape or ruler
- Fabric markers or tailor’s chalk
- Pins or fabric clips
- Iron and ironing board
- Safety pin or loop turner (for turning fabric tubes)
- Optional: Rivet setting tool and rivets for strap attachments (for a professional finish).
Understanding the Bag Construction & Cutting Dimensions:
This large tote bag will be comprised of exterior panels, a gusset (sides and bottom), a top zipper panel, and several pocket pieces. The dimensions below are for a finished bag approximately 16 inches wide x 13 inches tall x 5 inches deep (40.5 cm x 33 cm x 12.7 cm).
- Main Bag Panels (Cut 2 each):
- Exterior Fabric: 17″ W x 14″ H (43 cm x 35.5 cm)
- Lining Fabric: 17″ W x 14″ H (43 cm x 35.5 cm)
- Heavyweight Interfacing: 16″ W x 13″ H (40.5 cm x 33 cm) (Centrally placed)
- Side/Bottom Gusset (Cut 1 each):
- Exterior Fabric: 6″ W x 40″ L (15 cm x 101.5 cm)
- Lining Fabric: 6″ W x 40″ L (15 cm x 101.5 cm)
- Heavyweight Interfacing: 5″ W x 39″ L (12.7 cm x 99 cm) (Centrally placed)
- Top Zipper Panel (Cut 2 each):
- Exterior Fabric: 17″ W x 2.5″ H (43 cm x 6.3 cm)
- Lining Fabric: 17″ W x 2.5″ H (43 cm x 6.3 cm)
- Heavyweight Interfacing: 16″ W x 1.5″ H (40.5 cm x 3.8 cm) (Centrally placed)
- Strap Connectors (Cut 2):
- Exterior Fabric: 6″ W x 4″ H (15 cm x 10 cm)
- Heavyweight Interfacing: 5″ W x 3″ H (12.7 cm x 7.6 cm)
- Shoulder Straps (Cut 2):
- Exterior Fabric: 4″ W x 28″ L (10 cm x 71 cm) (Adjust length as desired)
- Heavyweight Interfacing: 3″ W x 27″ L (7.6 cm x 68.5 cm)
- Interior Slip Pockets (Cut 2 or 3):
- Lining Fabric: 17″ W x 12″ H (43 cm x 30.5 cm) for a full-width pocket that can be divided.
- Interior Zipper Pocket (Optional, Cut 1):
- Lining Fabric: 9″ W x 8″ H (23 cm x 20.3 cm)
Note: All seam allowances are 1/2 inch (1.25 cm) unless otherwise stated.
Step-by-Step Sewing Instructions:
1. Cut Fabrics and Fuse Interfacing
- Cut all fabric pieces according to the dimensions listed above.
- Fuse interfacing: Center and fuse the appropriate heavyweight interfacing to the wrong side of all your exterior fabric pieces (Main Panels, Gusset, Top Zipper Panels, Strap Connectors, Shoulder Straps). Fuse lightweight interfacing to your lining fabric pocket pieces if desired for more body. Press well to ensure proper adhesion.
2. Prepare the Pockets
- Interior Slip Pockets:
- Take your Interior Slip Pocket pieces (lining fabric). For each pocket, fold it in half lengthwise, wrong sides together, so it measures 17″ W x 6″ H (43 cm x 15.2 cm). Press the fold.
- Topstitch along the folded edge, 1/8 inch (0.3 cm) from the fold, to create a neat finished top edge.
- Place each pocket piece on top of one of your main lining fabric panels, aligning the raw side and bottom edges. The pocket will cover the bottom 6 inches (15.2 cm) of the lining panel. Pin in place.
- Baste (stitch temporarily) the sides and bottom of the pocket to the main lining panel within the 1/2 inch (1.25 cm) seam allowance.
- Optional: If you want to divide a pocket, draw vertical lines where you want the divisions and stitch along them. For instance, to create a phone pocket and a larger general pocket, you might stitch a line 6 inches (15 cm) from one side.
- Interior Zipper Pocket (Optional):
- Take your Interior Zipper Pocket piece. On one of your main lining fabric panels (the one without the slip pockets, or the opposite side from the slip pockets if you put them on both), mark the placement for your zipper. Typically, this is centered, about 2-3 inches (5-7.6 cm) down from the top raw edge.
- Create a zipper opening by following standard zipper pocket instructions (e.g., mark a rectangle, stitch, cut, turn, press, and topstitch the zipper in place).
- Once the zipper is sewn into the lining panel, fold your zipper pocket fabric in half, right sides together, and stitch the side and bottom edges to form the pocket bag. Trim corners and finish seams if desired.
3. Prepare the Shoulder Straps
- Take each shoulder strap piece. Fold it in half lengthwise, right sides together. Stitch down the long raw edge using a 1/2 inch (1.25 cm) seam allowance.
- Turn the tube right side out using a safety pin or loop turner. Press flat, centering the seam or placing it along one edge.
- Topstitch along both long edges of the strap, 1/8 inch (0.3 cm) from the edge, for a neat and durable finish. Repeat for the second strap.
4. Prepare the Strap Connectors
- Take each strap connector piece. Fold it in half lengthwise, wrong sides together, so it measures 3″ W x 4″ H (7.6 cm x 10 cm). Press. Open it up.
- Fold the long raw edges in to meet the center crease. Press. Now fold the entire piece in half along the original center crease. Press again. You should have a sturdy strip measuring 1.5″ W x 4″ H (3.8 cm x 10 cm) with all raw edges enclosed.
- Topstitch along both long edges of the strip.
- Thread a D-ring onto each connector. Fold the connector in half around the D-ring, creating a loop with the D-ring at the top. The raw ends should be aligned. Baste the raw ends together within the 1/2 inch (1.25 cm) seam allowance.
5. Attach Strap Connectors to Main Bag Panels
- On one of your main exterior fabric panels (the front or back of the bag), measure in 2 inches (5 cm) from each top side edge. This is where your strap connectors will be attached.
- Place the raw ends of each D-ring strap connector onto these marks, aligning their raw edges with the top raw edge of the main panel. The D-ring should point downwards towards the center of the panel.
- Baste the strap connectors in place securely with a 1/4 inch (0.6 cm) seam allowance.
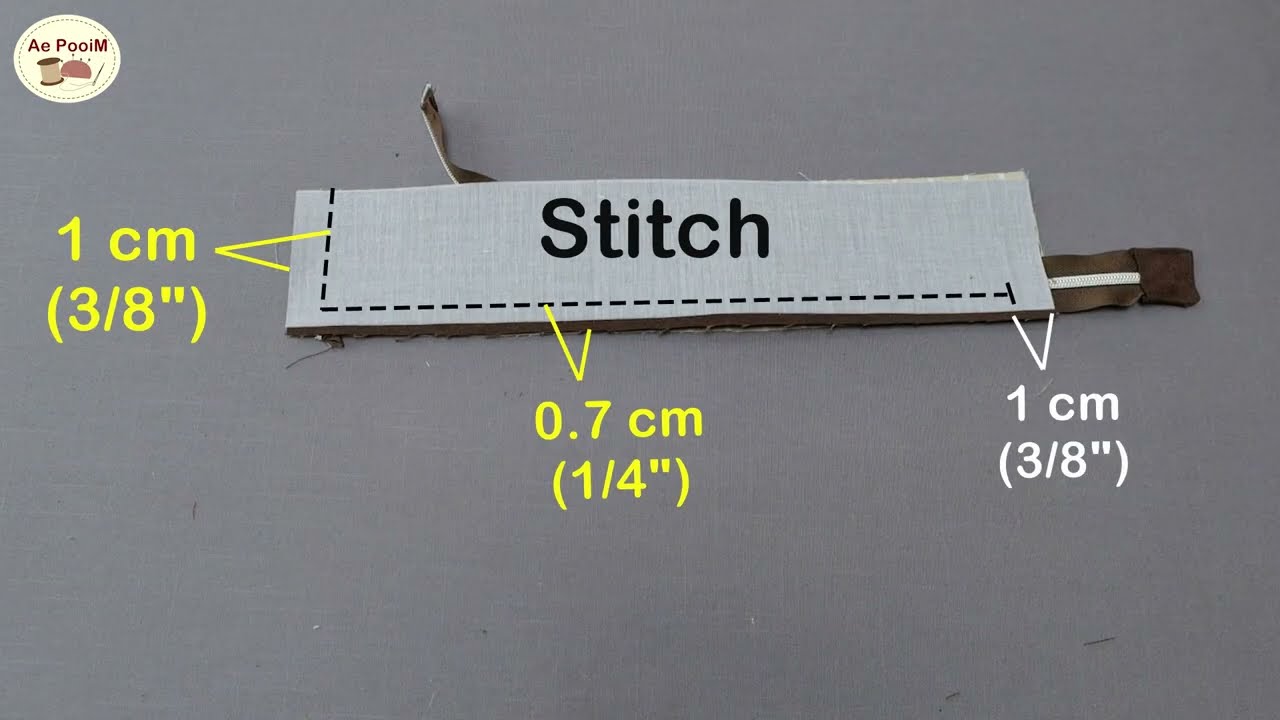
6. Assemble the Top Zipper Panel
- Take one exterior top zipper panel piece. Place your main zipper right side down along one of the long edges. Align the top edge of the zipper tape with the top edge of the fabric. Pin in place.
- Place one lining top zipper panel piece on top of the zipper and the exterior panel, right side down, aligning all raw edges. The zipper is now sandwiched between the exterior and lining pieces. Pin.
- Using your zipper foot, stitch along this edge, sewing through all three layers (exterior, zipper tape, lining).
- Press the fabric pieces away from the zipper teeth, so the exterior and lining are pulled flat. Topstitch along the folded edge, 1/8 inch (0.3 cm) from the zipper teeth, through all layers.
- Repeat steps 1-4 for the other side of the zipper, attaching the remaining exterior and lining top zipper panel pieces. You should now have a continuous zipper panel with exterior fabric on one side and lining fabric on the other.
7. Assemble the Bag Body (Exterior and Lining)
- Take your exterior gusset piece. Mark the center of each short end. Mark the center of the long edges (which will be the bottom of the bag).
- Take one of your main exterior bag panels (the one with the strap connectors), and mark the center of its bottom edge.
- Align the center mark of the gusset’s long edge with the center mark of the bag panel’s bottom edge, right sides together. Pin, starting from the center and working your way around the bottom curved corners and up the sides. Match the raw edges precisely.
- Tip: Clip the gusset’s seam allowance along the curves to help it lay flat.
- Stitch the gusset to the panel with a 1/2 inch (1.25 cm) seam allowance. Go slowly around the curves. Backstitch at the start and end.
- Repeat this process for the other main exterior bag panel, attaching the remaining long edge of the gusset to this panel, right sides together.
- Turn the exterior bag right side out and gently push out the seams and corners. Press well.
- Repeat steps 1-6 for your lining fabric pieces, forming the lining bag body with its pockets.
- Important: When sewing the second lining panel to the lining gusset, leave a 5-6 inch (12.7-15 cm) opening along the bottom of the lining gusset. This opening will be used to turn the bag right side out later. Backstitch securely at the beginning and end of this opening.
8. Attach the Zipper Panel to the Bag Bodies
- With your exterior bag right side out, find the center of its top opening on both the front and back. Mark these.
- Find the center of the exterior side of your zipper panel.
- Align the center of the exterior side of the zipper panel with the center front of the exterior bag’s top opening, right sides together. Pin the entire exterior perimeter of the zipper panel to the top opening of the exterior bag.
- Stitch the zipper panel to the exterior bag with a 1/2 inch (1.25 cm) seam allowance.
- Repeat for the lining bag: With your lining bag wrong side out, align the center of the lining side of the zipper panel with the center front of the lining bag’s top opening. Pin the entire lining perimeter of the zipper panel to the top opening of the lining bag.
- Stitch the zipper panel to the lining bag with a 1/2 inch (1.25 cm) seam allowance.
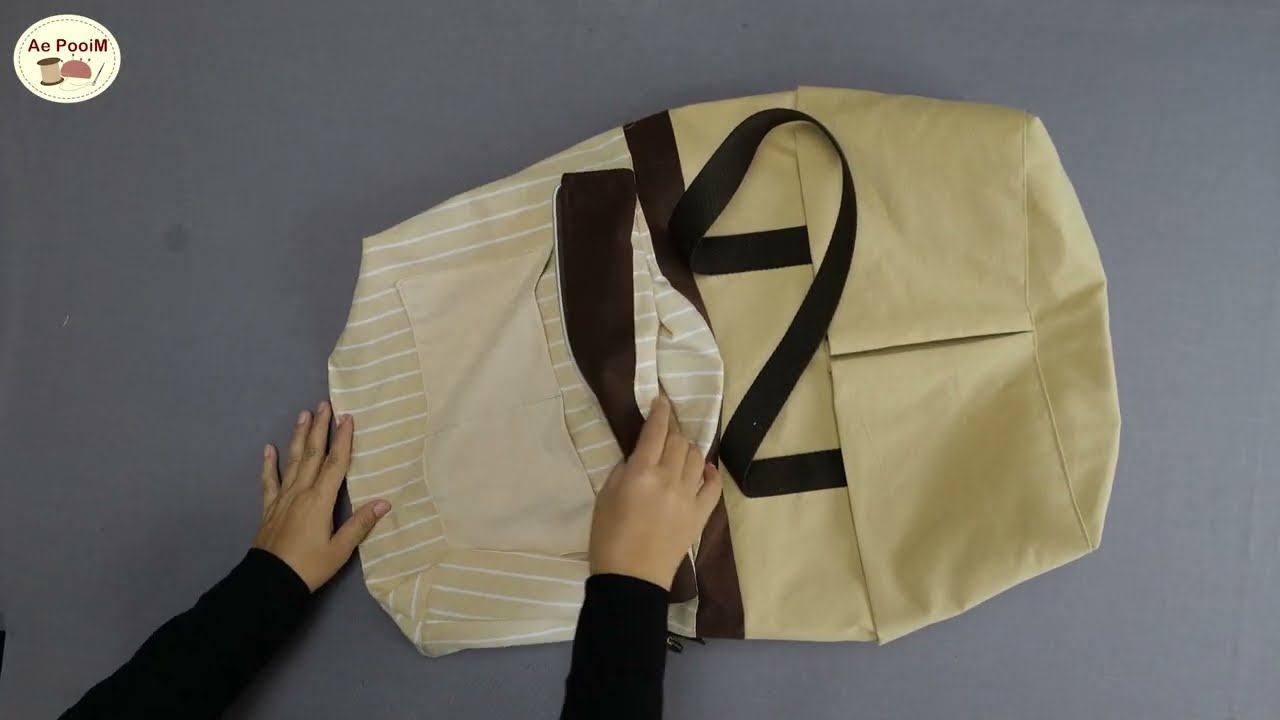
9. Final Assembly: Bagging It Out!
- This step can be tricky, but take your time. With your exterior bag right side out and your lining bag wrong side out, carefully place the exterior bag inside the lining bag.
- Align the top seams where the zipper panel attaches to both the exterior and lining. Match the side seams and the corners. Pin generously around the entire top opening of the bag.
- Stitch around the entire top perimeter with a 1/2 inch (1.25 cm) seam allowance. Backstitch at the beginning and end.
- Reach into the opening you left in the bottom of the lining gusset. Carefully pull the entire bag through this opening until it’s right side out.
- Gently push out all corners and curves to create a neat shape.
- Press the entire bag, especially the top seam.
- Close the opening in the lining: Press the raw edges of the opening inwards by 1/2 inch (1.25 cm). Stitch the opening closed either by machine (topstitch very close to the edge) or by hand using an invisible ladder stitch.
- Push the lining down into the bag. Press the top edge of the bag again.
- Topstitch: For a professional finish and added durability, topstitch around the entire top opening of the bag, about 1/8 to 1/4 inch (0.3-0.6 cm) from the edge.
10. Attach Shoulder Straps
- If using simple fabric straps: Simply attach one end of each finished shoulder strap securely to the D-rings on the bag. You can sew a rectangle with an “X” through it for extra strength.
- If using adjustable straps with hardware:
- Thread one end of a strap through one swivel clasp. Fold the end over by about 1.5 inches (3.8 cm) and stitch it down securely to create a loop around the clasp.
- Thread the other end of the strap through the slider buckle, going over the middle bar. Pull through about 2 inches (5 cm).
- Thread the remaining swivel clasp onto this end of the strap.
- Now, loop this strap end back through the slider buckle, going under the middle bar. This creates your adjustable loop.
- Fold the raw end over by about 1.5 inches (3.8 cm) and stitch it down securely to create a loop around the slider buckle.
- Attach the swivel clasps to the D-rings on your bag.
Customization & Finishing Touches:
- Exterior Pockets: Before assembling your exterior bag, you can add a large patch pocket or a zippered welt pocket to the front or back main panels.
- Key Fob: Stitch a small loop of fabric with a D-ring or swivel clasp inside one of your lining pockets for easy key attachment.
- Feet: Add bag feet to the bottom of your tote for extra protection and durability.
- Handles: Instead of just a shoulder strap, you could add shorter grab handles as well.
You’ve now created an incredibly versatile and durable large zipper tote bag with multiple pockets! This bag is perfect for daily use, travel, or anything else you need to carry in style and organized fashion. Enjoy your fantastic new handmade accessory!
Video tutorial: