by
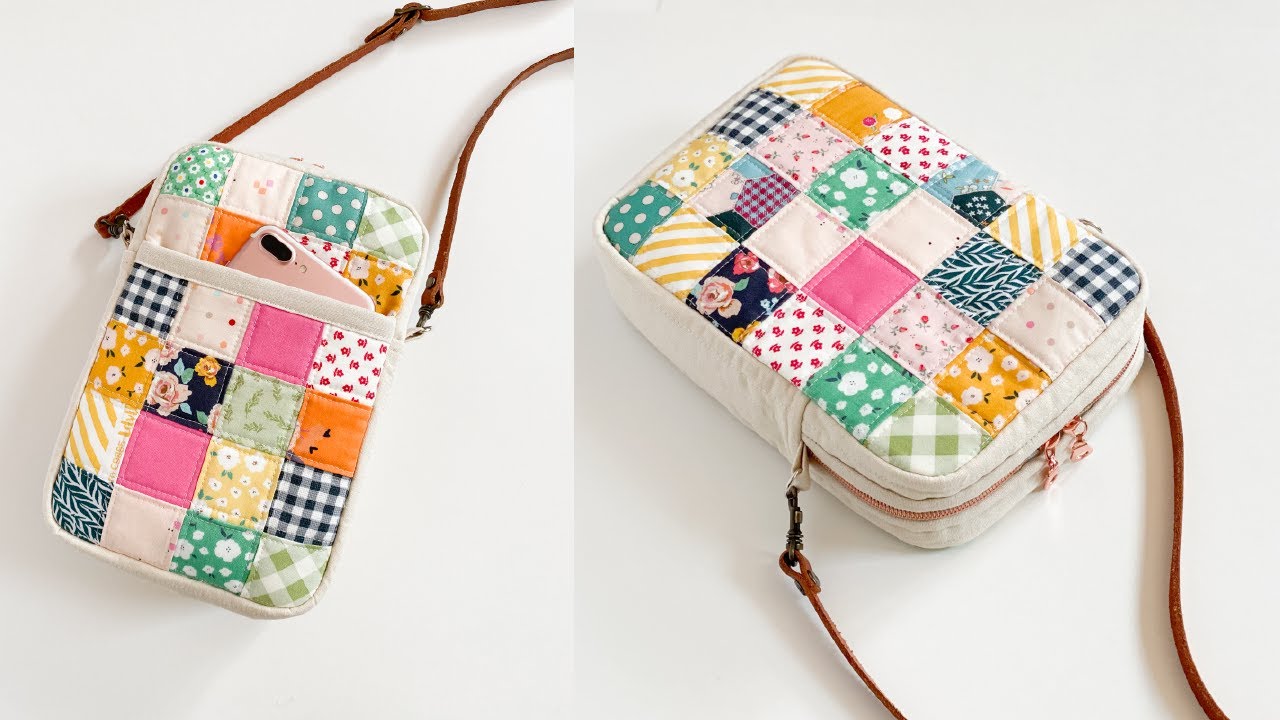
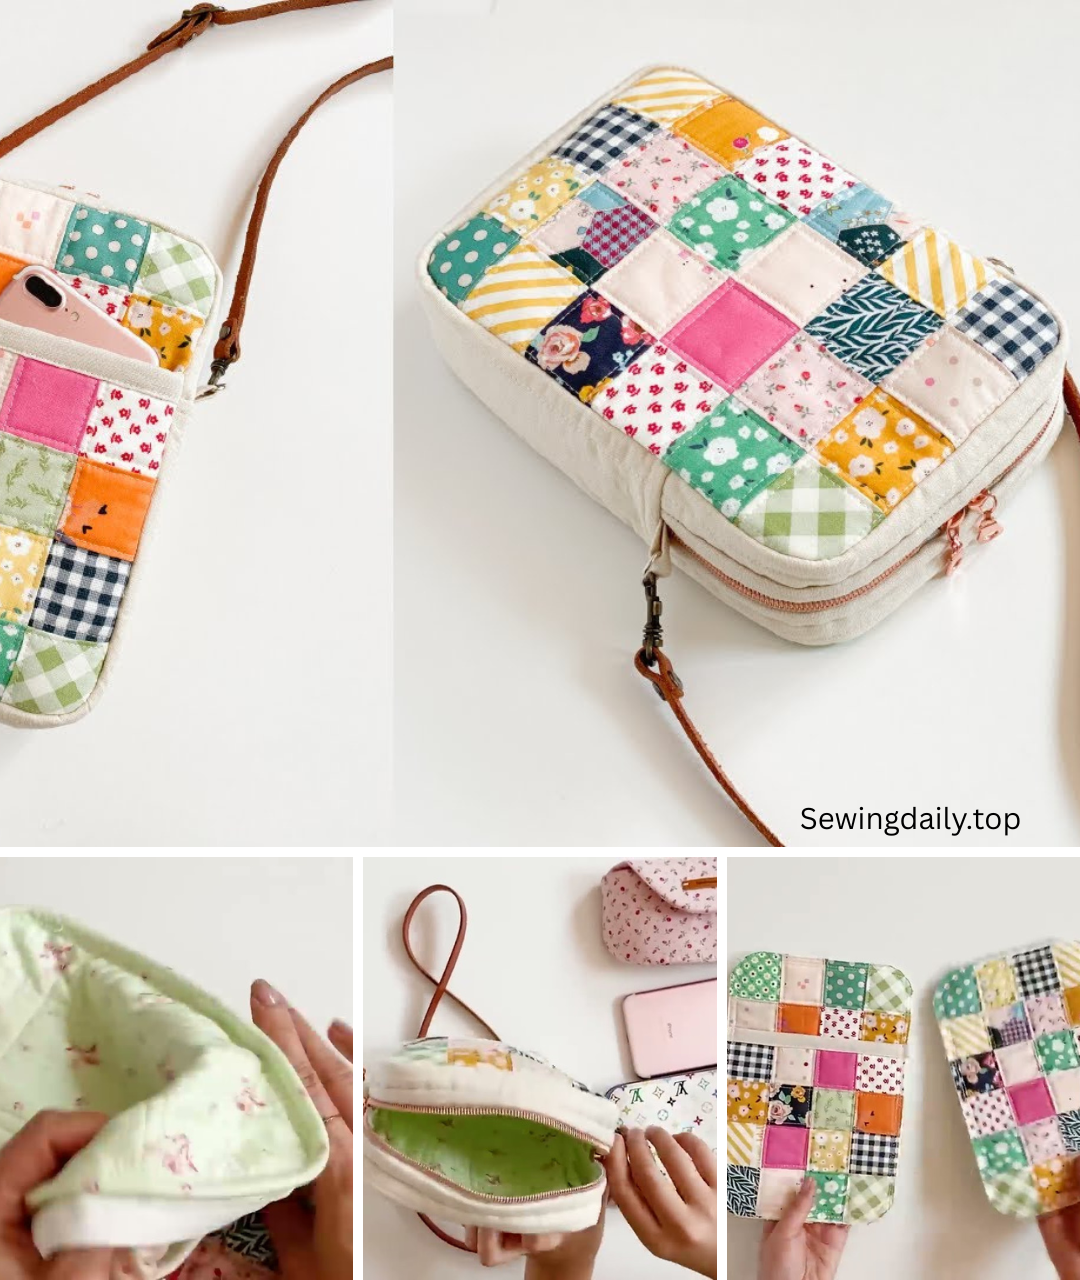
by Imagine carrying a little piece of sunshine with you wherever you go – that’s the magic of a Sun Patch Crossbody Bag. This project blends the cozy charm of patchwork and quilting with the practicality of a secure, zippered crossbody design. It’s a fantastic opportunity to use up fabric scraps, experiment with color, and create a truly unique accessory that’s as functional as it is beautiful.
What You’ll Need:
Before you begin, gather all your materials. Organization is key to a smooth and enjoyable sewing experience!
- Fabric Scraps for Patchwork:
- A variety of cotton fabric scraps in yellows, oranges, reds, and complementary colors for your “sun rays.”
- A small piece (approx. 6″x6″ / 15cm x 15cm) of background fabric (e.g., blue, cream, grey) for the “sky” around the sun.
- A small piece (approx. 3″x3″ / 7.5cm x 7.5cm) of dark fabric (e.g., black, dark brown) for the sun’s center.
- Main Exterior Fabric: 1/2 yard (0.45 meters) of a sturdy cotton (e.g., quilting cotton, canvas light) that complements your patchwork, for the back of the bag and top zipper panels.
- Lining Fabric: 1/2 yard (0.45 meters) of lightweight cotton (e.g., quilting cotton, broadcloth) for the bag’s interior.
- Batting: 1/2 yard (0.45 meters) of low-loft cotton or polyester batting for quilting.
- Zipper: One 10-12 inch (25-30 cm) nylon coil zipper for the main bag opening.
- Hardware:
- D-rings (2): 1-inch (2.5 cm) internal diameter.
- Swivel clasps (2): To match your D-rings, 1-inch (2.5 cm) internal diameter.
- Strap adjuster slide (1): To match your D-rings, 1-inch (2.5 cm) internal diameter.
- Thread:
- Matching all-purpose polyester thread for construction.
- Contrasting thread for quilting (optional, but can enhance the design).
- Tools:
- Sewing machine with a zipper foot and walking foot (highly recommended for quilting).
- Rotary cutter, quilting ruler, and mat (essential for precise patchwork).
- Fabric scissors.
- Fabric markers or tailor’s chalk.
- Pins or fabric clips.
- Iron and ironing board.
- Safety pin or loop turner (for strap).
- Basic quilting supplies: Basting spray or safety pins for layering.
Designing Your Sun Patch (Front Panel):
This is where the artistry comes in! While you can follow a specific sun block pattern, for a truly “scrappy” feel, we’ll suggest a free-form approach. The goal is to create a square block that will be the front of your bag.
Finished Sun Patch Block Size: Approximately 9.5 inches x 9.5 inches (24 cm x 24 cm).
- Center Circle:
- Cut a circle from your dark fabric, about 2.5-3 inches (6.3-7.5 cm) in diameter.
- Appliqué this circle onto the center of your background fabric. You can use a raw-edge appliqué with a zigzag stitch, or turn under the edges for a more finished look.
- Sun Rays:
- Cut various strips of your “ray” fabrics (yellows, oranges, etc.) in different widths (e.g., 1 inch to 2 inches / 2.5-5 cm). They don’t have to be perfect.
- Starting from the center circle, stitch these strips radiating outwards. You can use a technique called “crazy quilting” or “foundation paper piecing” (if you want precise angles). For a simple approach, just sew strips around the circle, trimming as you go, until you form a larger square.
- Alternatively, you can cut small triangles or wedge shapes and piece them around the circle to create the ray effect.
- Continue adding strips or shapes until your patchwork square is at least 10 inches x 10 inches (25.5 cm x 25.5 cm) – slightly larger than your target size to allow for trimming.
- Trim and Press:
- Once your patchwork sun block is complete, press it thoroughly.
- Using your rotary cutter and ruler, trim the block to 10 inches x 10 inches (25.5 cm x 25.5 cm). This will be your Exterior Front Panel.
Cutting All Fabric Pieces:
- Exterior Front Panel: 10″ x 10″ (25.5 cm x 25.5 cm) – your completed sun patch block.
- Exterior Back Panel: 10″ x 10″ (25.5 cm x 25.5 cm) – from your main exterior fabric.
- Lining Panels (Cut 2): 10″ x 10″ (25.5 cm x 25.5 cm) – from your lining fabric.
- Gusset (Sides & Bottom, Cut 1 each):
- Exterior Fabric: 3.5″ W x 28″ L (9 cm x 71 cm)
- Lining Fabric: 3.5″ W x 28″ L (9 cm x 71 cm)
- Zipper Tab Strips (Cut 2): 2″ W x 2″ L (5 cm x 5 cm) – from your main exterior fabric.
- Zipper Panel Strips (Cut 2 each):
- Exterior Fabric: 10″ W x 2″ H (25.5 cm x 5 cm)
- Lining Fabric: 10″ W x 2″ H (25.5 cm x 5 cm)
- Strap Connector Tabs (Cut 2): 4″ W x 2″ H (10 cm x 5 cm) – from your main exterior fabric.
- Adjustable Strap Piece: 4″ W x 50″ L (10 cm x 127 cm) – from your main exterior fabric.
- Batting: Cut pieces to match all exterior fabric pieces (Front Panel, Back Panel, Gusset, Zipper Panel Strips, Strap Connector Tabs, Adjustable Strap Piece).
Note: All seam allowances are 1/4 inch (0.6 cm) unless otherwise stated.
Step-by-Step Sewing Instructions:
1. Quilt the Exterior Pieces
- Layering: For each exterior fabric piece (Front Panel, Back Panel, Gusset, Zipper Panel Strips, Strap Connector Tabs, Adjustable Strap Piece), create a quilt sandwich:
- Place a piece of batting down first.
- Place the corresponding fabric piece on top, right side up.
- Baste the layers together using basting spray, safety pins, or long hand stitches.
- Quilting:
- Using your walking foot, quilt these pieces. For the sun patch, you might outline the sun, then do straight lines or echoing stitches for the rays. For the other pieces, simple parallel lines or a crosshatch pattern will add texture and stability.
- Trim any excess batting after quilting, ensuring all pieces are back to their original cut dimensions.
2. Prepare the Strap Connector Tabs
- Take each quilted strap connector tab piece. Fold it in half lengthwise, wrong sides together, so it measures 2″ W x 2″ H (5 cm x 5 cm). Press.
- Open it up. Fold the long raw edges in to meet the center crease. Press. Now fold the entire piece in half along the original center crease. Press again. You should have a sturdy strip measuring 1″ W x 2″ H (2.5 cm x 5 cm) with all raw edges enclosed.
- Topstitch along both long edges, 1/8 inch (0.3 cm) from the edge.
- Thread one D-ring onto each tab. Fold the connector in half around the D-ring, creating a loop with the D-ring at the top. The raw ends should be aligned. Baste the raw ends together with a 1/8 inch (0.3 cm) seam allowance.
3. Attach Strap Connectors to Back Panel
- On your quilted Exterior Back Panel, measure in 1.5 inches (3.8 cm) from each top side edge.
- Place the raw ends of each D-ring strap connector onto these marks, aligning their raw edges with the top raw edge of the back panel. The D-ring should point downwards towards the center of the panel.
- Baste the strap connectors in place securely with a 1/8 inch (0.3 cm) seam allowance.
4. Attach Zipper Tabs to Main Zipper
- Take your main zipper. Cut the zipper tabs (2″ x 2″ / 5cm x 5cm).
- Place one zipper tab piece on one end of the zipper, right sides together, aligning the raw edges. Stitch across with a 1/4 inch (0.6 cm) seam allowance. Press the tab away from the zipper. Repeat for the other end of the zipper. This creates neat ends for your zipper.
- Trim the zipper so the total length (including tabs) is 10 inches (25.5 cm).
5. Assemble the Zipper Panel
- Take one quilted Exterior Zipper Panel Strip (10″ W x 2″ H). Place your prepared main zipper right side down along one of the long edges. Align the top edge of the zipper tape with the top edge of the fabric. Pin in place.
- Place one Lining Zipper Panel Strip (10″ W x 2″ H) on top of the zipper and the quilted exterior strip, right side down, aligning all raw edges. The zipper is now sandwiched between the exterior and lining pieces. Pin.
- Using your zipper foot, stitch along this edge (1/4 inch / 0.6 cm seam allowance), sewing through all three layers (exterior, zipper tape, lining).
- Press the fabric pieces away from the zipper teeth, so the exterior and lining are pulled flat. Topstitch along the folded edge, 1/8 inch (0.3 cm) from the zipper teeth, through all layers.
- Repeat steps 1-4 for the other side of the zipper, attaching the remaining quilted exterior and lining zipper panel strips. You should now have a continuous zipper panel with quilted exterior fabric on one side and lining fabric on the other.
6. Assemble the Bag Bodies (Exterior and Lining)
- Exterior Bag:
- Mark the center of the top and bottom edges of your quilted Exterior Front Panel (sun patch) and quilted Exterior Back Panel.
- Mark the center of each short end and the center of the long edges of your quilted Exterior Gusset piece.
- Align the center mark of the gusset’s long edge with the center mark of the Exterior Front Panel’s bottom edge, right sides together. Pin, starting from the center and working your way around the bottom corners and up the sides. Match the raw edges precisely. Stitch with a 1/4 inch (0.6 cm) seam allowance.
- Repeat this process for the Exterior Back Panel, attaching the remaining long edge of the gusset. Turn the exterior bag right side out and gently push out the seams.
- Lining Bag:
- Repeat the process from Step 6.1 with your Lining Fabric Gusset and Lining Panels.
- Important: When sewing the second lining panel to the lining gusset, leave a 4-5 inch (10-12.7 cm) opening along the bottom of the lining gusset. This opening will be used to turn the bag right side out later. Backstitch securely at the beginning and end of this opening.
7. Combine Bags with Zipper Panel
- With your exterior bag right side out, find the center of its top opening on both the front and back. Mark these.
- Find the center of the quilted exterior side of your zipper panel.
- Align the center of the quilted exterior side of the zipper panel with the center front of the exterior bag’s top opening, right sides together. Pin the entire exterior perimeter of the zipper panel to the top opening of the exterior bag. Stitch with a 1/4 inch (0.6 cm) seam allowance.
- Repeat for the lining bag: With your lining bag wrong side out, align the center of the lining side of the zipper panel with the center front of the lining bag’s top opening. Pin the entire lining perimeter of the zipper panel to the top opening of the lining bag. Stitch with a 1/4 inch (0.6 cm) seam allowance.
8. Finishing the Bag
- Reach into the opening you left in the bottom of the lining. Carefully pull the entire bag through this opening until it’s right side out.
- Gently push out all corners and curves.
- Press the entire bag, especially the top seam.
- Close the opening in the lining: Press the raw edges of the opening inwards by 1/4 inch (0.6 cm). Stitch the opening closed either by machine (topstitch very close to the edge) or by hand using an invisible ladder stitch.
- Push the lining down into the bag. Press the top edge of the bag again.
- Topstitch: For a professional finish, topstitch around the entire top opening of the bag, about 1/8 inch (0.3 cm) from the edge.
9. Make and Attach the Adjustable Strap
- Take your quilted adjustable strap piece. Fold it in half lengthwise, wrong sides together, and press. Open it up.
- Fold the long raw edges in to meet the center crease. Press. Now fold the entire piece in half along the original center crease. Press again. You should have a sturdy strap measuring 1″ W x 50″ L (2.5 cm x 127 cm) with all raw edges enclosed.
- Topstitch along both long edges, 1/8 inch (0.3 cm) from the edge.
- Attach hardware:
- Thread one end of the strap through one swivel clasp. Fold the end over by about 1 inch (2.5 cm) and stitch it down securely, forming a loop around the clasp. Stitch a rectangle with an “X” through it for extra strength.
- Take the other end of the strap and thread it through the strap adjuster slide, going over the middle bar. Pull through about 2 inches (5 cm).
- Thread the remaining swivel clasp onto this end of the strap.
- Now, loop this strap end back through the strap adjuster slide, going under the middle bar. This creates your adjustable loop.
- Fold the raw end over by about 1 inch (2.5 cm) and stitch it down securely, forming a loop around the adjuster slide. Stitch a rectangle with an “X” through it.
- Attach the swivel clasps to the D-rings on your bag.
Your Sun Patch Crossbody Bag is Complete!
You’ve now created a truly unique and vibrant accessory! This patchwork quilted zipper crossbody bag is not just a practical way to carry your essentials securely, but also a beautiful statement of your creativity. Every time you wear it, it’s like carrying a little piece of sunshine with you.
Video tutorial: