by
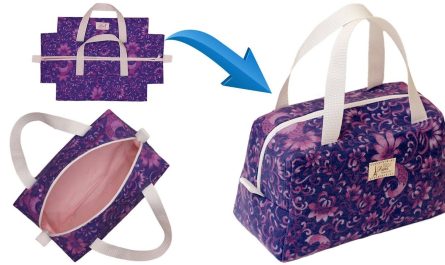
by Imagine whipping up a stylish, sturdy tote bag in just a few hours. A bag so beautiful and practical, people will be asking where you bought it! This detailed tutorial, inspired by the incredibly efficient “A simple trick how to sew a bag quickly – even a beginner can do it!” video from Miarti – Reuse, will guide you through creating a charming and functional tote bag. The beauty of this project lies in its clever construction, which minimizes visible seams and makes the entire process surprisingly straightforward, even for beginner sewists.

Get ready to transform simple fabric into a versatile accessory that will elevate your everyday style and make your carrying tasks a breeze. This tote is perfect for shopping, carrying books, beach essentials, or simply adding a touch of handmade elegance to your look.
Why This Tote Bag is Your Next Must-Sew Project
This isn’t just another bag; it’s a “one-day wonder” with irresistible qualities:
- Lightning-Fast Construction: The video’s clever technique dramatically speeds up the sewing process, making it possible to complete this bag in just a few hours.
- Clean, Professional Finish: The unique construction method minimizes visible raw edges, giving your bag a polished, high-end look.
- Beginner-Friendly: Despite its professional appearance, the steps are broken down to be simple and accessible, perfect for those new to sewing.
- Customizable Charm: Choose your favorite fabric prints and textures to truly make it your own and match your personal style.
- Eco-Conscious & Practical: Create a durable, reusable bag that’s both fashionable and a smart alternative to single-use options.
Materials You’ll Need:
Gathering your materials efficiently is the first step to a successful and enjoyable sewing experience. The video showcases a lovely patterned fabric, inspiring you to select materials that spark joy.
- Main Exterior Fabric (Linen Fabric): 2 pieces, each 45 cm x 35 cm. (The video uses a red fabric with white palm leaves pattern).
- Lining Fabric (Linen Fabric): 2 pieces, each 45 cm x 35 cm. (The video uses a plain light pink fabric).
- Fusible Interfacing (Adhesive Fabric): 2 pieces, each 45 cm x 35 cm. (This is crucial for giving your bag structure and helping it maintain its shape. Medium-weight fusible fleece or heavy-duty interfacing is ideal).
- Strap Fabric (Linen Fabric): 2 pieces, each 45 cm x 8 cm. (The video uses the same patterned fabric as the main exterior).
- Interfacing for Straps (Adhesive Fabric): 2 pieces, each 45 cm x 8 cm. (Adds strength to your straps).
- Magnetic Button (Magnit Button): 1 set.
- Matching Thread: High-quality polyester thread that blends with your fabrics.
- Basic Sewing Tools:
- Sewing machine
- Sharp fabric scissors or rotary cutter and mat
- Ruler or measuring tape
- Fabric marker or tailor’s chalk
- Plenty of pins or fabric clips
- Iron and ironing board
- Seam ripper (every sewist’s best friend!)
Step-by-Step Tutorial: Crafting Your “One-Day Wonder” Tote Bag
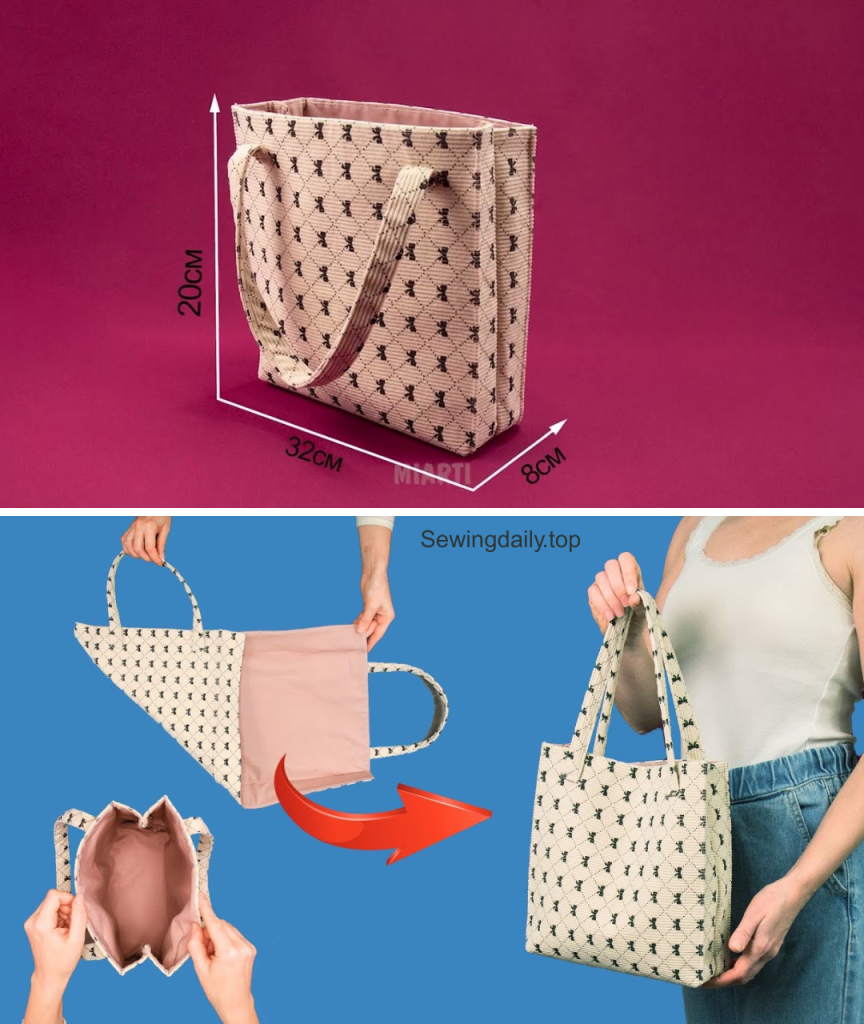
This tutorial will guide you through each stage, emphasizing the simple yet clever construction techniques from the video to ensure a beautifully finished and durable bag. The finished bag will measure approximately 34 cm wide, 28 cm tall, and 10 cm deep. All seam allowances are 1 cm unless otherwise stated.
Phase 1: Preparing Your Main Fabric Panels and Straps
Precision in this initial phase is key for a beautifully finished bag.
- Fuse Interfacing to Exterior Panels: Take one of your 45 cm x 35 cm main exterior linen pieces. Lay it wrong side up. Carefully center and press one piece of the 45 cm x 35 cm adhesive fabric (interfacing) to it, following the manufacturer’s instructions. This adds crucial structure. Repeat for the second exterior panel.
- Fuse Interfacing to Lining Panels: Take one of your 45 cm x 35 cm lining linen pieces. Lay it wrong side up. Carefully center and press one piece of the 45 cm x 35 cm adhesive fabric (interfacing) to it, following the manufacturer’s instructions. This adds crucial structure. Repeat for the second lining panel.
- Fuse Interfacing to Strap Fabric: Take one of your 45 cm x 8 cm strap linen pieces. Lay it wrong side up and press one piece of the 45 cm x 8 cm adhesive fabric (interfacing) to it. This will make your straps sturdy. Repeat for the second strap piece.
- Prepare Strap Pieces: Take one interfaced 45 cm x 8 cm strap piece. Fold it in half lengthwise, wrong sides together, and press firmly. Open it up. Fold each long raw edge inward to meet the center crease you just made, and press well. Now, fold the entire strap in half again along the original center crease, enclosing all raw edges. Press firmly. Your strap should now be approximately 45 cm x 2 cm wide.
- Topstitch Straps: Pin the strap edges in place. Using your sewing machine, topstitch along both long edges of the strap, about 0.2 cm from the edge. This secures the folds and gives a professional finish. Repeat for the second strap.
Phase 2: Assembling the Bag Body – The “Simple Trick”
This is where the magic happens, allowing for quick and clean assembly.
- Sew Exterior Panels:
- Take your two fused exterior fabric panels.
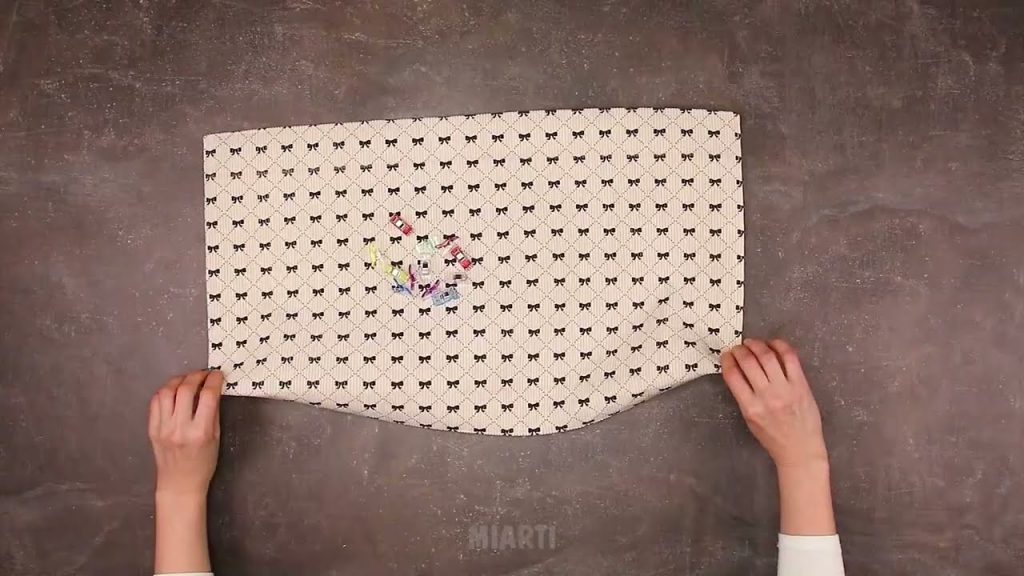
- Mark and cut out 5 cm x 5 cm squares from both bottom corners of each exterior panel.
- Lay one prepared strap on the right side of an exterior panel, aligning the raw ends of the strap with the top raw edge of the fabric. The strap should be pointing downwards into the bag. Position the outer edge of each strap 13 cm in from the side raw edge. Pin in place. Repeat for the second strap on the second exterior panel.
- Place the two exterior panels (with straps basted) right sides together. Pin along the two side edges. Stitch these two sides with a 1 cm seam allowance. Press seams open.
- To form the bottom, flatten each cut-out corner so the side seam meets the bottom fold, creating a straight line. Pin across this line and stitch with a 1 cm seam allowance. Repeat for the other corner.
- Sew Lining Panels:
- Take your two fused lining fabric panels.
- Mark and cut out 5 cm x 5 cm squares from both bottom corners of each lining panel.
- Repeat the process from “Sew Exterior Panels” for your lining pieces. Important: Leave a 10-15 cm opening along the center of the bottom seam of the lining. This is where you will turn the bag right side out later. Backstitch securely at the beginning and end of this opening.

Phase 3: Combining the Layers – The Clever Finish
This technique cleverly hides all raw edges, resulting in a very clean interior and exterior.
- Insert Exterior into Lining:
- Keep your exterior fabric tube (with basted straps) right side out.
- Keep your lining fabric tube right side out.
- Carefully slide the exterior tube inside the lining tube, so their right sides are facing each other. The straps should be tucked neatly between the two layers.
- Align and Pin Top Edges: Align the top raw edges of both fabric tubes perfectly. Match up the side seams of the exterior to the side seams of the lining. Pin securely all around the top opening.
- Stitch Top Opening: Stitch all around the entire top opening with a 1 cm seam allowance. Backstitch at the start and end.
Phase 4: Turning and Finishing Your Tote Bag
The final steps reveal your professional-looking, handmade tote!
- Turn Right Side Out: Reach into the center of the bag (which is still a tube with raw edges inside). Carefully pull the entire bag through until it’s right side out. This action will invert the lining, bringing it inside the exterior.
- Close the Lining Opening: Gently pull the lining out. Press the raw edges of the opening inwards. Stitch this opening closed with a very narrow seam allowance, either by machine (for speed) or by hand (for an invisible finish). Trim any excess thread.
- Push Lining In & Press: Push the lining completely down into the exterior bag. Smooth out the interior so no lining peeks out. Give the entire top edge of the bag a good press with your iron, ensuring the seam is crisp and even.
- Create Boxed Corners (The Final Trick!): This is the ultimate “simple trick” for making a flat bottom.
- Flatten the bag so the side seams meet the bottom fold, creating a pointed corner.
- Measure 4 cm from the point of the corner and draw a line perpendicular to the seam line. This line will be 8 cm long across the corner.
- Pin along this marked line.
- Stitch directly along this line. Backstitch securely. Repeat for the other bottom corner.
- Trim the excess fabric from these newly sewn corners to reduce bulk.
- Final Press and Topstitch:
- Push the lining completely down into the exterior bag. Smooth out the interior so no lining peeks out.
- Give the entire top edge of the bag another good press with your iron, ensuring the seam is crisp and even.
- For a professional finish and added durability, topstitch around the entire top opening of the bag, about 0.5 cm from the edge. This secures the lining to the exterior and prevents it from rolling out, while also reinforcing your strap attachments.

Your beautiful, functional, and effortlessly chic “One-Day Wonder” Tote Bag is now complete! Take a moment to admire your work. You’ve created a sturdy, stylish bag with a clean finish, all thanks to a few clever tricks. This tote is ready for anything your day throws at it, from a quick grocery run to a stylish day out.
Enjoy the versatility and the immense satisfaction of carrying your unique, handmade creation!
Video tutorial: