 by
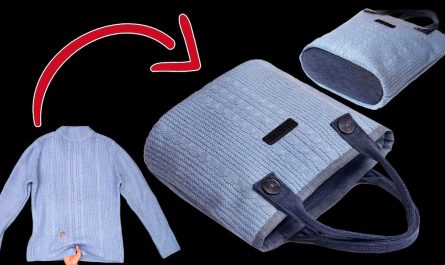
by Transforming old jeans into a stylish and functional tote bag is a fantastic way to upcycle, reduce waste, and create a unique accessory. This DIY denim bag project is designed to be straightforward and accessible, even if you’re new to sewing, because it requires no zipper! You’ll learn how to leverage the inherent durability of denim and some clever construction techniques to make a tote that’s both fashionable and practical.

The Ultimate Upcycle: DIY Denim Tote Bag (No Zipper Needed!)
Are those worn-out jeans taking up space in your closet? Give them a fashionable new life by transforming them into a chic and sturdy denim tote bag. This project is a fantastic entry point into bag making, particularly because we’re skipping the zipper, simplifying the process without compromising style or utility. The natural resilience of denim makes for a wonderfully durable bag perfect for groceries, books, beach days, or everyday essentials.
Why Craft a Zipper-Free Denim Tote?
- Eco-Friendly & Sustainable: Repurpose old clothing and divert textile waste from landfills.
- Budget-Friendly: Get a stylish new bag without buying expensive new fabric.
- Beginner-Friendly: No tricky zippers mean a faster, more accessible sewing experience.
- Durable & Practical: Denim is inherently strong, making for a long-lasting, heavy-duty tote.
- Unique & Personalized: Your bag will be one-of-a-kind, reflecting the original character of your jeans and your personal touch.
What You’ll Need:
- Old Jeans: 1-2 pairs of adult-sized jeans (the larger the better for more usable fabric). Look for jeans with good quality denim, minimal holes in the leg sections, and an interesting wash.
- Lining Fabric: 1 yard (0.9 meters) of quilting cotton, canvas, or other durable fabric. A fun print can add a surprising pop!
- Webbing for Straps (Optional): 2 yards (1.8 meters) of 1.5-inch (3.8 cm) wide cotton or polyester webbing. (You can also make straps from denim scraps.)
- Thread: Strong, all-purpose polyester thread that matches or contrasts with your denim (e.g., gold or tan for classic denim look).
- Sewing Machine: A machine capable of sewing through multiple layers of denim. A jeans needle (size 90/14 or 100/16) is highly recommended, and a walking foot can be very helpful.
- Tools:
- Sharp fabric scissors or a rotary cutter with a new blade and cutting mat.
- Measuring tape or a long clear ruler.
- Fabric marker or tailor’s chalk.
- Plenty of strong pins or fabric clips (Wonder Clips are excellent for thick denim).
- Iron and ironing board.
- Seam ripper (for deconstructing jeans).
Step-by-Step Construction Guide:
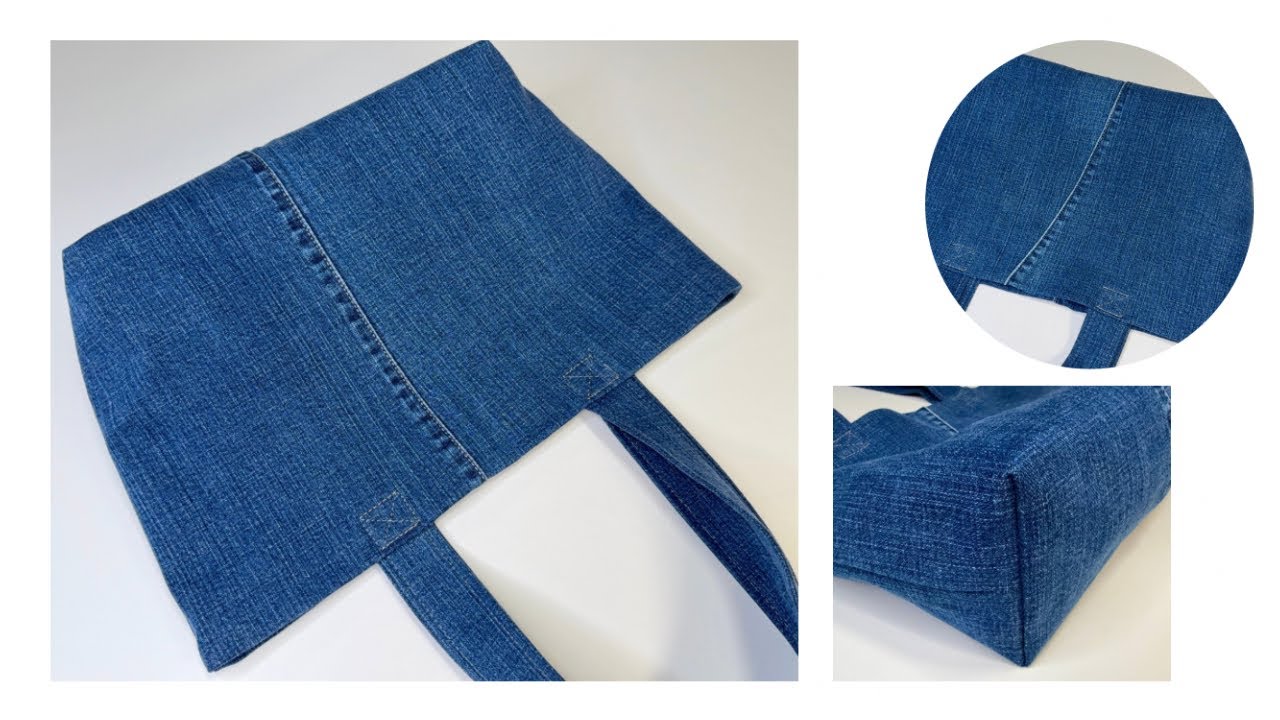
This tutorial creates a finished tote bag approximately 15 inches wide x 16 inches tall, with a 5-inch deep boxed bottom.
1. Deconstruct Your Jeans
- Cut off the Legs: Lay your jeans flat and cut off the legs just below the crotch seam, removing the top block (waistband, fly, pockets).
- Open Seams: Carefully cut open the inseam and the outer side seam of each jean leg. This will give you two large, flat rectangular pieces of denim from each leg. Remove any bulky seams.
- Salvage Pockets (Optional): If you want to use the back pockets of your jeans, carefully cut them off the top block, leaving a small seam allowance around them.
- Press Flat: Iron all your denim pieces flat to remove creases and make cutting easier.
2. Cut Your Fabric Pieces
- Main Exterior Panels (Cut 2): From your flat denim pieces, cut 16″ W x 17″ H (40.6 cm x 43.2 cm). Try to use parts of the denim that are uniform in color and texture.
- Main Lining Panels (Cut 2): From your lining fabric, cut 16″ W x 17″ H (40.6 cm x 43.2 cm).
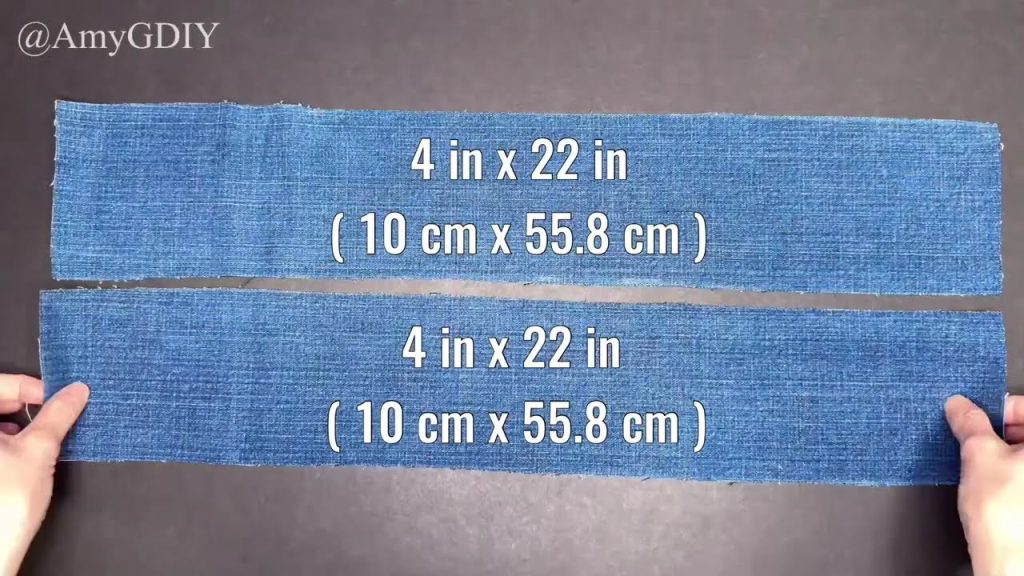
- Straps (Cut 2):
- If using webbing: Cut 28″ L (71 cm) from your 1.5-inch wide webbing.
- If making denim straps: From denim scraps, cut 4″ W x 28″ L (10 cm x 71 cm).
Note: All seam allowances are 1/2 inch (1.25 cm) unless otherwise stated.
3. Construct the Straps
- For Webbing Straps:
- Briefly melt the cut ends of the webbing with a lighter to prevent fraying (be careful!). Set aside.
- For Denim Straps:
- Take one denim strap piece. Fold it in half lengthwise, wrong sides together, and press. Open it up.
- Fold each long raw edge inwards to meet the center crease you just made. Press well.
- Now, fold the entire strap in half again along the original center crease, enclosing all raw edges. Press firmly. Your strap should now be 1.5 inches (3.8 cm) wide.
- Topstitch along both long edges of the strap, about 1/8 inch (0.3 cm) from the edge. This secures the strap and gives it a professional finish. Use a longer stitch length (e.g., 3.0-3.5 mm) for topstitching.
- Repeat steps 3.1-3.4 for the second denim strap.
4. Attach Optional Exterior Pockets
- If you saved jean back pockets, position one onto the right side of one Main Exterior Panel (this will be the front of your bag).
- Pin it securely. Topstitch around the three sides of the pocket (leaving the top open) to attach it. Use a heavy-duty needle and topstitching thread for durability and a classic look.
5. Assemble the Exterior Bag
- Place the two Main Exterior Panels (one with pocket, if applicable) right sides together, aligning all edges.
- Pin along the two side edges and the bottom edge.
- Stitch these three edges using a 1/2 inch (1.25 cm) seam allowance. Backstitch at the beginning and end of each seam for reinforcement.
- For extra strength, you can double-stitch these seams or use a zigzag stitch along the raw edges to prevent fraying.
6. Create the Boxed Corners (Exterior)
This step gives your tote bag a flat, defined bottom.
- At each of the two bottom corners of your bag, flatten the corner so the side seam meets the bottom seam. This will naturally form a triangle with the seam running down its center.
- Measure 2.5 inches (6.3 cm) from the tip of the triangle (where the two seams cross) and draw a line perpendicular to the seam. This line should be 5 inches (12.7 cm) long across the corner. (This creates a 5-inch deep box.)
- Stitch directly along this marked line. Backstitch securely at the beginning and end.
- Trim the excess fabric from the corner, leaving a 1/2 inch (1.25 cm) seam allowance. You can zigzag or serge this raw edge to prevent fraying.
- Repeat for the other bottom corner.
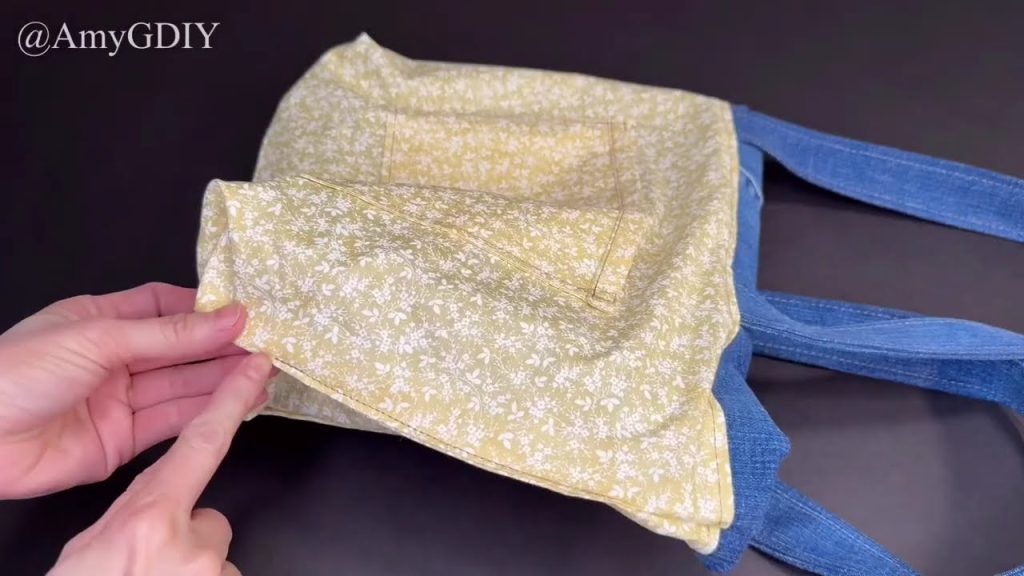
7. Assemble the Lining Bag
- Place the two Main Lining Panels right sides together, aligning all edges.
- Pin along the two side edges and the bottom edge.
- Stitch these three edges using a 1/2 inch (1.25 cm) seam allowance. Backstitch at the beginning and end.
- Important: Leave an Opening! When sewing the bottom seam of the lining bag, leave a 5-6 inch (12.7-15 cm) opening in the middle of the seam. This is crucial for turning the bag right side out later. Remember to backstitch securely at the beginning and end of this opening.
- Boxed Corners (Lining): Repeat the boxed corner steps (from 6.1-6.5) for the lining bag. Use the same 2.5-inch measurement for the corners.
- Finish all raw seam allowances with a zigzag stitch or serger.
8. Attach the Straps to the Exterior Bag
- Turn your exterior bag right side out.
- On the top raw edge of the bag, measure in 4 inches (10 cm) from each side seam on both the front and back. Mark these points. These marks indicate where the outer edge of your straps will be placed.
- Place the raw ends of one strap on the right side of the exterior bag at these marked points. The strap should be pointing downwards into the bag. Pin the strap ends securely in place. Ensure the strap is not twisted.
- Repeat for the second strap on the opposite side of the bag.
- Baste (stitch temporarily) the strap ends in place within the 1/4 inch (0.6 cm) seam allowance to secure them before final assembly.
9. Combine Exterior and Lining Bags
- Keep the exterior bag right side out, with the straps tucked neatly inside.
- Keep the lining bag wrong side out.
- Carefully insert the exterior bag into the lining bag, so their right sides are facing each other. The strap ends will be sandwiched between the layers.
- Align the top raw edges of both bags perfectly. Match the side seams and boxed corners. Pin securely all around the top opening.
- Stitch around the entire top opening with a 1/2 inch (1.25 cm) seam allowance. Backstitch at the start and end.
10. Finish the Tote Bag
- Reach into the opening you left in the bottom of the lining. Carefully pull the entire bag through this opening until it’s right side out.
- Gently push out all corners and seams to create a neat, defined shape. Use a point turner or a blunt stick if needed.
- Press the entire bag thoroughly, especially the top seam where the lining meets the exterior.
- Close the lining opening: Press the raw edges of the opening inwards by 1/2 inch (1.25 cm). Stitch the opening closed either by machine (topstitch very close to the edge) or by hand using an invisible ladder stitch for a seamless finish.
- Push the lining down into the bag. Press the top edge of the bag again.
- Topstitch: For a professional finish and added durability, topstitch around the entire top opening of the bag, about 1/8 to 1/4 inch (0.3-0.6 cm) from the edge. This secures the lining to the exterior and prevents it from rolling out. For extra strength on the straps, topstitch a box with an “X” through it at each strap attachment point.
Customization & Embellishment Ideas:
- Pockets: Add a simple patch pocket to the inside of your lining before assembly for extra organization.
- Contrast Stitching: Use a bright or contrasting thread color for all your topstitching to make it pop against the denim.
- Embellishments: Personalize your denim with fabric paint, embroidery, patches, or studs for a unique look.
- Fringe: Create a distressed look by cutting small vertical snips along the top edge of the denim (before assembly) or along the bottom hem.
Your rugged, stylish, and eco-friendly DIY denim tote bag is now complete! Without the need for a zipper, you’ve created a functional and fashionable accessory ready for all your adventures. Enjoy carrying your unique, upcycled creation!
Video tutorial: