by
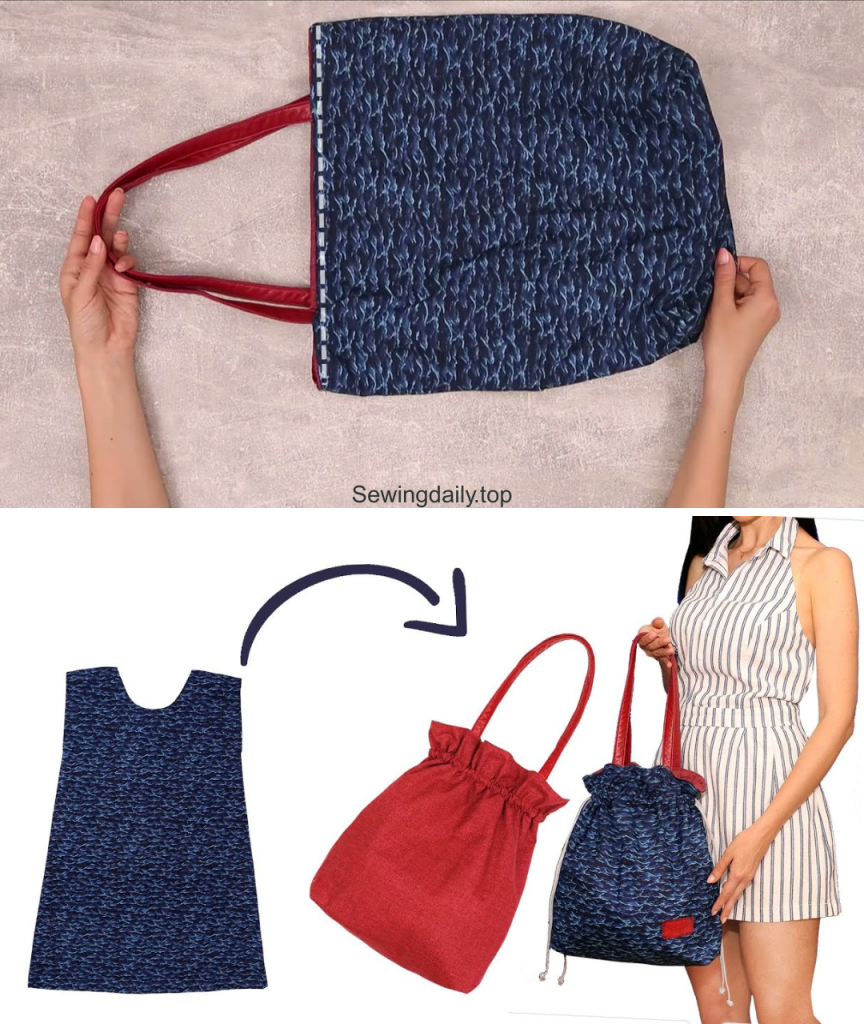
by Imagine turning a discarded dress—perhaps one with a lovely print or texture—into a large, durable, and completely reversible shopping tote! This detailed tutorial, inspired by the ingenious “Sew a double-sided bag out of an old dress – easy sewing tutorial!” video from Miarti – Reuse, will guide you through creating this charming, high-capacity shopper. The brilliance of this design is that it uses simple rectangular construction and a double layer of fabric to create a reversible bag with a wide, stable base.
Get ready to transform an old garment into a practical, sustainable accessory that’s two bags in one, perfect for groceries, crafts, or the beach!

Why This “Old Dress Shopper” Will Be Your New Favorite
This design is a champion of sustainability and practicality, offering several compelling reasons to make it your next sewing project:
- Two Bags in One: The fully lined, reversible design allows you to flip the bag inside out for a completely new look, maximizing versatility.
- Ultimate Upcycling: Repurpose the beautiful fabric of an old dress (or two coordinating dresses/fabrics) instead of sending it to the landfill.
- High Capacity & Stable Base: The design incorporates a wide, boxed base, giving the bag stability and plenty of room for bulky items.
- Easy Construction: The pattern is based on simple rectangles and straight seams, making it ideal for beginners.
- Seamless Handle Integration: The handles are sewn directly into the top edge, ensuring maximum durability for carrying heavy loads.
Materials You’ll Need:
Gathering your upcycled materials is the first step. The video uses two coordinating fabrics (one patterned, one solid, likely from a dress and a lining remnant) to create the reversible effect.
- Exterior Fabric 1 (from an old dress): 2 pieces, 35 cm x 40 cm.
- Exterior Fabric 2 (Lining/Reverse side): 2 pieces, 35 cm x 40 cm. (This piece acts as the second, reversible side.)
- Handle Fabric: 2 pieces, 50 cm long x 8 cm wide. (You may cut these from the dress sleeves or scraps.)
- Fusible Interfacing (Optional but recommended): 2 pieces, 35 cm x 40 cm. (Medium-weight, for added structure to one side.)
- Matching Thread: High-quality polyester thread.
- Basic Sewing Tools: Sewing machine, fabric scissors or rotary cutter, ruler, fabric marker, pins or clips, and an iron.
Step-by-Step Tutorial: Crafting Your “Old Dress Shopper” Tote
This tutorial is broken down into three efficient phases: preparing the handles and panels, constructing the exterior and lining bags, and the final assembly. All seam allowances are 1 cm unless otherwise stated.
Phase 1: Preparing the Fabric Panels and Handles
The structure and handles are prepared first for easy integration.
- Fuse Interfacing (Optional): If using interfacing, iron it onto the wrong side of the Exterior Fabric 1 pieces. This will give that side of the bag extra structure and stability.
- Construct Handles: Take the two 50 cm x 8 cm Handle Fabric pieces.
- Fold each strip in half lengthwise, wrong sides together, and press.
- Open it up. Fold both long raw edges inward to meet the center crease, and press firmly.
- Now, fold the entire handle in half again along the original center crease, enclosing all raw edges. Press firmly.
- Topstitch along both long edges of each handle, about 0.2 cm from the edge, to secure the folds.
Phase 2: Constructing the Exterior and Lining Bodies
Both sides of the reversible bag are built as separate, identical components.
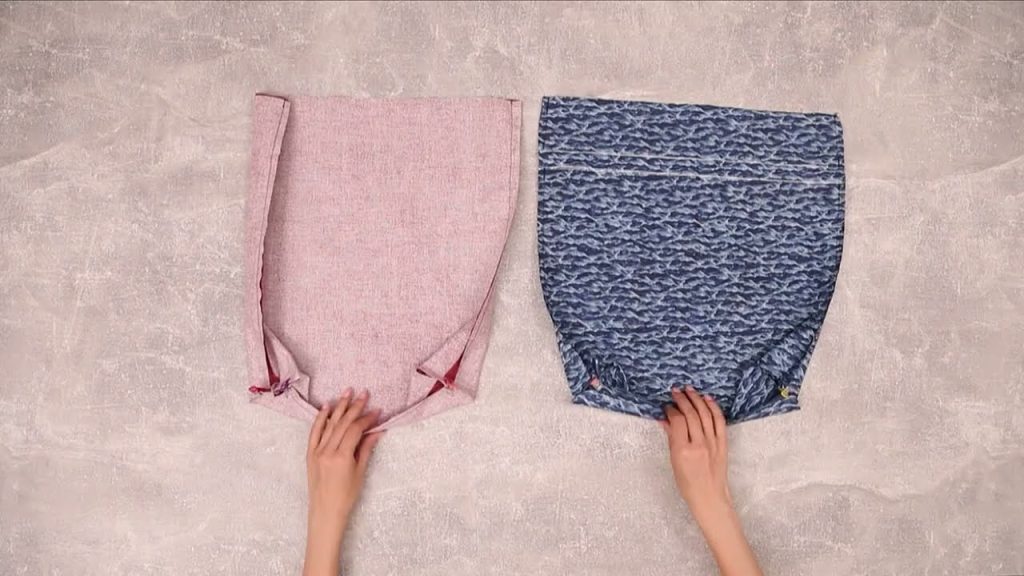
- Sew Exterior Bag (Fabric 1):
- Place the two 35 cm x 40 cm Fabric 1 pieces right sides together, aligning all edges.
- Pin and stitch along the two 40 cm side edges and the 35 cm bottom edge, leaving the top 35 cm edge open.
- Box the Corners: At both bottom corners (where the side seam meets the bottom seam), measure and mark a 4 cm x 4 cm square from the corner. Cut out these squares.
- Pinch the cut-out corner edges together, matching the side seam to the bottom seam to form a straight line. Pin and stitch the corner closed on both sides to create the boxed base.
- Sew Lining Bag (Fabric 2):
- Repeat the entire process (steps 1 and 2) using the two 35 cm x 40 cm Fabric 2 pieces (your lining/reverse side fabric).
- CRUCIAL STEP: When sewing the bottom 35 cm seam of the lining bag, leave a 15 cm turning opening along the center of the seam. This is where you will turn the entire bag right side out later.
Phase 3: Final Assembly and Finishing
The exterior, lining, and handles are joined to complete the reversible tote.
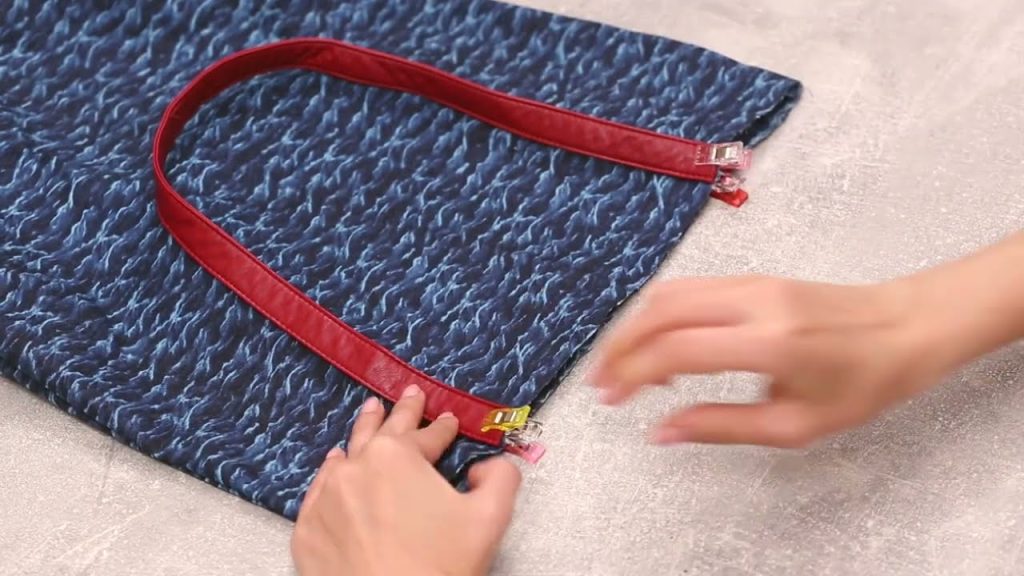
- Baste Handles to Exterior: Turn the Exterior Bag (Fabric 1) right side out. Lay it flat.
- Place the raw ends of the prepared Handle 1 onto the top raw edge of the bag, centering them. A good placement is 6-8 cm in from the side seams.
- Baste the handle ends to the top raw edge with a 0.5 cm seam allowance. Repeat for Handle 2 on the opposite side of the bag top.
- Join Exterior and Lining: Keep the Exterior Bag right side out (with handles basted). Keep the Lining Bag (Fabric 2) wrong side out.
- Slide the exterior bag into the lining bag. The two bags should now be right sides together, and the handles should be sandwiched between them.
- Align the top raw edges perfectly (the top of the exterior bag should match the top of the lining bag). Pin all around the top 35 cm edge.
- Stitch Top Perimeter: Stitch all around the top raw edge with a 1 cm seam allowance.
- Turn Right Side Out: Reach into the turning hole left in the lining bottom seam. Carefully pull the entire bag through the hole.
- Close Turning Hole: Stitch the turning hole closed (by machine or hand).
- Topstitch: Push the lining neatly inside the exterior bag. Press the top edge flat and topstitch all around the top opening, 0.5 cm from the edge, to secure the lining, reinforce the handles, and give the bag a crisp, professional finish.
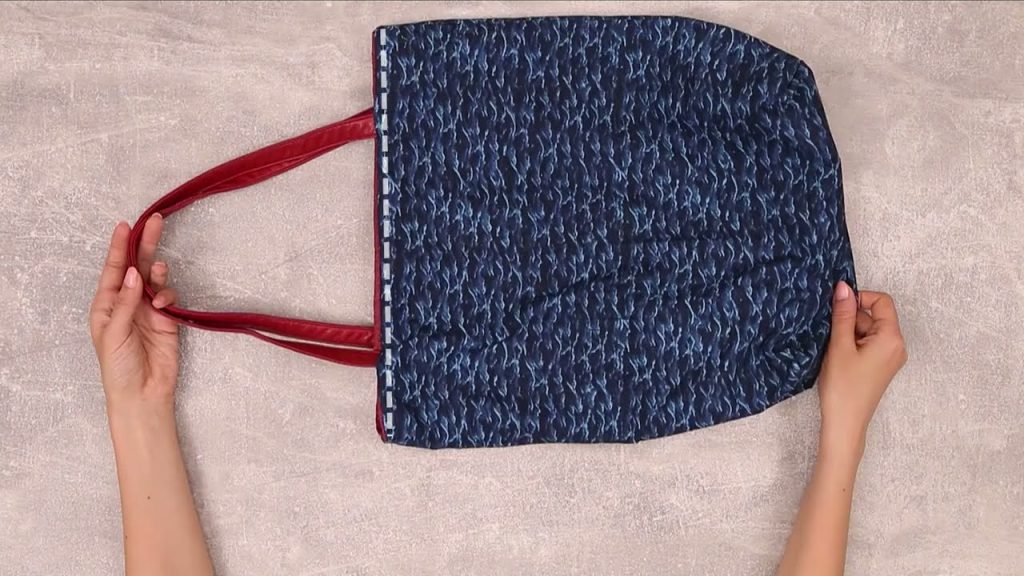
Your unique “Old Dress Shopper” Tote is complete! Flip it to choose your look and enjoy your new sustainable, double-sided accessory.
Video tutorial: