 by
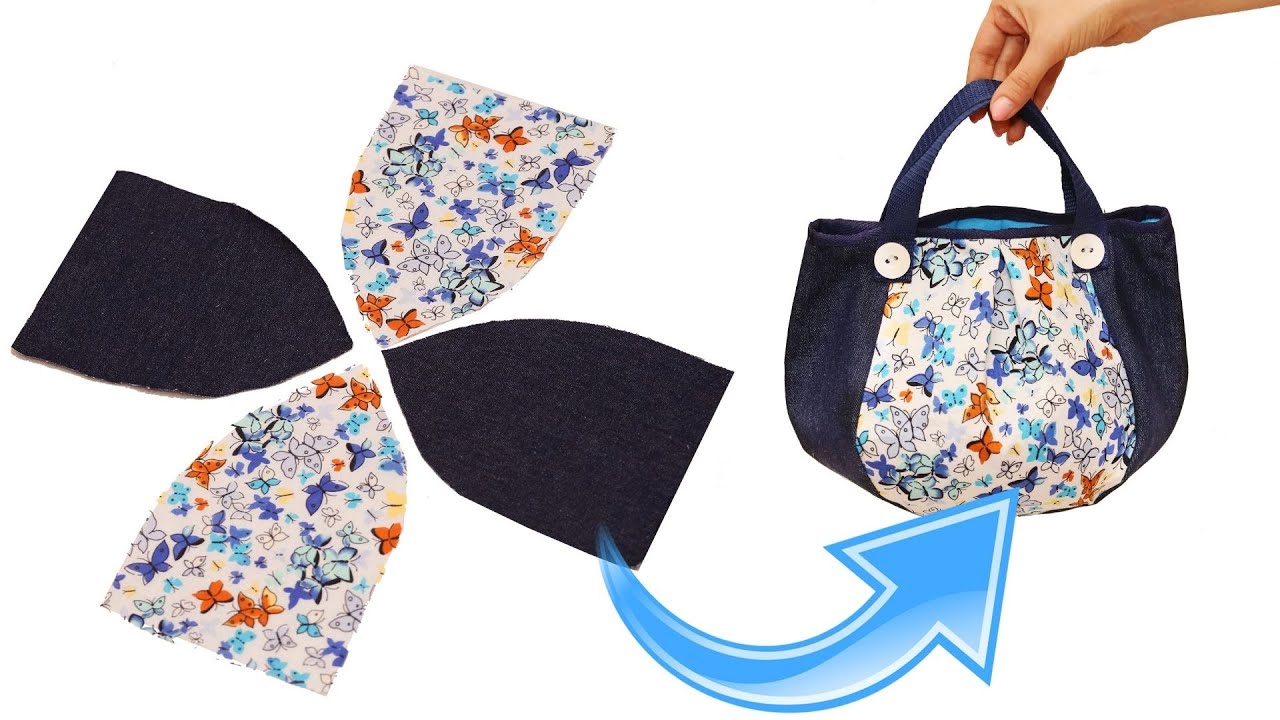
by Imagine a stylish handbag with a unique, structured shape and clever internal organization, yet so simple to sew that it’s perfect for a beginner! This detailed tutorial, inspired by the fantastic “How easily to sew a handbag – a new idea, a simple pattern!” video from Miarti – Reuse, will guide you through creating a charming and functional handbag. The genius of this design lies in its use of a single, cleverly folded fabric piece to create the body, minimizing seams and maximizing internal space.
Get ready to transform simple fabric into a sophisticated, one-of-a-kind accessory that’s perfect for everyday errands, date nights, or a quick shopping trip. This bag is a delightful blend of simplicity and style!

Why This “Origami Fold” Handbag Will Be Your New Favorite Project
This design is a masterclass in elegant simplicity, offering several compelling reasons to make it your next sewing project:
- Minimalist Construction: The bag body is formed from a single piece of fabric, reducing cutting time and complex seaming.
- Unique Shape: The final design boasts a structured, modern silhouette achieved through simple folding—it looks much more complicated than it is!
- Secure Zipper Closure: A recessed zipper keeps all your belongings safe and secure, perfect for peace of mind.
- Internal Organization: The clever folding creates natural, deep internal pockets or compartments, keeping your essentials tidy.
- Beginner-Friendly: The video’s clear, visual steps make this an ideal project for those new to sewing bags, offering a high-impact result with low difficulty.
- Customizable Style: Choose your favorite prints and textures—a canvas or denim will give it a structured look, while cotton prints offer charm.
Materials You’ll Need:
Gathering your materials efficiently is the first step to a successful and enjoyable sewing experience. The video uses a charming floral-on-blue fabric for the exterior and a light solid lining, showing how pattern and structure work together beautifully.
- Main Body Fabric (Exterior): 1 piece, 36 cm x 60 cm. (A medium-weight cotton, canvas, or denim is recommended for structure.)
- Lining Fabric: 1 piece, 36 cm x 60 cm. (A lightweight cotton works well for the interior.)
- Fusible Interfacing: 1 piece, 36 cm x 60 cm. (Medium-weight fusible fleece or heavy-duty interfacing is crucial for the bag’s structure and will be ironed onto the exterior fabric.)
- Zipper: 1 piece, 33 cm long. (A sturdy nylon coil zipper in a coordinating color.)
- Zipper Tab Fabric: 2 pieces, 6 cm x 8 cm. (Used to finish the ends of the zipper.)
- Strap Webbing/Fabric: 2 pieces, approximately 30 cm long x 3 cm wide. (You can use pre-made webbing or create your own straps from fabric strips.)
- D-Rings: 2 pieces. (To attach the strap.)
- Matching Thread: High-quality polyester thread.
- Basic Sewing Tools: Sewing machine, fabric scissors or rotary cutter, ruler, fabric marker, pins or clips, iron, and ironing board.
Step-by-Step Tutorial: Crafting Your “Origami Fold” Handbag
This tutorial is broken down into four phases: preparing the fabric, creating the interior pocket and handle tabs, installing the zipper, and assembling the final bag shape. All seam allowances are 1 cm unless otherwise stated.
Phase 1: Preparing the Body Fabric & Interfacing
The entire bag starts with fusing the structure to your exterior fabric.
- Fuse Interfacing: Iron the 36 cm x 60 cm Fusible Interfacing onto the wrong side of the 36 cm x 60 cm Main Body Fabric (Exterior), following the manufacturer’s instructions. This creates the stiff exterior piece.
- Mark the Base Corners: Take the interfaced exterior piece (36 cm x 60 cm). At the two bottom corners (along one of the 36 cm sides), measure a 4 cm x 4 cm square from the corner and cut it out. These cut-outs will form the box bottom of the bag.
- Prepare the Lining: Take the 36 cm x 60 cm Lining Fabric. Repeat the corner box step: measure a 4 cm x 4 cm square from the two corresponding bottom corners and cut it out.
Phase 2: Creating the Interior Compartment & Handle Tabs
This clever step uses the lining to form a unique internal pocket structure.
- Form the Lining Pocket: Fold the Lining Fabric in half lengthwise (30 cm x 36 cm), wrong sides together, so the raw 36 cm edges meet. Pin the two side edges together.
- Sew Side Seams: Stitch the two pinned 30 cm side edges, leaving the corner box cut-outs open.
- Box the Corners: Match the side seam to the base fold at the corner box cut-out, creating a straight line. Pin and stitch the corner closed to form a boxed base. Turn the lining right side out.
- Create Handle Tabs: Take your Zipper Tab Fabric pieces (6 cm x 8 cm). Fold each piece in half lengthwise (8 cm x 3 cm) and press. Fold the raw edges inward to the center crease and press again, creating a sturdy tab (8 cm x 1.5 cm). Topstitch down both long edges. Set aside.
Phase 3: Zipper Installation and Bag Top
The zipper is attached to both the main exterior piece and the handle tabs before the final assembly.
- Attach Zipper Tabs: Take your 33 cm Zipper. Center the raw edge of one Handle Tab piece over one end of the zipper tape (right sides facing). Stitch across the end. Trim and repeat with the second Handle Tab on the opposite zipper end. This lengthens the zipper strip to match the 36 cm width of the bag.
- Attach Zipper to Exterior: Place the Exterior Piece right side up. Lay the prepared zipper/tab unit along the top 36 cm edge, right side down. Pin the zipper tape edge to the fabric edge.
- Attach Zipper to Lining: Take the Lining Bag (right side out). Slide the Exterior/Zipper unit into the Lining Bag so the remaining free zipper tape edge aligns with the top raw edge of the lining. Stitch all three layers together (Exterior, Zipper, Lining).
- Topstitch: Flip the fabric so the zipper is visible. Topstitch along the seam you just created, keeping the fabric away from the zipper teeth, to give a neat finish.
Phase 4: Final Assembly and Shaping
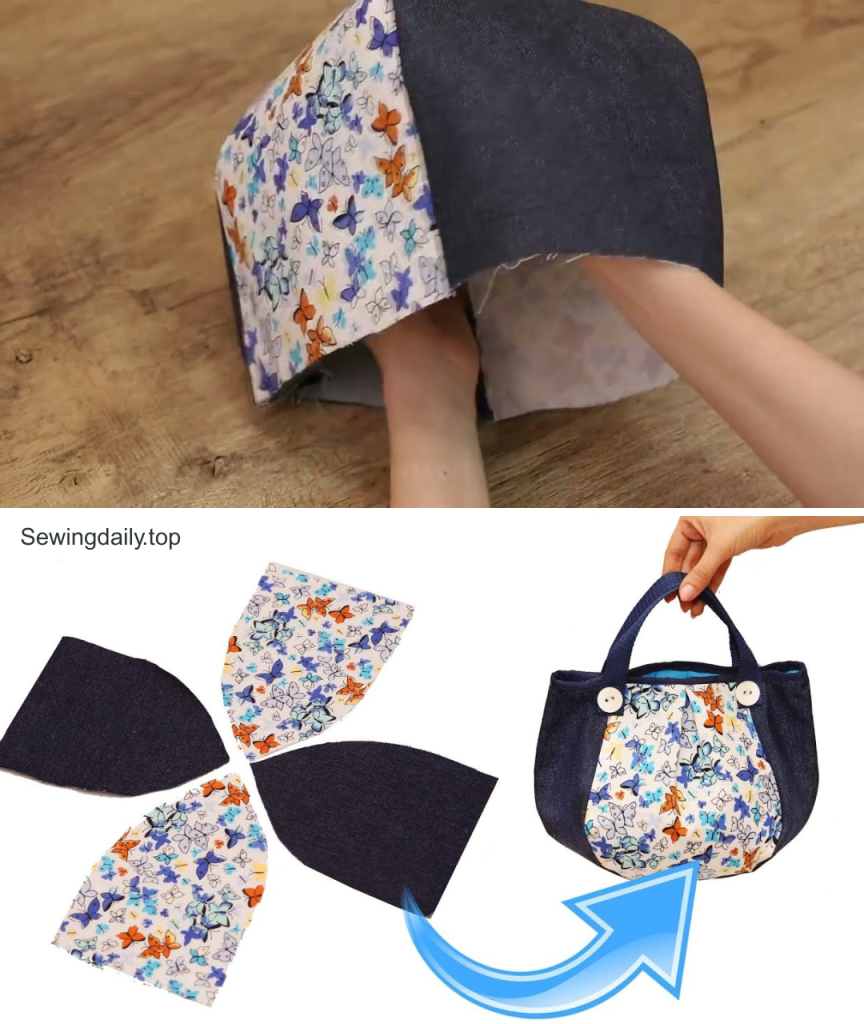
This is where the “origami fold” takes place, creating the bag’s signature look.
- Separate Layers: Separate the exterior and lining pieces at the zipper. Unzip the zipper halfway.
- Sew Exterior Side Seams: Fold the Exterior Piece in half, right sides together (30 cm x 36 cm), matching the side edges and the unstitched raw bottom edge. Pin. Stitch the two side edges together, starting just below the zipper.
- Box Exterior Corners: Match the exterior side seam to the cut-out corner, creating a straight line. Stitch the corner closed to form the boxed base.
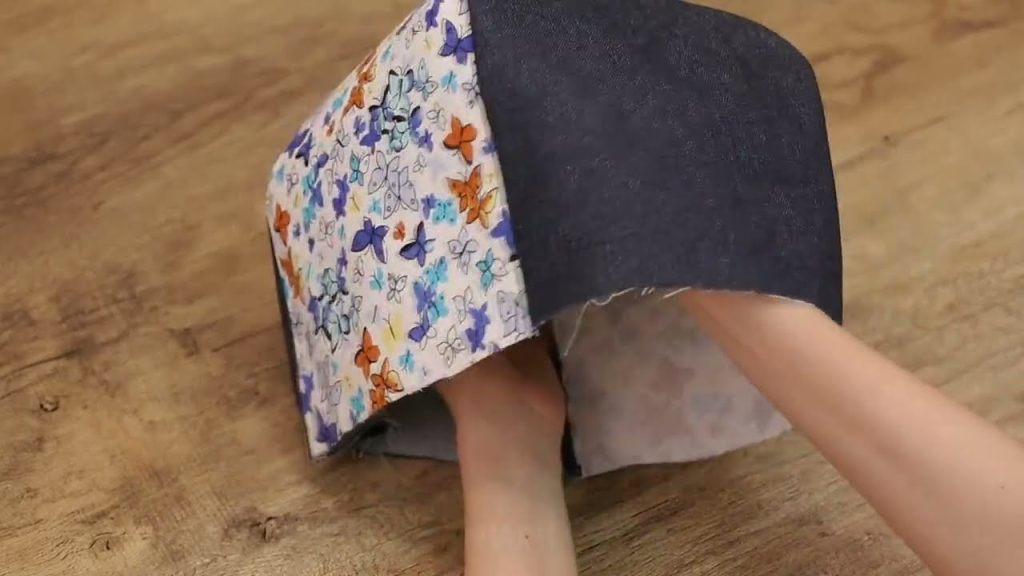
- Create the Origami Fold: Turn the exterior bag right side out. This is the key step: Push the side seams inwards towards the center of the bag bottom, folding the exterior fabric into a flattened “box” shape. This creates the structured, pleated look at the sides.
- Final Stitching: Align the side edges of the exterior and lining bags at the base. Place the Exterior Bag inside the Lining Bag, matching the boxed corners and the side folds. This will secure the “origami fold.” Stitch the two bags together around the base, and use a zigzag stitch to reinforce the folds.
Your unique “Origami Fold” Handbag is complete! This clever design results in a sturdy, stylish bag that looks sophisticated but was incredibly simple to achieve. Clip on your desired strap, and enjoy your new accessory!
Video tutorial: