 by
by Have you ever wanted to create a stylish, functional accessory without the hassle of complicated patterns or endless steps? Look no further! Today, we’re taking inspiration from the fantastic “A few people know this is the easiest way to sew a bag!” video by Miarti – Reuse to bring you a blog post pattern for crafting a beautiful zipper pouch that’s surprisingly simple and incredibly rewarding. Perfect for storing makeup, art supplies, or anything in between, this project is designed for everyone, from absolute beginners to seasoned sewers. Let’s get started and turn some fabric into a unique, handmade treasure!

(Visual Hook Placeholder: Imagine a captivating, high-quality photograph or a short animated GIF of the finished zipper pouch. It should be styled beautifully, perhaps with its contents peeking out, enticing readers with the final product they’re about to create. Think vibrant colors, crisp lines, and a touch of professional flair, much like the finished product reveal in the video.)
Gather Your Essentials: What You’ll Need
A successful project begins with organized materials. Here’s a comprehensive list of what you’ll need to create your very own zipper pouch, mirroring the clear presentation of supplies in the video:
- Outer Fabric: [Your choice of dense cotton, quilting cotton, or canvas] – 2 pieces, cut to [40] cm x [23] cm each. (Visualize: A flat lay photo of your chosen outer fabric, neatly cut and displaying the dimensions clearly.)
- Lining Fabric: [Complementary cotton fabric] – 2 pieces, cut to [40] cm x [23] cm each. (Visualize: A flat lay photo of your chosen lining fabric, cut to size. Perhaps placed next to the outer fabric for comparison.)
- Fusible Interfacing (Lightweight/Medium Weight): 2 pieces, cut to [40] cm x [23] cm each. (Visualize: A photo of the fusible interfacing, showing its texture.)
- Zipper: One [35] cm zipper (or appropriate length for your pouch, ensuring it’s longer than the side it’s attached to). (Visualize: A neatly laid out zipper, perhaps with a measuring tape beside it.)
- Zipper Pull Tag (Optional): A small piece of contrasting fabric or faux leather for a decorative touch. (Visualize: A small, stylish tag.)
- Fabric Scissors: Sharp and ready for precise cuts. (Visualize: Scissors next to fabric.)
- Pins or Fabric Clips: Essential for holding layers together. (Visualize: A small pile of colorful pins or clips.)
- Matching Thread: High-quality polyester thread to blend with your fabric. (Visualize: A spool of thread matching your fabric colors.)
- Sewing Machine: Equipped with a standard foot and a zipper foot. (Visualize: A close-up of a sewing machine.)
- Iron and Ironing Board: Crucial for crisp seams and fusing interfacing. (Visualize: An iron.)
- Ruler/Measuring Tape & Fabric Marker/Chalk: For accurate measurements and markings. (Visualize: Measuring tools.)
Your Step-by-Step Crafting Journey: Follow Along with Confidence!
This section is designed to be as visually driven and easy to follow as a video tutorial. Each step is broken down with clear instructions and specific timestamps referencing the referral video to guide your understanding of the process.
- Prepare Your Fabric with Interfacing
- Lay one piece of your outer fabric wrong side up on your ironing board.
- Place a piece of fusible interfacing, glue side down, on top of the outer fabric, ensuring all edges align.
- Carefully iron to fuse the interfacing to the fabric, pressing firmly and evenly. This gives your pouch body and structure.
- Repeat this process for the second piece of outer fabric.
- (Visual Reference Placeholder: A series of images or a short GIF demonstrating the precise ironing technique for fusing interfacing, mirroring the video’s smooth execution.)
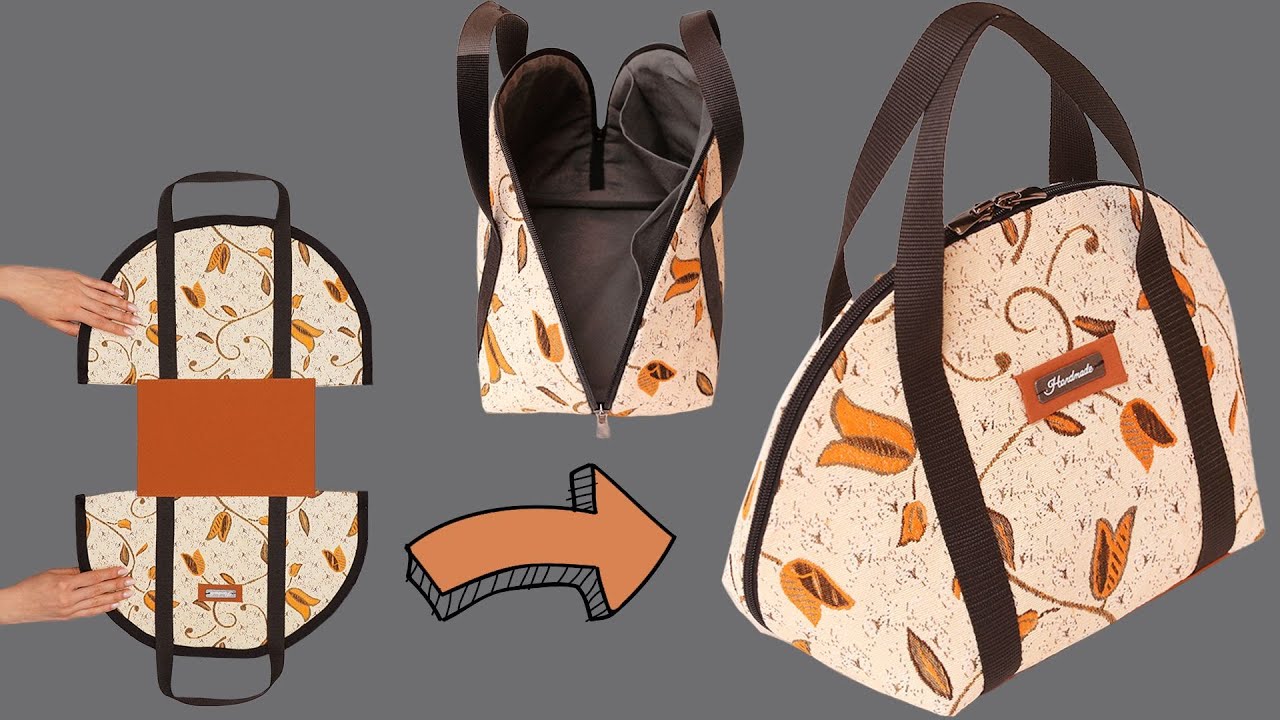
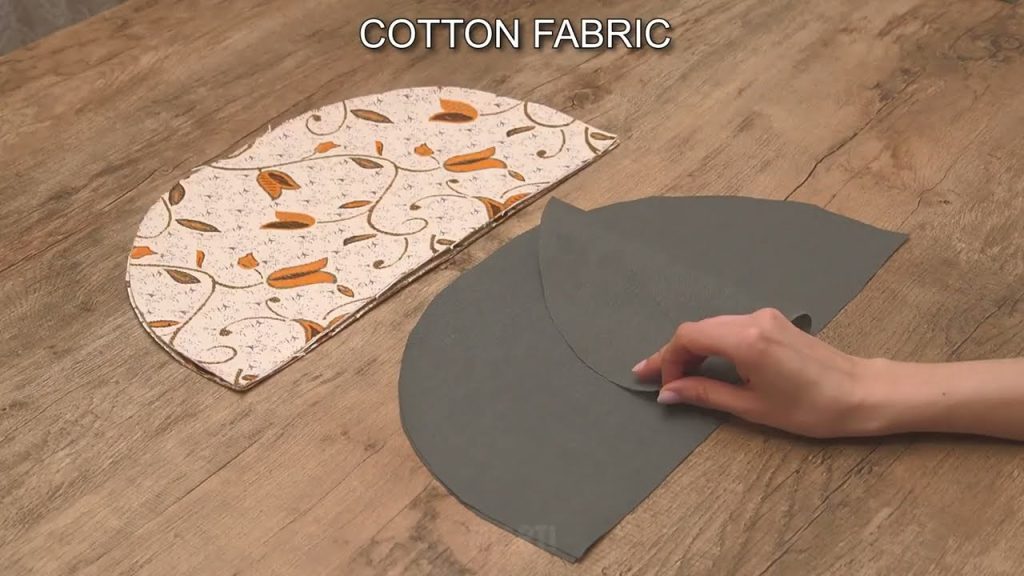
- Cut the Curved Shape (The “Easiest Way” Method!)
- Fold your interfaced outer fabric piece in half, then fold it in half again (into quarters).
- Using a circular template (or a plate/bowl) with a [27] cm diameter, place it on the folded corner and trace a curve.
- Carefully cut along this curved line, creating a rounded edge on one side when unfolded.
- Repeat this for the second interfaced outer fabric piece.
- Now, use these two cut outer fabric pieces as templates to cut two identical pieces from your lining fabric.
- (Visual Reference Placeholder: A detailed progression of photos showing the fabric folding, template placement, tracing, and precise cutting to achieve the curved shape for all four pieces. Pay attention to how the video shows the fabric unfolding after cutting.)
- Prepare the Zipper and Zipper Tag (If Using)
- Cut your zipper to the desired length if necessary. For our [X] cm side, a [Y] cm zipper works well.
- If adding a zipper pull tag, cut a small rectangle of fabric (e.g., [8] cm x [3] cm). Fold it in half lengthwise and press, then fold the raw edges to the center and press again to create a neat strap.
- Feed the folded tag through the zipper pull and stitch the ends together to secure it.
- (Visual Reference Placeholder: Images showing the zipper preparation, including the optional creation and attachment of a zipper pull tag to the zipper.)
- Attach the Zipper – First Side
- Lay one curved outer fabric piece right side up on your work surface.
- Place your zipper right side down along the straight edge of the outer fabric, aligning the top edge of the zipper tape with the fabric’s raw edge. Pin in place.
- Next, lay one curved lining fabric piece right side down on top of the zipper, sandwiching the zipper between the outer and lining fabric. Pin all three layers securely together.
- Using your sewing machine with a zipper foot, stitch along the zipper tape, maintaining a consistent seam allowance.
- (Visual Reference Placeholder: A sequence of photos showing the precise layering of outer fabric, zipper, and lining, followed by pinning and the initial seam stitching with a zipper foot.)
- Attach the Zipper – Second Side
- Open up the fabric layers and press the outer and lining fabrics away from the zipper.
- Take the remaining curved outer fabric piece and align its straight edge with the other side of the zipper, right sides together. Pin securely.
- Now, place the remaining curved lining fabric piece right side down on top of the zipper, creating another zipper “sandwich”. Pin this entire assembly.
- Stitch this second side of the zipper in the same manner as the first, using your zipper foot.
- (Visual Reference Placeholder: Photos demonstrating the attachment of the second side of the zipper, clearly showing the right sides together and the pinned layers, leading to the second zipper seam.)
- Topstitching for a Professional Finish
- Lay your entire piece flat, with the outer fabrics on one side of the zipper and the lining fabrics on the other. Press the fabric neatly away from the zipper on both sides.
- Carefully topstitch along both sides of the zipper, about [3 mm or 1/8 inch] from the zipper teeth. This crucial step prevents fabric from getting caught in the zipper and provides a crisp, professional look.
- (Visual Reference Placeholder: Close-up images or a GIF showing the pressing and precise topstitching along both sides of the zipper.)
- Prepare the Handles (If Using)
- Cut two pieces of webbing or strap material to [100] cm each.
- On one outer fabric/lining panel, measure [11] cm in from each straight edge along the bottom of the curved section and mark. This is where your straps will be placed.
- Pin the ends of one strap to these marks, ensuring the strap forms a handle loop upwards. Securely stitch the strap ends to the outer fabric, possibly forming a box or ‘X’ stitch for extra reinforcement.
- Repeat for the second strap on the other outer fabric/lining panel.
- (Visual Reference Placeholder: Images showing the measuring, marking, pinning, and stitching of the two fabric handles to the outer panels.)
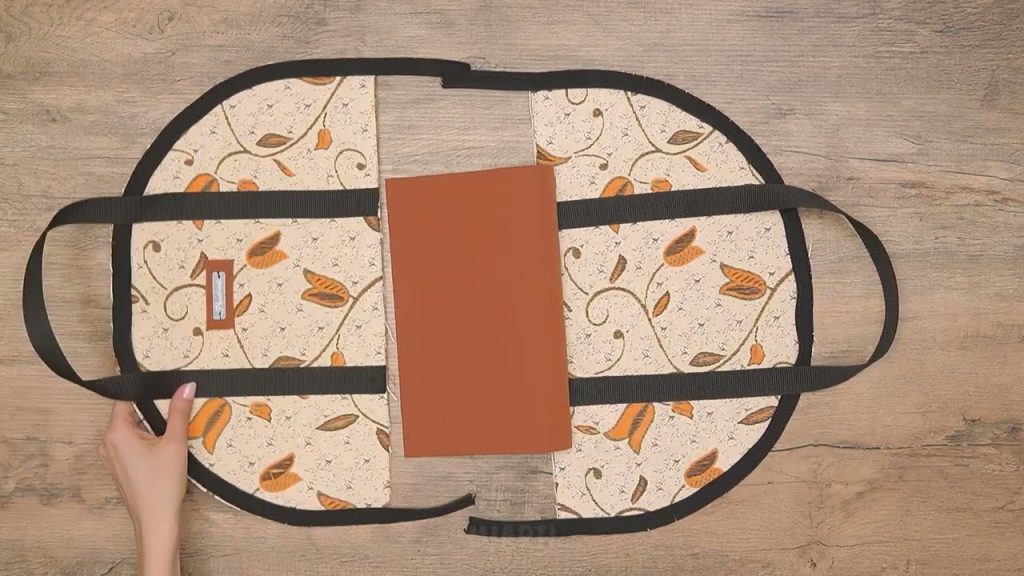
- Create the Side Panels and Base
- Cut two rectangular pieces of a contrasting fabric (or outer fabric) for the side panels, [18] cm x [24] cm. These will form the middle section of your bag.
- Cut another rectangular piece for the base, [18] cm x [12] cm.
- Take one [18 x 24] cm side panel piece. On one of the [18] cm sides, measure in [2.5] cm from each corner and mark. Cut a small curve from these marks to create a slight “ear” shape at the top.
- Pin and stitch this side panel to one of your outer fabric/lining sections, along the straight edge without the zipper. Stitch securely.
- (Visual Reference Placeholder: Photos illustrating the cutting of the side and base panels, including the small curved cuts on the side panels. Then, the pinning and stitching of the first side panel to one of the main body pieces.)
- Attach Inner Pockets (Optional)
- Cut two pieces of lining fabric to [18] cm x [12] cm each. Hem the top edge of each.
- On the lining side of one main bag panel, place one pocket piece. Pin and stitch the sides and bottom, leaving the top open.
- Repeat for the other main bag panel.
- (Visual Reference Placeholder: Photos showing the pocket fabric, hemming, placement, and stitching onto the lining.)
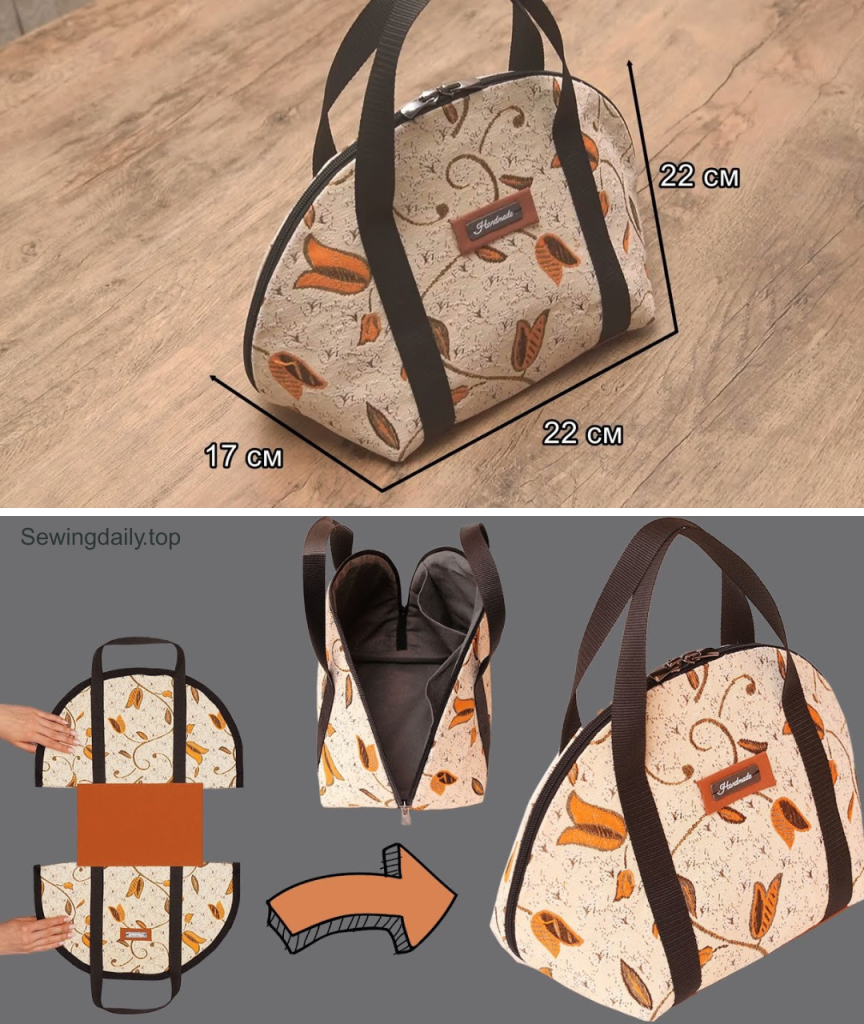
- Assemble the Bag Body: Lining Up!
- Lay your main bag sections flat, with the outer fabric sides facing up. The zipper should be open halfway.
- Place the base piece in the center, between the two main bag sections, aligning its [18] cm sides with the bottom straight edges of the main sections. Pin in place and stitch the base to both main body panels.
- Next, take the side panels (the ones with the small curves). Pin them to the curved sides of the main bag panels, ensuring right sides are together. Stitch these seams, forming the three-dimensional shape of your bag.
- (Visual Reference Placeholder: A detailed sequence showing the pinning and stitching of the base to the main panels, then the side panels to the curved edges, clearly outlining the seam lines with dashed lines as seen in the video.)
- Stitch the Lining Together
- Repeat the entire assembly process from Step 8 and 10 for your lining pieces, making sure to connect the side panels and base to the two curved lining pieces.
- Important: When stitching the bottom straight edge of the lining base, leave a [7-10] cm opening in the middle. This is crucial for turning your bag right side out later! Backstitch securely at the beginning and end of this opening.
- (Visual Reference Placeholder: Images showing the lining assembly, emphasizing the unstitched opening left in the base of the lining.)
- Joining Outer Bag and Lining
- With the outer bag turned right side out and the lining still wrong side out, insert the outer bag into the lining, so their right sides are facing each other. The zipper should be open.
- Align the top edges of the outer bag and lining, carefully matching the seams and the zipper ends. Pin all along the top curved edge, around the zipper.
- Stitch all the way around this top opening, ensuring a neat and strong seam.
- (Visual Reference Placeholder: A step-by-step visual of inserting the outer bag into the lining, pinning the top edges, and stitching them together.)
- Turning and Finishing!
- Through the opening you left in the lining, gently pull the entire bag right side out. Take your time, easing the fabric through.
- Carefully push out all corners and curves to get a crisp shape.
- Once the bag is right side out, push the lining into the outer bag. Press the entire bag, paying special attention to the top edge around the zipper to make it neat and flat.
- Close the opening in the lining by hand-stitching with an invisible ladder stitch or machine-stitching very close to the edge.
- (Visual Reference Placeholder: A final series of images showing the turning process, the lining being tucked in, and the final pressing of the completed pouch.)
Your Masterpiece Awaits!
And there you have it! A unique, durable, and absolutely stunning zipper pouch, crafted by your own hands. This project proves that beautiful results don’t always require complex techniques. Experiment with different fabric combinations, add embroidery, or even change the dimensions to create pouches for every need.
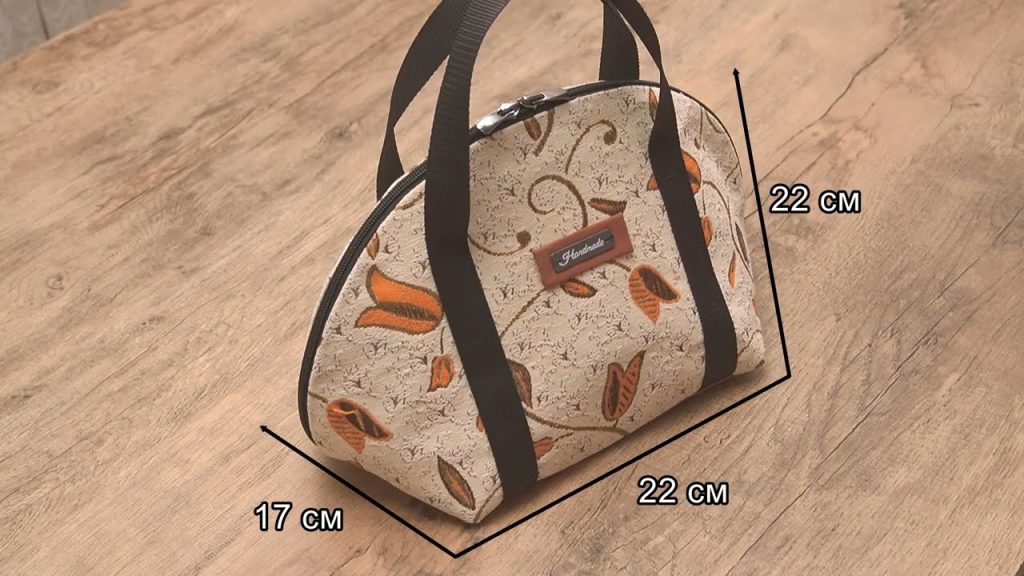
(Final Showcase Placeholder: A full-page, professionally shot image of the completed zipper pouch. Show it in action – perhaps holding a tablet, a collection of craft supplies, or as a chic clutch. Highlight its functionality and style, just like the video’s impressive final reveal. Include visual callouts for dimensions if applicable, such as [22] cm x [17] cm x [22] cm.)
We encourage you to share your creations with us! Post photos of your newly sewn zipper pouch in the comments below, or tag us on social media with #MyDIYZipperPouch. We can’t wait to see what you make!
Happy Sewing!
Video tutorial: