by
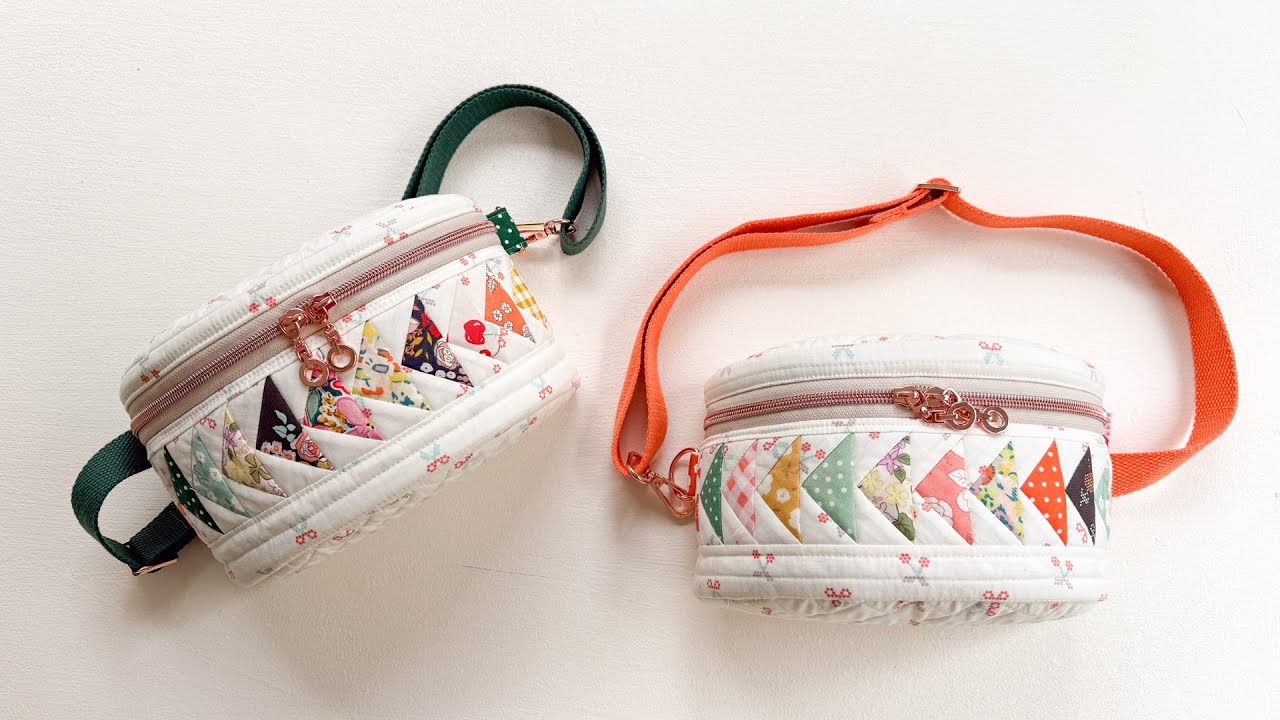
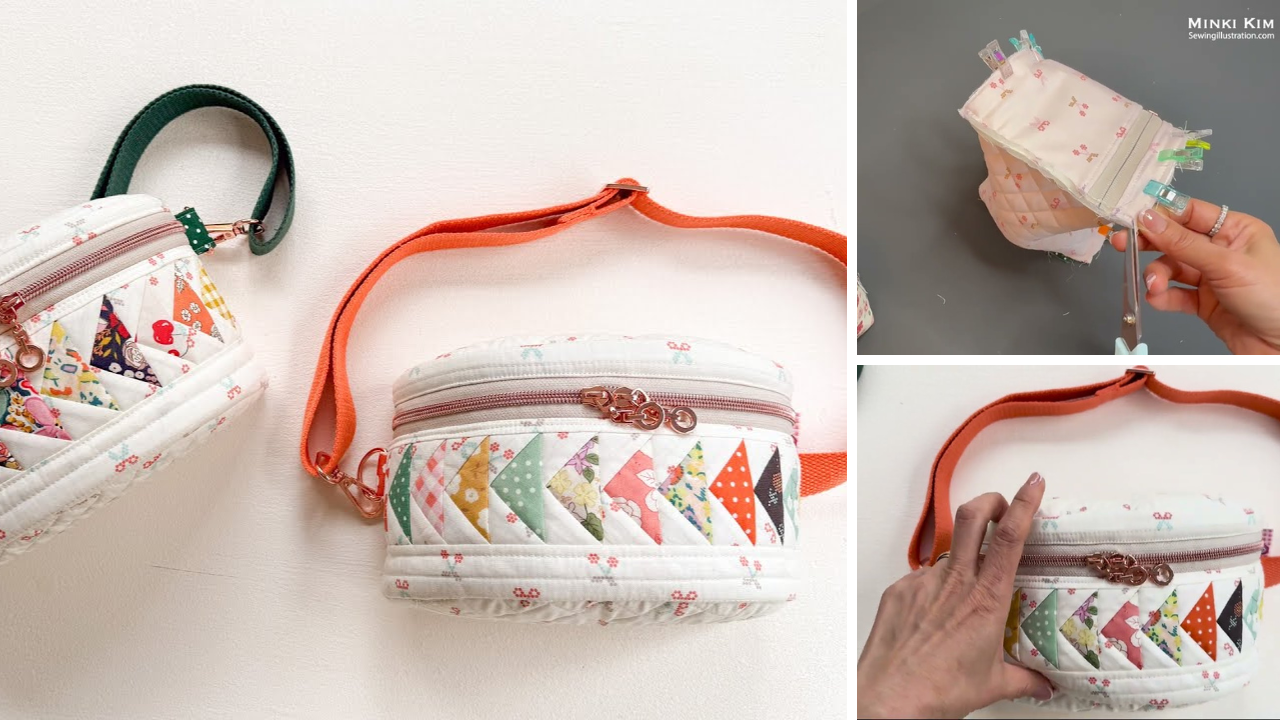
by Soaring in Style: Crafting Your Own Flying Geese Belt Bag
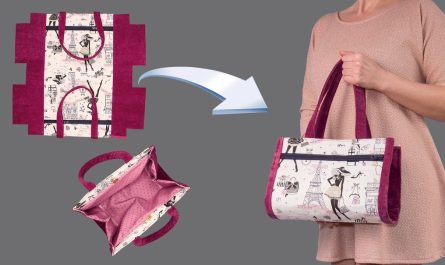
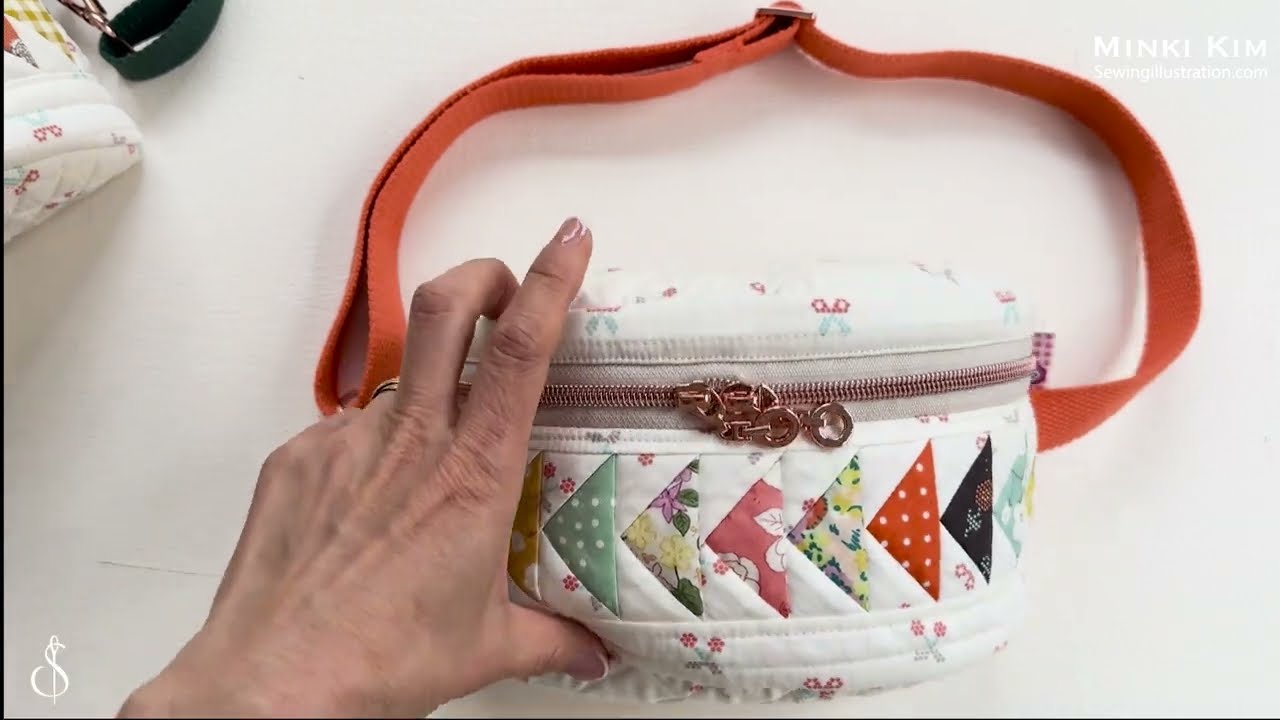
The belt bag, also known as a fanny pack or hip bag, has made a triumphant return, blending convenience with cool. Elevate this popular accessory by incorporating the classic Flying Geese quilt block. This iconic patchwork motif, with its dynamic V-shape, adds a touch of intricate beauty and personal flair, transforming a simple belt bag into a true statement piece.
Why a Flying Geese Belt Bag?
- Fashion Meets Function: Keeps your essentials secure and hands-free while adding a stylish accent to any outfit.
- Quilting Showcase: A perfect small-scale project to practice or display your patchwork skills with the versatile Flying Geese block.
- Customization: Endless possibilities for fabric combinations—from vibrant scraps to sophisticated solids—making your bag truly unique.
- Practicality: Ideal for travel, festivals, walks, or simply a day out when you want to carry just the necessities.
Understanding the Flying Geese Block
The Flying Geese block consists of one large triangle (the “goose”) flanked by two smaller triangles (the “sky”). They are typically arranged in rows, creating a sense of movement. For a belt bag, you’ll create a panel of these blocks to form the front of your bag.
What You’ll Need:
Gather your materials before you begin. Precision in cutting and sewing is key, especially with patchwork!
- Fabric:
- “Goose” Fabrics (various scraps): Small pieces of cotton fabric for your geese triangles. Think bright colors, subtle patterns, or even themed prints.
- “Sky” Fabric: A single, contrasting fabric (e.g., solid background, subtle print) for the smaller triangles that form the sky around the geese.
- Main Exterior Fabric: 1/2 yard (0.45 meters) of a sturdy cotton (e.g., quilting cotton, canvas light) for the back of the bag and the zipper panels. Choose something that complements your Flying Geese panel.
- Lining Fabric: 1/2 yard (0.45 meters) of lightweight cotton (e.g., quilting cotton, broadcloth) for the bag’s interior.
- Interfacing (Recommended for Structure):
- Heavyweight Fusible Interfacing: 1/2 yard (0.45 meters). Products like Pellon SF101 or Decovil Light will give your bag structure and body.
- Zipper:
- One 10-12 inch (25-30 cm) nylon coil zipper for the main bag opening.
- Hardware:
- Side Release Buckle (1): To match your strap width (e.g., 1-inch / 2.5 cm or 1.5-inch / 3.8 cm).
- Strap Adjuster Slide (1): To match your strap width.
- Webbing for Strap: 1-inch (2.5 cm) or 1.5-inch (3.8 cm) wide, about 40-50 inches (100-125 cm) long (adjust for waist/hip size).
- Thread:
- All-purpose polyester thread that matches or complements your fabrics.
- Tools:
- Sewing machine with a zipper foot.
- Rotary cutter, quilting ruler, and mat (highly recommended for precise patchwork).
- Fabric scissors.
- Fabric marker or tailor’s chalk.
- Pins or fabric clips.
- Iron and ironing board.
Designing Your Flying Geese Panel
The size of your Flying Geese units will depend on your desired bag dimensions. For a typical belt bag, a panel about 10 inches wide by 5-6 inches tall (25.5 cm x 12.7-15 cm) is a good starting point.
Flying Geese Math (No-Waste Method):
This method is efficient and commonly used for accuracy.
- Determine “Finished” Goose Unit Size: Let’s aim for finished units that are 4 inches wide x 2 inches tall (10 cm x 5 cm).
- Cut “Goose” Fabric: Cut a square from your “goose” fabric that is 2 inches larger than the finished height of your unit.
- Example: For a 2-inch finished height, cut a 4-inch x 4-inch (10 cm x 10 cm) square. You’ll need one of these for each goose unit you want to make.
- Cut “Sky” Fabric: Cut squares from your “sky” fabric that are 1 inch larger than the finished height of your unit.
- Example: For a 2-inch finished height, cut 3-inch x 3-inch (7.6 cm x 7.6 cm) squares. You’ll need two of these for each goose unit you want to make.
Making a Flying Geese Panel (Example for 2″ x 4″ Finished Units):
To make a panel roughly 10″ W x 5″ H, you could aim for:
- A row of 2 units (8 inches finished width)
- Stacked two rows high (4 inches finished height).
- Add border strips to reach 10″ W x 5″ H.
Alternatively, you could make a row of 3 units wide for 12 inches, and trim down. Let’s aim for a single row of Flying Geese units to be the focal point. For a 10-inch wide bag, you could make 2 units (each 4″ finished width) and add side borders, or make 5 units (each 2″ finished width). Let’s go with five 2″ x 4″ finished units in a row, for a finished panel of 10″ x 2″. Then add borders.
Flying Geese Units (2″ H x 4″ W finished):
- “Goose” Fabric: Cut five 2.5″ x 4.5″ rectangles (6.3 cm x 11.4 cm).
- “Sky” Fabric: Cut ten 2.5″ x 2.5″ squares (6.3 cm x 6.3 cm).
(Alternatively, using the “No-Waste” method with a 2″ H finished unit means 4″ x 4″ “goose” squares and 3″ x 3″ “sky” squares. You’d make 5 units and then trim them to size.)
For this tutorial, let’s simplify and assume you have already constructed a quilted Flying Geese panel that measures 10 inches wide x 6 inches tall (25.5 cm x 15 cm). (This includes 1/2″ seam allowances on all sides.) If you need a detailed quilting tutorial, that’s a separate step, but assume your panel is done and ready!
Cutting All Fabric Pieces:
- Exterior Front Panel: 10″ W x 6″ H (25.5 cm x 15 cm) – your completed and quilted Flying Geese panel.
- Exterior Back Panel: 10″ W x 7″ H (25.5 cm x 17.8 cm) – from your main exterior fabric. (The back is slightly taller to accommodate the curve.)
- Lining Panels (Cut 2): 10″ W x 7″ H (25.5 cm x 17.8 cm) – from your lining fabric.
- Zipper Panel Strips (Cut 2 each):
- Exterior Fabric: 10″ W x 2″ H (25.5 cm x 5 cm)
- Lining Fabric: 10″ W x 2″ H (25.5 cm x 5 cm)
- Strap Connector Tabs (Cut 2): 4″ W x 2″ H (10 cm x 5 cm) – from your main exterior fabric.
Note: All seam allowances are 1/2 inch (1.25 cm) unless otherwise stated.
Step-by-Step Sewing Instructions:
1. Prepare Your Fabrics & Fuse Interfacing
- Cut all fabric pieces according to the dimensions.
- Fuse interfacing: Fuse heavyweight fusible interfacing to the wrong side of all exterior fabric pieces except your already-quilted Flying Geese panel (which has batting/interfacing built-in). This includes the Exterior Back Panel, Zipper Panel Strips (exterior), and Strap Connector Tabs. Press firmly for good adhesion.
2. Prepare the Strap Connector Tabs
- Take each Strap Connector Tab piece. Fold it in half lengthwise, wrong sides together, so it measures 2″ W x 2″ H (5 cm x 5 cm). Press.
- Open it up. Fold the long raw edges in to meet the center crease. Press. Now fold the entire piece in half along the original center crease. Press again. You should have a sturdy strip measuring 1 inch (2.5 cm) wide x 2 inches (5 cm) high with all raw edges enclosed.
- Topstitch along both long edges, 1/8 inch (0.3 cm) from the edge.
- The side release buckle will attach here later. For now, set them aside.
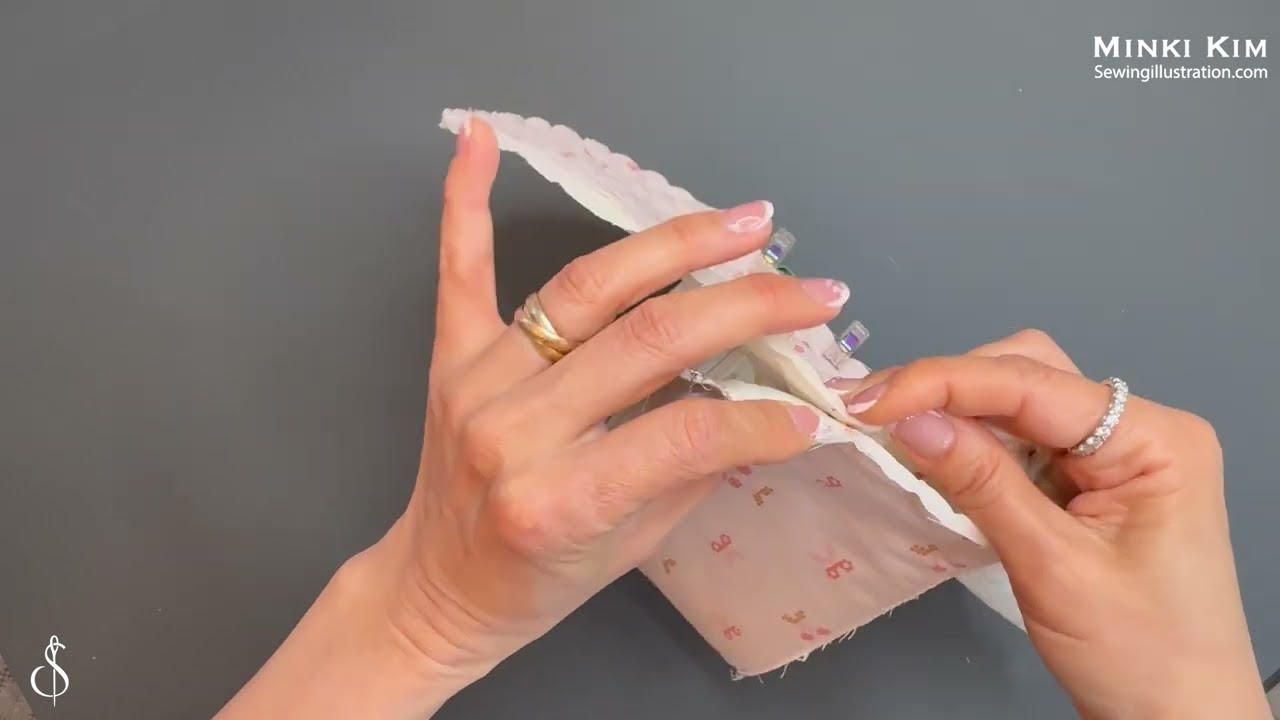
3. Assemble the Zipper Panel
- Take one Exterior Zipper Panel Strip (10″ W x 2″ H). Place your main zipper right side down along one of the long edges. Align the top edge of the zipper tape with the top edge of the fabric. Pin in place.
- Place one Lining Zipper Panel Strip (10″ W x 2″ H) on top of the zipper and the exterior strip, right side down, aligning all raw edges. The zipper is now sandwiched between the exterior and lining pieces. Pin.
- Using your zipper foot, stitch along this edge with a 1/2 inch (1.25 cm) seam allowance, sewing through all three layers (exterior, zipper tape, lining).
- Press the fabric pieces away from the zipper teeth, so the exterior and lining are pulled flat. Topstitch along the folded edge, 1/8 inch (0.3 cm) from the zipper teeth, through all layers.
- Repeat steps 1-4 for the other side of the zipper, attaching the remaining Exterior and Lining Zipper Panel Strips. You should now have a continuous zipper panel with exterior fabric on one side and lining fabric on the other.
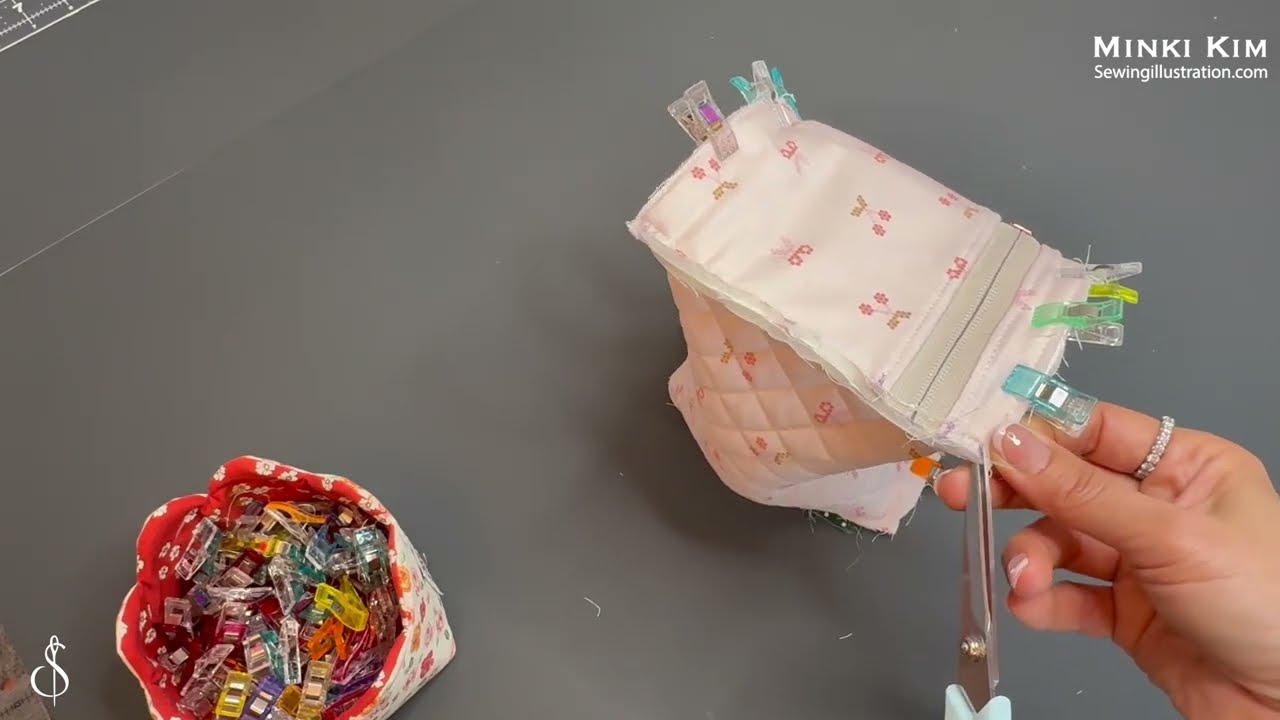
4. Assemble the Bag Body Panels
- Attach Zipper Panel to Front Panel:
- Take your quilted Flying Geese Exterior Front Panel. Mark the center of its top raw edge.
- Take your assembled zipper panel. Mark the center of its exterior side.
- Align the center marks of the zipper panel and the front panel, right sides together. Pin the entire exterior edge of the zipper panel to the top raw edge of the Exterior Front Panel.
- Stitch with a 1/2 inch (1.25 cm) seam allowance. Press the seam open.
- Attach Zipper Panel to Back Panel:
- Take your Exterior Back Panel. Mark the center of its top raw edge.
- Align the center mark of the remaining exterior side of the zipper panel with the center mark of the Exterior Back Panel, right sides together. Pin.
- Insert Strap Connectors: Place the raw ends of your two Strap Connector Tabs onto the top raw edge of the Exterior Back Panel (before stitching to the zipper panel), about 1.5 inches (3.8 cm) in from each side edge. The tab loops should point down into the bag. Baste them in place within the 1/2 inch (1.25 cm) seam allowance.
- Stitch the zipper panel to the Exterior Back Panel (and strap connectors) with a 1/2 inch (1.25 cm) seam allowance. Press the seam open.
- You now have the full exterior bag body (front, zipper panel, back) ready.
5. Assemble the Lining Bag
- Take your two Lining Panels.
- Place them right sides together, aligning all edges.
- Pin along the two side edges and the bottom edge. Stitch these three edges using a 1/2 inch (1.25 cm) seam allowance. Backstitch at the beginning and end of each seam.
- Important: Leave a 3-4 inch (7.6-10 cm) opening in the middle of the bottom seam of the lining bag. This opening will be used to turn the bag right side out later. Remember to backstitch securely before and after this opening.
- Leave the top edge open.

6. Form the Bag Shape (Boxed Corners – Optional but Recommended)
This step gives your bag depth and allows it to sit nicely.
- For the Exterior Bag: At each bottom corner, flatten the corner so the side seam meets the bottom seam, forming a triangle. Measure 1.5 inches (3.8 cm) from the tip of the triangle (where the seams cross) and draw a line perpendicular to the seam. Stitch along this line.
- Trim the excess corner away, leaving a 1/2 inch (1.25 cm) seam allowance. This creates a 3-inch (7.6 cm) boxed corner.
- Repeat for the other bottom corner of the exterior bag.
- Repeat the exact same steps for both bottom corners of the Lining Bag.
7. Combine Exterior and Lining Bags
- Open the main zipper on your assembled exterior bag about halfway.
- Keep the exterior bag right side out.
- Keep the lining bag wrong side out.
- Carefully insert the exterior bag into the lining bag, so their right sides are facing each other. The strap connector tabs should be tucked down between the layers.
- Align the top raw edges of both bags perfectly. Match the side seams. Pin all around the top opening securely.
- Stitch around the entire top opening with a 1/2 inch (1.25 cm) seam allowance. Backstitch at the start and end.
8. Finish the Bag
- Reach into the opening you left in the bottom of the lining bag. Carefully pull the entire bag through this opening until it’s right side out.
- Gently push out all corners, curves, and seams to create a neat, defined shape for your bag.
- Press the entire bag thoroughly, especially the top seam where the zipper is.
- Close the opening in the lining: Press the raw edges of the opening inwards by 1/2 inch (1.25 cm). Stitch the opening closed either by machine (topstitch very close to the edge for a quick finish) or by hand using an invisible ladder stitch for a seamless look.
- Push the lining down into the bag. Press the top edge of the bag again.
- Topstitch: For a professional finish and added durability, topstitch around the entire top opening of the bag, about 1/8 inch (0.3 cm) from the edge. This secures the lining to the exterior and prevents it from rolling out.
9. Attach the Webbing Strap
- Cut your webbing to your desired length (e.g., 40-50 inches / 100-125 cm).
- Attach the side release buckle:
- Thread one end of the webbing through one half of the side release buckle (the non-adjustable side). Fold the end over by about 1 inch (2.5 cm) and stitch it down securely to create a loop around the buckle. Stitch a rectangle with an “X” through it for strength.
- Thread the loose end of the webbing through the strap adjuster slide, going over the middle bar. Pull through about 2 inches (5 cm).
- Now, thread the remaining half of the side release buckle onto the webbing.
- Finally, loop the webbing end back through the strap adjuster slide, going under the middle bar. This creates your adjustable loop.
- Fold the raw end over by about 1 inch (2.5 cm) and stitch it down securely to create a loop around the adjuster slide. Stitch a rectangle with an “X” through it.
- Thread the exposed loops of the webbing strap through the D-rings on your bag’s strap connector tabs.
Customization Ideas for Your Belt Bag:
- Interior Pockets: Before assembling the lining, add a simple patch pocket to one of your lining panels.
- Zipper Pull: Add a decorative tassel, charm, or ribbon to your zipper pull for extra flair.
- Embroidery: Embroider your initials or a small design on the back panel before assembly.
- Different Flying Geese Layouts: Experiment with the size and arrangement of your geese units on the front panel.
You’ve now successfully created a unique and stylish Flying Geese Belt Bag! This hands-free accessory is not just practical but also a beautiful display of your sewing and quilting skills. Enjoy wearing your personalized creation!
Video tutorial: