by
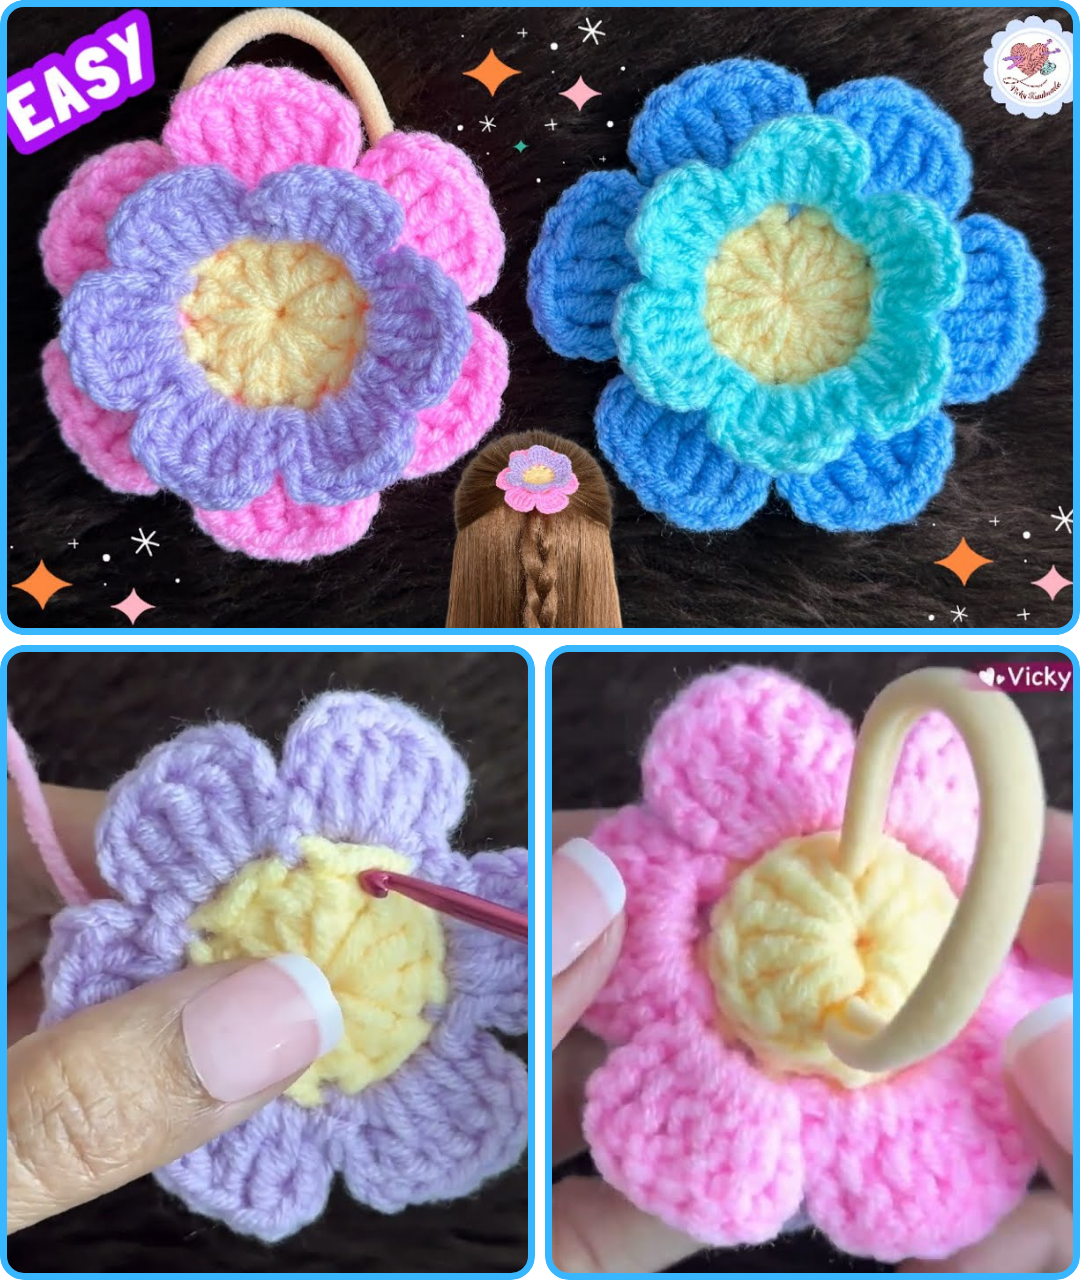
by You’re looking for a quick and charming crochet project that adds a handmade touch to your style, or makes a lovely small gift! An easy crochet flower hair tie fits the bill perfectly. This simple accessory combines a basic elastic hair tie with a delightful crocheted flower, transforming an everyday item into something special and decorative.
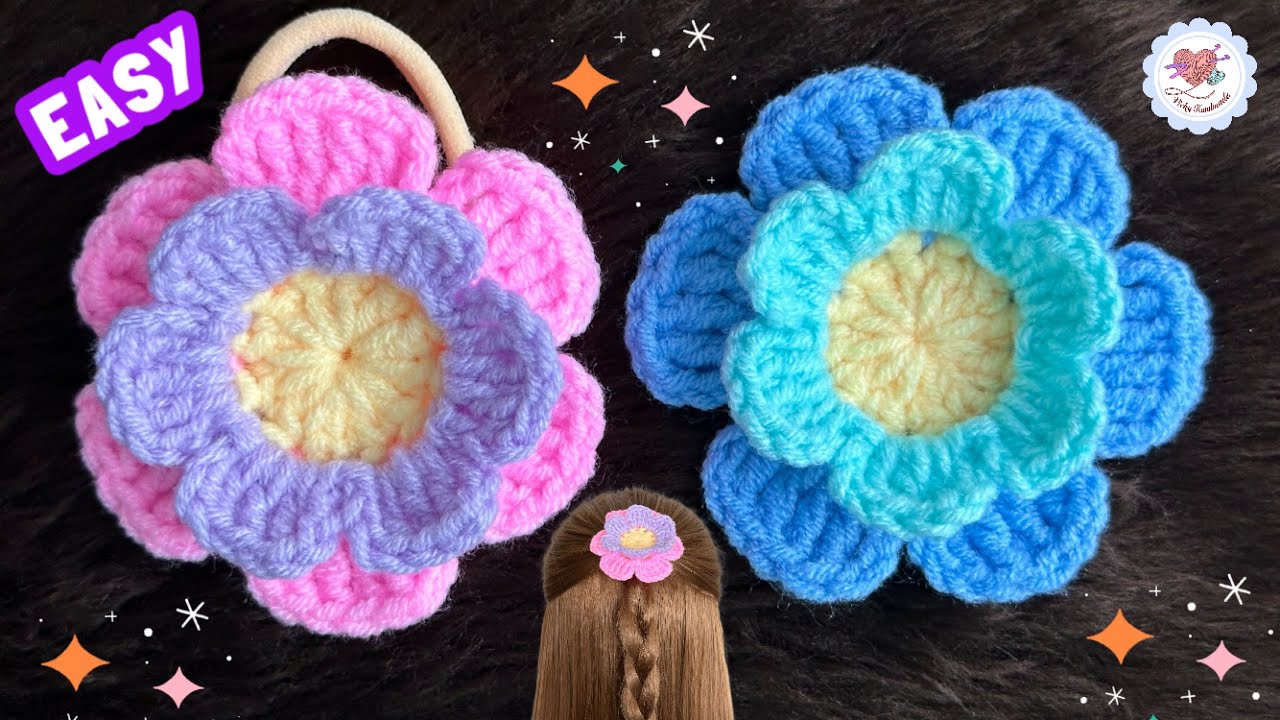
Bloom in Your Hair: An Easy Crochet Flower Hair Tie Tutorial
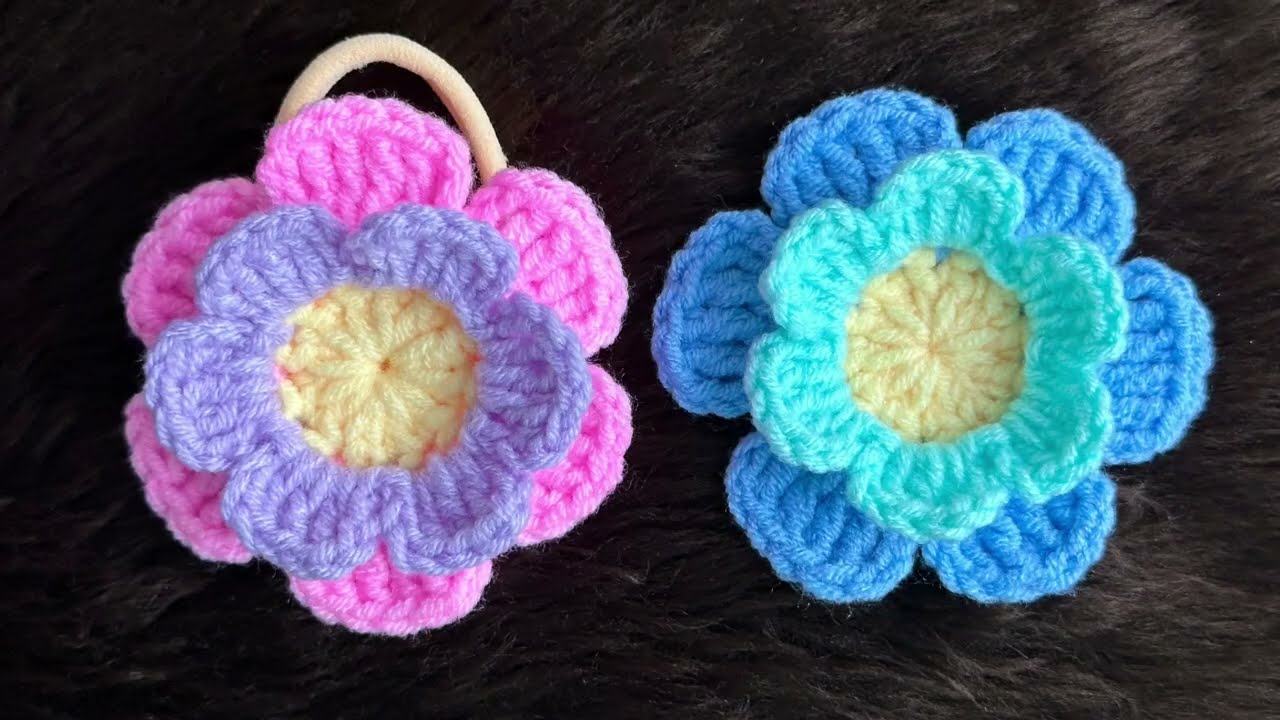
Adding a handmade touch to your everyday accessories is a wonderfully rewarding experience, and a crochet flower hair tie is one of the quickest and cutest ways to do it! This project is perfect for beginners looking to practice basic stitches and for experienced crocheters wanting a fast, satisfying craft. You can whip up a collection of these charming hair ties in various colors, matching them to outfits or gifting them to friends.
Why Crochet Your Own Flower Hair Ties?
- Quick & Easy: Most patterns can be completed in under an hour, making them perfect for instant gratification or last-minute gifts.
- Stash Buster: A fantastic way to use up those small amounts of leftover yarn from bigger projects.
- Customizable: Endless possibilities for color combinations, flower sizes, and styles to match any aesthetic.
- Personal Touch: Transform a simple elastic into a unique, decorative accessory.
- Beginner-Friendly: Uses fundamental crochet stitches, ideal for those just starting their crochet journey.
What You’ll Need:
- Yarn: Any weight of yarn will work, but DK (light worsted) or worsted weight cotton or acrylic yarn is generally recommended for good stitch definition and durability. Choose a color that pops!
- Small amounts of different colors for multiple flowers.
- Crochet Hook: A hook size appropriate for your chosen yarn. For worsted weight, a G (4.0 mm) or H (5.0 mm) hook is common. Check your yarn label for recommendations.
- Hair Tie (Elastic Band): A basic elastic hair tie (without any metal clasps) is best. Black or a neutral color usually works well.
- Tools:
- Yarn needle (for weaving in ends).
- Scissors.
Step-by-Step Tutorial: Simple Petal Flower
This is a very common and easy flower pattern that creates a lovely, full bloom. We’ll attach it directly to the hair tie as we crochet.
Common Abbreviations:
- ch: chain
- sl st: slip stitch
- sc: single crochet
- hdc: half double crochet
- dc: double crochet
- tr: treble crochet (also called triple crochet)
- st(s): stitch(es)
Instructions for One Flower:
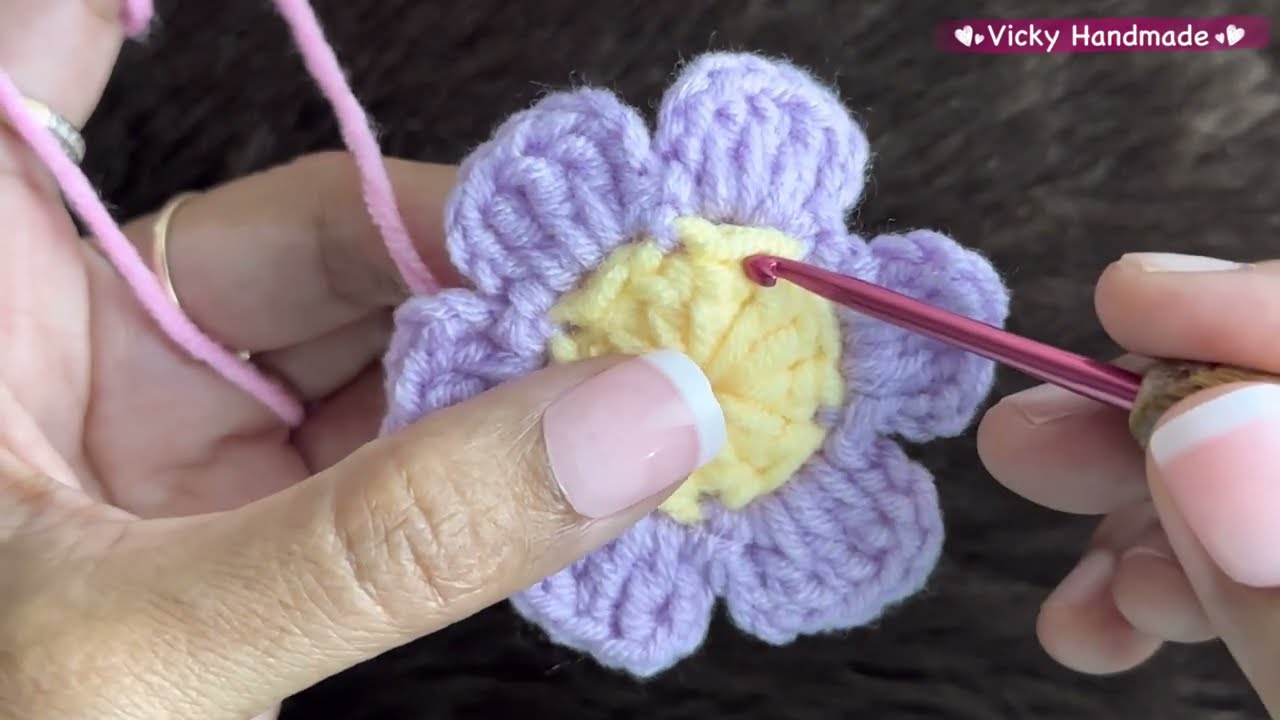
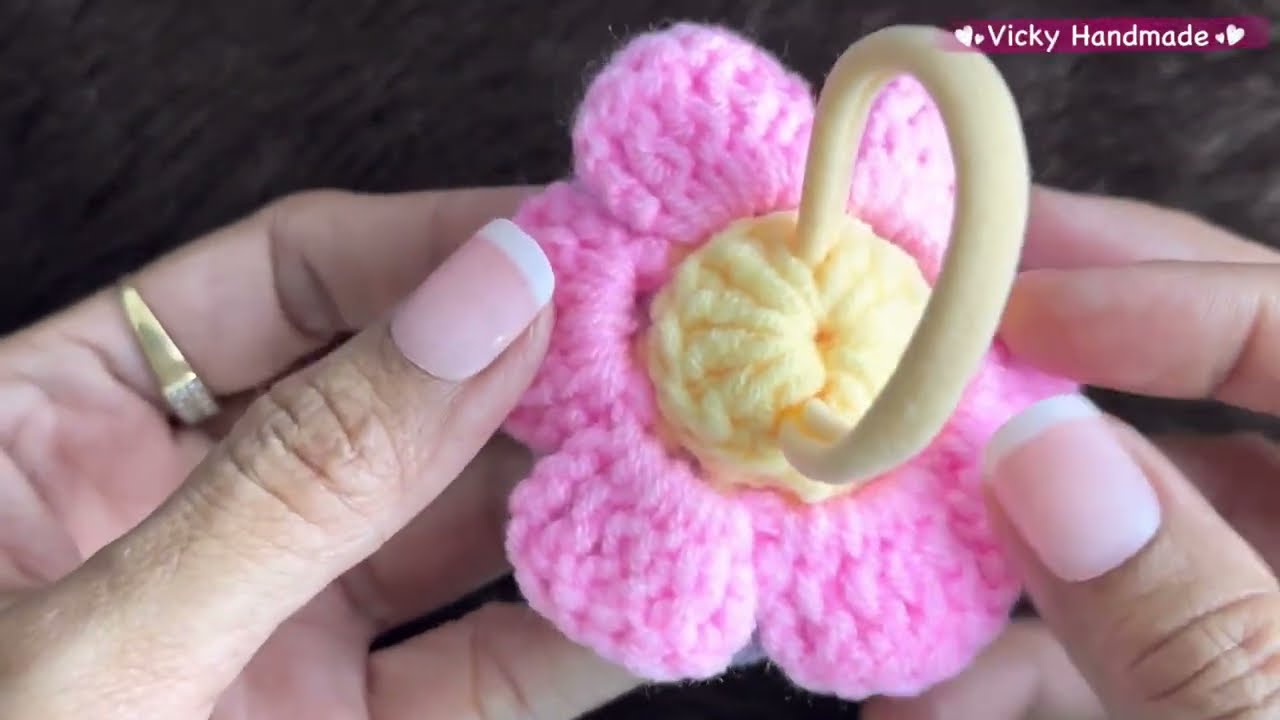
Important Note: When you see “work into hair tie,” you will literally insert your hook around the elastic hair tie itself, trapping the elastic within your stitches.
Step 1: Establishing the Base on the Hair Tie
- Take your hair tie.
- Join your yarn to the hair tie by making a slip knot on your hook, inserting your hook around the hair tie, yarn over, and pull up a loop. Yarn over and pull through both loops to make a single crochet (sc).
- Continue to sc around the hair tie until it is completely covered with stitches. Aim for a number of stitches that makes the hair tie slightly gathered but not stretched out. For a standard elastic, this might be 20-30 sc stitches.
- Join with a sl st to the first sc to form a circle. This creates the center of your flower.
Step 2: Creating the First Petal
- ch 2 (counts as first hdc for petal).
- Work 1 dc into the same stitch where you joined.
- Work 1 hdc into the next stitch.
- sl st into the next stitch.
- You’ve just completed your first petal!
Step 3: Repeating Petals
- ch 2 (counts as first hdc for next petal).
- Work 1 dc into the same stitch where you made the sl st.
- Work 1 hdc into the next stitch.
- sl st into the next stitch.
- Repeat these 4 steps (ch 2, 1 dc in same st, 1 hdc in next st, sl st in next st) around the entire circle, creating petals.
Step 4: Finishing the Flower
- Continue making petals until you’ve worked your way around the entire base. You might have to adjust your last petal slightly to fit the remaining stitches.
- After your final petal, sl st into the very first st of Round 1 where you started.
- Fasten off (cut yarn, leaving a 6-inch tail, then pull the tail through the loop on your hook to secure).
Step 5: Weave in Ends
- Using your yarn needle, carefully weave in all loose yarn ends into the back of your flower. Ensure they are secure so they don’t unravel.
Customization & Embellishment Ideas:
- Vary Petal Size:
- For smaller, daintier petals: Use (ch 1, 1 hdc in same st, sl st in next st).
- For larger, fuller petals: Use (ch 3, 1 tr in same st, 1 dc in next st, 1 hdc in next st, sl st in next st).
- Double Layer Flower: Make a smaller flower first, then make a slightly larger flower (perhaps using a different color) and sew the smaller one on top of the larger one.
- Center Embellishment: Sew a small button, bead, or a pearl to the center of your flower for extra sparkle.
- Picot Edging: Add a picot stitch (ch 3, sl st into first ch) to the tip of each petal for a delicate, pointed look.
- Yarn Choice: Experiment with different yarn types like fine mercerized cotton for a glossy look, or fluffy mohair blends for a soft, fuzzy bloom.
- Color Changes: Use multiple colors within the same flower, changing colors per round or even per petal!
You’ve now crocheted a lovely, custom-made flower hair tie! These make fantastic small gifts, party favors, or just a sweet way to add a pop of handmade charm to your own hairstyle. Which color will you make next?
Video tutorial: