by
by You’re looking to combine two beloved upcycling materials – an old shirt and a pair of jeans – into a super cute and practical mini tote bag! This project is a fantastic way to give new life to forgotten garments, creating a unique accessory that’s both stylish and sustainable.
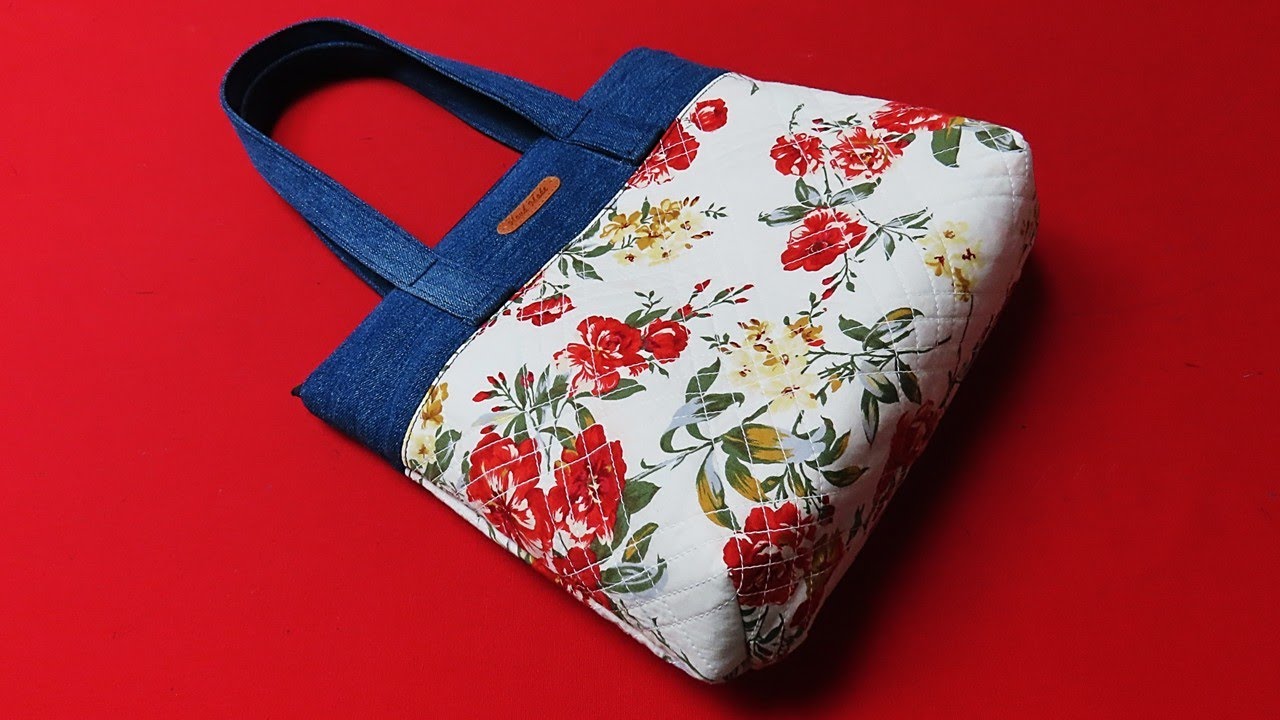
From Wardrobe to Wonderful: Sewing a Mini Tote Bag from an Old Shirt & Jeans
Got a favorite old shirt and a pair of worn-out jeans gathering dust? Don’t toss them! This project shows you how to transform these pre-loved garments into an adorable and surprisingly sturdy mini tote bag. It’s the perfect size for carrying essentials like your phone, wallet, keys, and a few small extras, making it ideal for quick errands, a casual outing, or as a charming gift. Plus, it’s a fantastic way to practice your sewing skills while being eco-friendly.
Why Combine a Shirt and Jeans?
- Texture & Contrast: Jeans offer sturdy structure and classic denim texture, while a shirt can provide softness, unique prints, or interesting colors, creating a visually appealing contrast.
- Sustainability: You’re giving two items a second life, significantly reducing textile waste.
- Personalized Style: The specific shirt and jeans you choose will make your bag truly one-of-a-kind.
- Durability: Denim is naturally tough, ensuring your mini tote can handle daily use.
- Skill Building: It’s a great way to work with different fabric weights and integrate existing garment features.
Choosing Your Materials Wisely
The type of shirt and jeans you pick will influence the final look and feel of your mini tote.
- Old Jeans:
- Denim Weight: Medium to heavy-weight denim works best for the bag’s body, providing good structure.
- Condition: Look for sections that are relatively free of holes or excessive wear, especially for the main panels. The legs are usually perfect.
- Features: Pockets, waistbands, or even belt loops can be incorporated into your design!
- Old Shirt:
- Fabric Type:
- Woven Cotton (button-down, flannel, chambray): Ideal for the top band, lining, or straps. They’re easy to work with and add a nice contrast.
- Knit/T-shirt Fabric: Can work for the lining or soft details, but might need interfacing if used for a main structured part.
- Print/Color: Choose a shirt with a fun print, a coordinating solid, or an interesting texture to complement the denim.
- Fabric Type:
- Lining Fabric (Optional but Recommended): About 1/4 to 1/2 yard of lightweight cotton (like quilting cotton). This adds durability and a clean finish to the inside of your bag. You might be able to use a second shirt for this.
- Interfacing (Optional): Lightweight to medium-weight fusible interfacing if your shirt fabric is thin or if you want extra stiffness for the bag’s top band or straps.
- Thread: All-purpose polyester thread that matches or contrasts with your fabrics (e.g., denim-colored thread for jeans, matching thread for the shirt).
- Sewing Machine: A machine capable of sewing through multiple layers of denim. A jeans needle (size 90/14 or 100/16) is highly recommended.
- Tools:
- Sharp fabric scissors or a rotary cutter with a new blade and mat.
- Measuring tape or a clear ruler.
- Fabric marker or tailor’s chalk.
- Plenty of strong pins or fabric clips (especially for thick seams).
- Iron and ironing board.
- Denim-specific tools: a hump jumper or jean-a-ma-jig can help sew over thick seams.
Disassembling Your Garments: The First Step
Carefully deconstructing your shirt and jeans will give you the best usable fabric pieces.
- Deconstruct Jeans: Lay the jeans flat. Cut off the legs just above the knee or where the fabric is still in good condition. Open up the inseam and outseam of the legs to get large flat panels of denim. Trim away any bulky seams. The back pockets can be cut off and reused.
- Deconstruct Shirt: Cut off the sleeves, collar, plackets, and side seams of the shirt to get the largest possible flat pieces of fabric from the front and back panels. Iron everything flat.
Designing & Cutting Your Bag Pieces
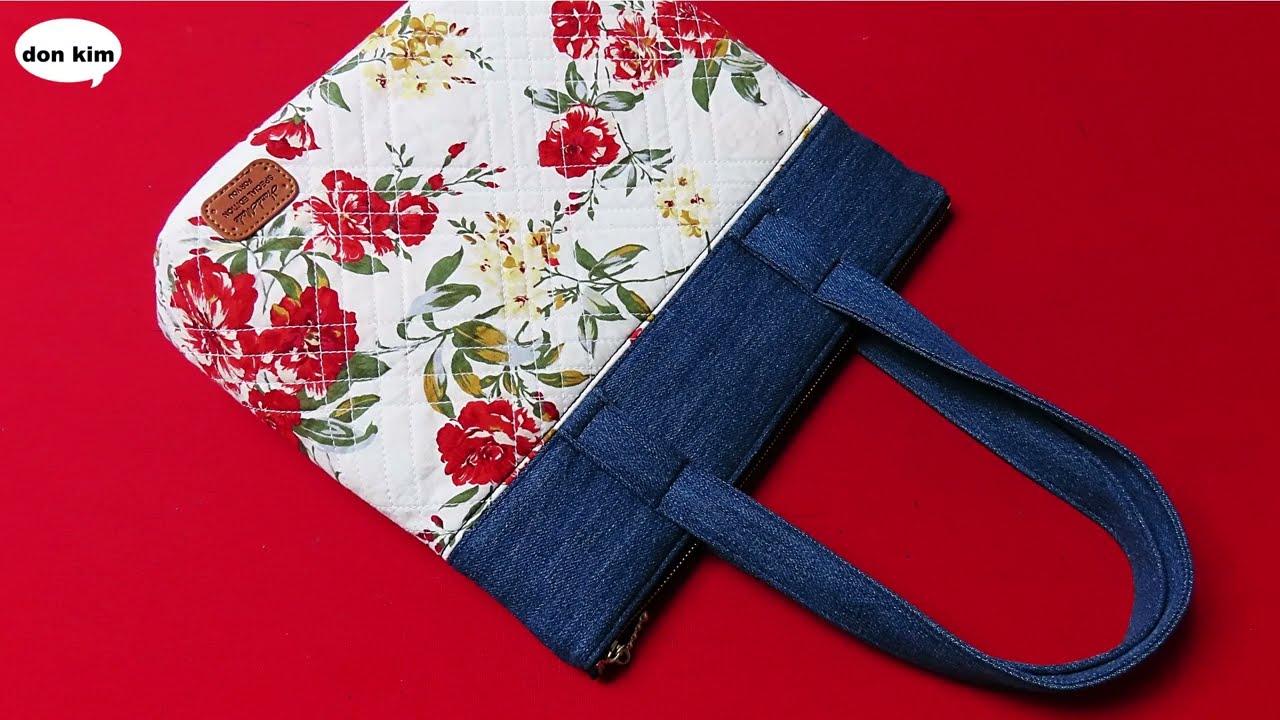
For a cute mini tote, we’ll aim for a finished size of approximately 8 inches wide x 9 inches tall x 3 inches deep.
- Main Bag Body (Cut 2):
- From Jeans Fabric: 9.5 inches wide x 7.5 inches tall (24 cm x 19 cm)
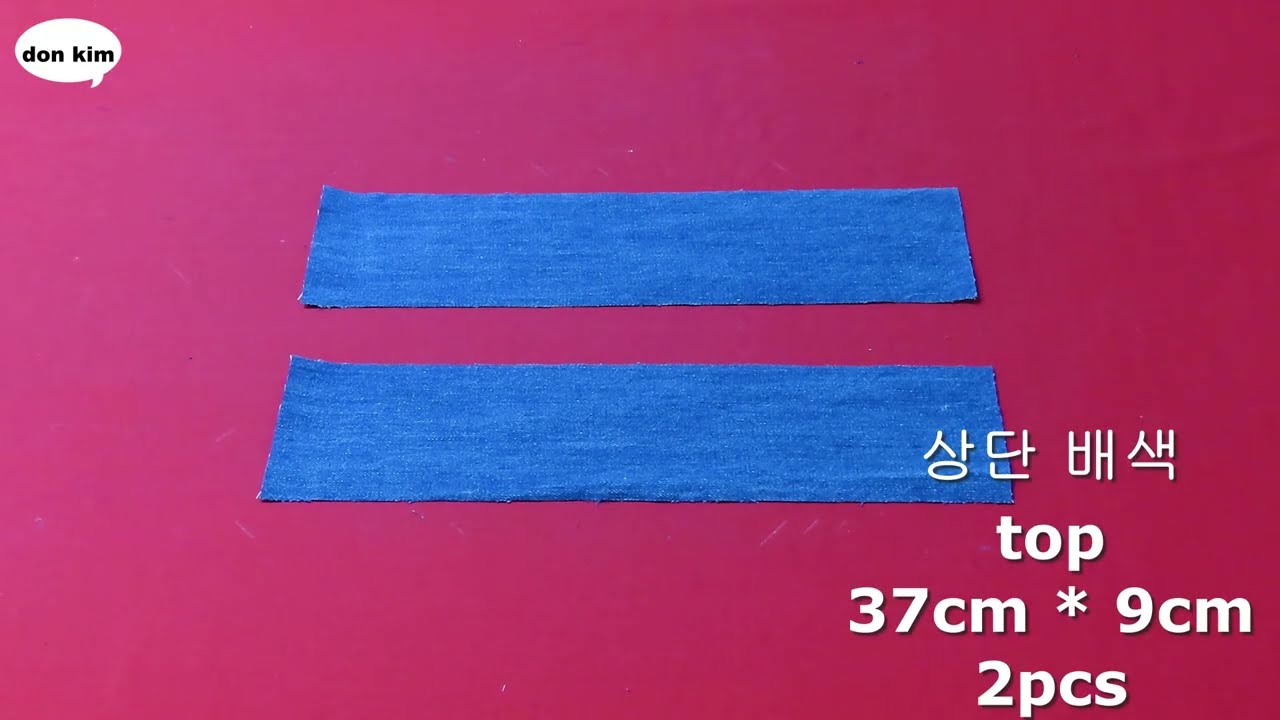
- Top Band (Cut 2):
- From Shirt Fabric: 9.5 inches wide x 4 inches tall (24 cm x 10 cm)
- Optional: Fuse lightweight interfacing to the wrong side of these pieces.
- Lining Panels (Cut 2):
- From Shirt Fabric (or other lining fabric): 9.5 inches wide x 10.5 inches tall (24 cm x 26.7 cm)
- Straps (Cut 2):
- From Shirt Fabric (or other sturdy fabric): 3 inches wide x 18 inches long (7.6 cm x 45.7 cm)
- Optional: Fuse lightweight interfacing to the wrong side of these pieces if the shirt fabric is thin.
- Optional: Jean Pocket (Cut 1): From the back pocket of your jeans. Trim neatly.
Note: All seam allowances are 1/2 inch (1.25 cm) unless otherwise stated.
Step-by-Step Sewing Instructions:
1. Prepare the Straps
- Take one strap piece. Fold it in half lengthwise, wrong sides together, and press. Open it up.
- Fold each long raw edge inwards to meet the center crease you just made. Press firmly.
- Now, fold the entire strap in half again along the original center crease, enclosing all raw edges. Press well. Your strap should now be 3/4 inch (1.9 cm) wide.
- Topstitch along both long edges of the strap, about 1/8 inch (0.3 cm) from the edge. This secures the strap and gives it a professional finish. Repeat for the second strap.
2. Assemble the Exterior Bag Body
- Attach Top Band to Main Body:
- Take one Jeans Main Bag Body piece and one Shirt Top Band piece. Place them right sides together, aligning one of the 9.5-inch edges. Pin.
- Stitch with a 1/2 inch (1.25 cm) seam allowance. Press the seam open or towards the darker denim for a cleaner look.
- Repeat for the other Jeans Main Bag Body piece and Shirt Top Band piece. You now have your two complete exterior panels.
- Optional: Attach Jean Pocket:
- If using an old jean pocket, position it onto the front exterior panel you just created. Pin in place.
- Topstitch around the three sides of the pocket (leaving the top open) to attach it securely. Use a heavy-duty needle and topstitching thread if desired.
- Sew Side and Bottom Seams:
- Place the two complete exterior panels right sides together, aligning all edges.
- Pin along the two side edges and the bottom edge.
- Stitch these three edges using a 1/2 inch (1.25 cm) seam allowance. Backstitch at the beginning and end of each seam.
- Boxed Corners: At each bottom corner, flatten the corner so the side seam meets the bottom seam, forming a triangle. Measure 1.5 inches (3.8 cm) from the tip of the triangle (where the seams cross) and draw a line perpendicular to the seam. Stitch along this line. Trim the excess corner away, leaving a 1/2 inch (1.25 cm) seam allowance. This creates a 3-inch (7.6 cm) deep box bottom.
- Leave the top edge open.
3. Assemble the Lining Bag
- Take your two Lining Panels.
- Place them right sides together, aligning all edges.
- Pin along the two side edges and the bottom edge. Stitch these three edges using a 1/2 inch (1.25 cm) seam allowance.
- Important: Leave an Opening! When sewing the bottom seam of the lining bag, leave a 3-4 inch (7.6-10 cm) opening in the middle of the seam. This opening will be used to turn the bag right side out later. Remember to backstitch securely at the beginning and end of this opening.
- Boxed Corners: Repeat the boxed corner steps from 2.3 for the lining bag.
- Leave the top edge open.
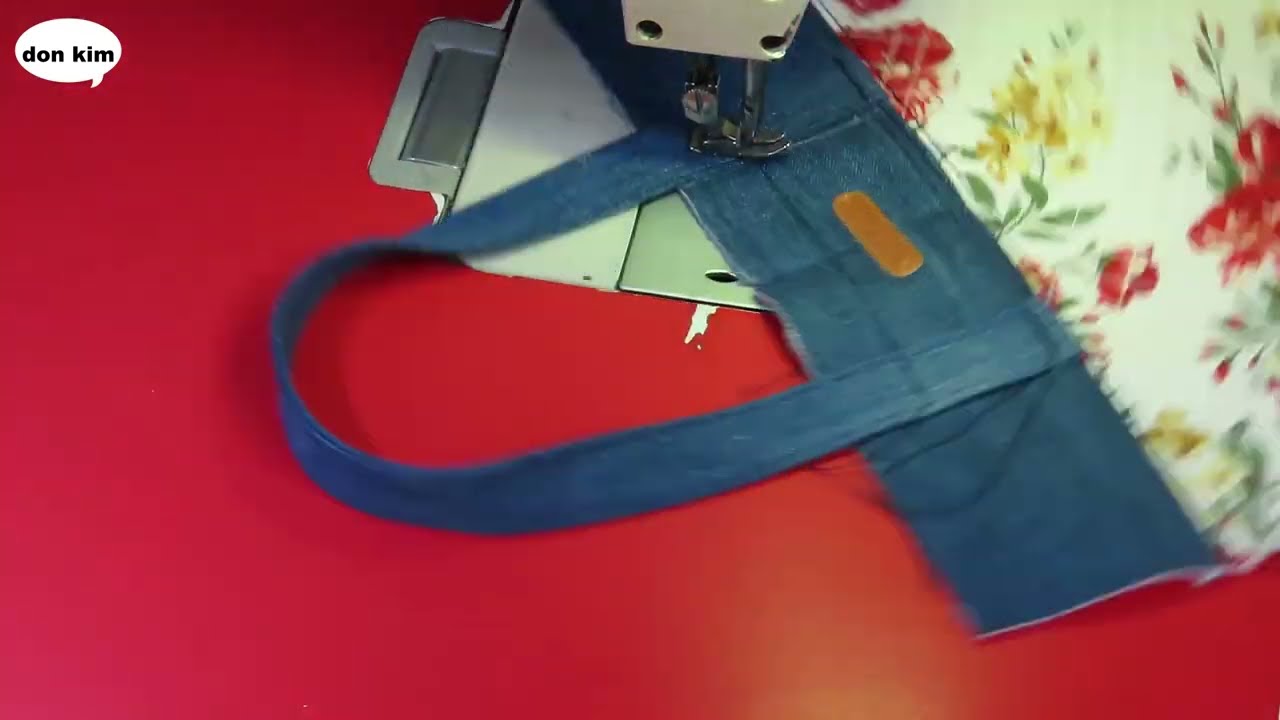
4. Attach the Straps to the Exterior Bag
- Turn your exterior bag right side out.
- Place one of your prepared straps. Measure in 2.5 inches (6.3 cm) from each top side edge of the exterior bag (this means from the top edge of the shirt fabric band).
- Align the raw ends of the strap with the top raw edge of the bag at these marks. Make sure the strap isn’t twisted. The strap will be pointing down into the bag.
- Pin the raw ends of the strap in place. Baste (stitch temporarily) them within the 1/4 inch (0.6 cm) seam allowance to secure them before final assembly. Repeat for the second strap.

5. Combine Exterior and Lining Bags
- Keep the exterior bag right side out, with the straps tucked inside.
- Keep the lining bag wrong side out.
- Carefully insert the exterior bag into the lining bag, so their right sides are facing each other. The strap ends should be sandwiched neatly between the exterior and lining layers.
- Align the top raw edges of both bags perfectly. Match the side seams and corner seams. Pin all around the top opening securely.
- Stitch around the entire top opening with a 1/2 inch (1.25 cm) seam allowance. Backstitch at the start and end.
6. Finish the Bag
- Reach into the opening you left in the bottom of the lining. Carefully pull the entire bag through this opening until it’s right side out.
- Gently push out all corners and seams to create a neat, crisp bag shape.
- Press the entire bag, especially the top seam where the lining meets the exterior.
- Close the opening in the lining: Press the raw edges of the opening inwards by 1/2 inch (1.25 cm). Stitch the opening closed either by machine (topstitch very close to the edge) or by hand using an invisible ladder stitch for a cleaner finish.
- Push the lining down into the bag. Press the top edge of the bag again.
- Topstitch: For a professional finish and added durability, topstitch around the entire top opening of the bag, about 1/8 to 1/4 inch (0.3-0.6 cm) from the edge. This secures the lining to the exterior and prevents it from rolling out.
Customization & Embellishment Ideas:
- Shirt Details: Incorporate a shirt pocket onto the outside of the denim, or use the shirt’s button placket as a decorative accent on the bag’s front.
- Distressing: If your jeans had natural distressing or rips, you could strategically place them for a trendy look.
- Embroidery/Patches: Add some hand embroidery, fabric paint, or iron-on patches to personalize your denim.
- Fringe: Cut a small fringe along the top denim seam line before attaching the shirt band for a fun detail.
- Internal Pockets: Before assembling the lining, add a simple patch pocket (from shirt scraps) to one of the lining panels for small items.
Your cute and unique mini tote bag, born from old shirts and jeans, is now ready for its debut! It’s a testament to creativity, sustainability, and your growing sewing skills. Enjoy carrying your one-of-a-kind creation!
Video tutorial: