by
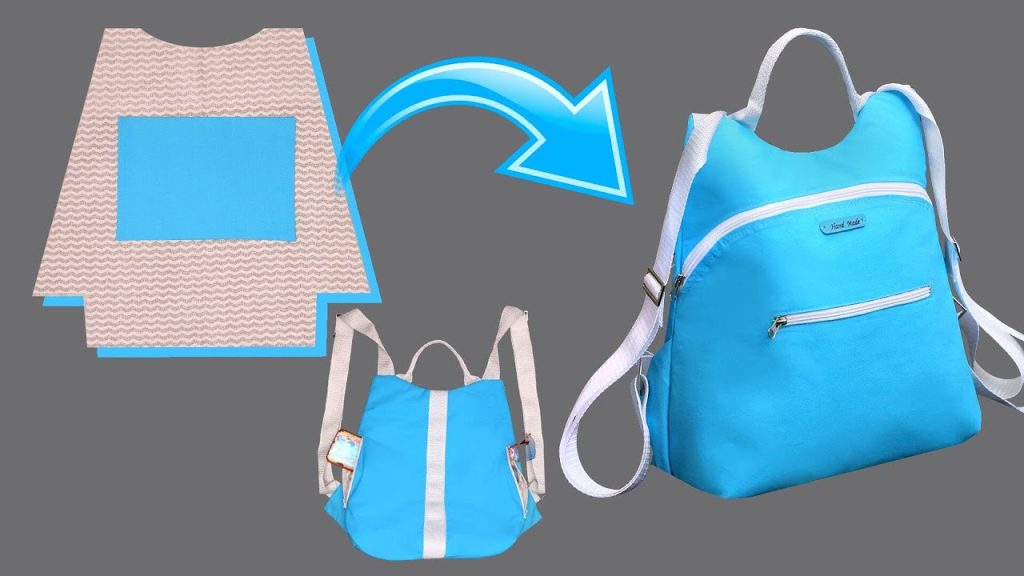
by Hello, sewing community! Are you looking for a stylish, modern backpack that emphasizes clean lines and surprisingly simple construction? I’m excited to share the pattern for the Architect Drawstring Backpack—a tall, structured, rectangular bag that manages to be both chic and incredibly easy to sew.
Inspired by a fantastic tutorial showing how to sew the easiest rectangular backpack, this design utilizes a single main pattern piece to form the body and introduces a quick drawstring closure at the top. It’s perfect for using up thicker fabrics like canvas, denim, or even upholstery remnants, giving the finished bag an impressive, sturdy look.
Grab your heavy-duty fabric and let’s create a minimalist masterpiece!
Why You’ll Love Making This Backpack:
- Clean, Structured Silhouette: The rectangular shape is modern and holds its form well, especially with interfacing.
- Minimalist Construction: Uses only three main pieces—no complicated curves or rounded corners.
- Beginner-Friendly: The technique for the drawstring top is straightforward and fast.
- Versatile: Perfect for school, day trips, or a sleek commuter bag.
What You’ll Need:
- Main Fabric: 1 yard of sturdy fabric (canvas, denim, twill, or faux leather).
- Lining Fabric: 1 yard of lightweight cotton or similar lining material.
- Fusible Interfacing: 1 yard of medium-weight fusible interfacing (for all main fabric pieces).
- Drawstring Cord/Rope: 3 yards (2.7 meters) of thick, sturdy cord or rope (5–7 mm thick).
- Hardware (Optional): 2 large metal grommets (1/2 inch) for the cord exit holes.
- Tools:
- Sewing Machine (with heavy-duty needle if using thick fabric).
- Ruler, Fabric Marker, and Scissors/Rotary Cutter.
- Safety pin or bodkin (for threading the cord).
- Grommet installation kit (if using grommets).
Measurements & Cutting List
The final bag size will be approximately 12 inches wide x 16 inches high x 4 inches deep. All measurements include a 1/2-inch (1.2 cm) seam allowance.
| Piece | Fabric | Dimensions (Width x Height) | Quantity | Interfacing? | Notes |
| A: Main Body | Main Fabric | 32 in. x 17 in. | 1 | Yes | This forms the front, bottom, and back of the bag. |
| B: Side Gusset | Main Fabric | 4 in. x 34 in. | 1 | Yes | The long strip that runs up the sides. |
| C: Lining Body | Lining Fabric | 32 in. x 17 in. | 1 | No | Lining for the main body. |
| D: Lining Side Gusset | Lining Fabric | 4 in. x 34 in. | 1 | No | Lining for the side gusset. |
| E: Handle Loop | Main Fabric | 2 in. x 6 in. | 1 | Yes | For the top carry loop. |
Construction: Building the Drawstring Backpack
Part 1: Preparing the Fabric & Panels
- Fuse Interfacing: Apply the medium-weight fusible interfacing to the wrong side of all three Main Fabric pieces: (A) Main Body, (B) Side Gusset, and (E) Handle Loop.
- Prepare Handle Loop: Take (E). Press the long edges inward by 1/4 inch, then fold the strip in half lengthwise and press again. Topstitch along both long edges. Fold in half to create a loop.
Part 2: Sewing the Outer Shell
- Prep the Body Panel (A): Fold the long (A) Main Body piece in half (16 in. x 17 in.) to find the center bottom crease. This crease marks where the front and back of the bag meet the bottom.
- Attach Side Gusset (B):
- Start pinning the (B) Side Gusset to the (A) Main Body panel, beginning at the center bottom crease. Pin the gusset up the side, across the top, and down the other side.
- Sew the Gusset to the Main Body using a 1/2-inch seam allowance to create the 3D rectangular shell. The top edge remains open.
- Attach Handle Loop (E): Find the center back of the top opening. Pin the raw ends of the (E) Handle Loop to the raw top edge. Baste securely.
Part 3: Sewing the Lining Shell
- Create the Lining: Repeat Step 2 of Part 2 with the (C) Lining Body and (D) Lining Side Gusset.
- Crucial Turning Hole: When joining the (C) Lining Body and (D) Lining Side Gusset, leave an unstitched opening of about 6 inches (15 cm) along the bottom edge of the lining gusset. This hole is essential for turning the bag later.
Part 4: The Drawstring Casing
- Fold and Press: Along the top raw edge of the Outer Shell, measure down 2 inches (5 cm). Fold the raw edge down to this line and press. Fold it down again by 1.5 inches (4 cm) to create the casing. Pin this fold securely.
- Stitch Casing: Stitch close to the bottom folded edge to create the drawstring channel. Ensure the handle loop remains secured at the back.
Part 5: Final Assembly
- Insert and Turn: Turn the Outer Bag Shell right-side out. Keep the Lining Shell inside out. Slide the Outer Bag inside the Lining Bag, aligning the top edges perfectly (right sides facing).
- Sew Top Seam: Pin the remaining raw edges (the top perimeter of the lining and the casing) together. Sew the top seam with a 1/2-inch seam allowance all the way around.
- Turn Right-Side Out: Reach into the 6-inch opening in the lining bottom. Gently pull the entire bag through this hole.
- Close and Finish: Stitch the opening in the lining closed (by hand slipstitch or machine stitch). Tuck the lining neatly inside the outer bag. Press the top casing edge flat.
Part 6: Inserting the Drawstring & Straps
- Grommets (Optional): Install two metal grommets on the lower-front panel of the bag, approximately 1 inch (2.5 cm) up from the bottom seam and 1 inch (2.5 cm) in from the side seams. (If skipping grommets, the cord loops will simply exit the casing and run down the sides.)
- Thread the Cord:
- Cut the 3 yards of cord in half to create two long pieces (4.5 feet each).
- Cord 1: Using a safety pin, thread the cord through the casing, starting at the back right of the bag, going all the way around, and exiting at the front right.
- Cord 2: Thread the second cord through the casing, starting at the back left, going all the way around, and exiting at the front left.
- Create Straps:
- Take the two cord ends on the front right. Bring them down the side of the bag. If using grommets, thread them through the right grommet and knot them securely inside the bag. This forms the right shoulder strap.
- Repeat for the two cord ends on the front left, threading them through the left grommet and knotting them securely.
Your Architect Drawstring Backpack is complete—a sturdy, chic, and functional bag perfect for your daily adventures!
Video tutorial: