by
by You’re looking to sew a versatile accessory that anyone can use! A DIY unisex crossbody bag is a fantastic project, blending practicality with style suitable for all. The beauty of making your own is that you can choose fabrics, colors, and features that appeal to a broad audience, making it a perfect everyday carry for essentials.
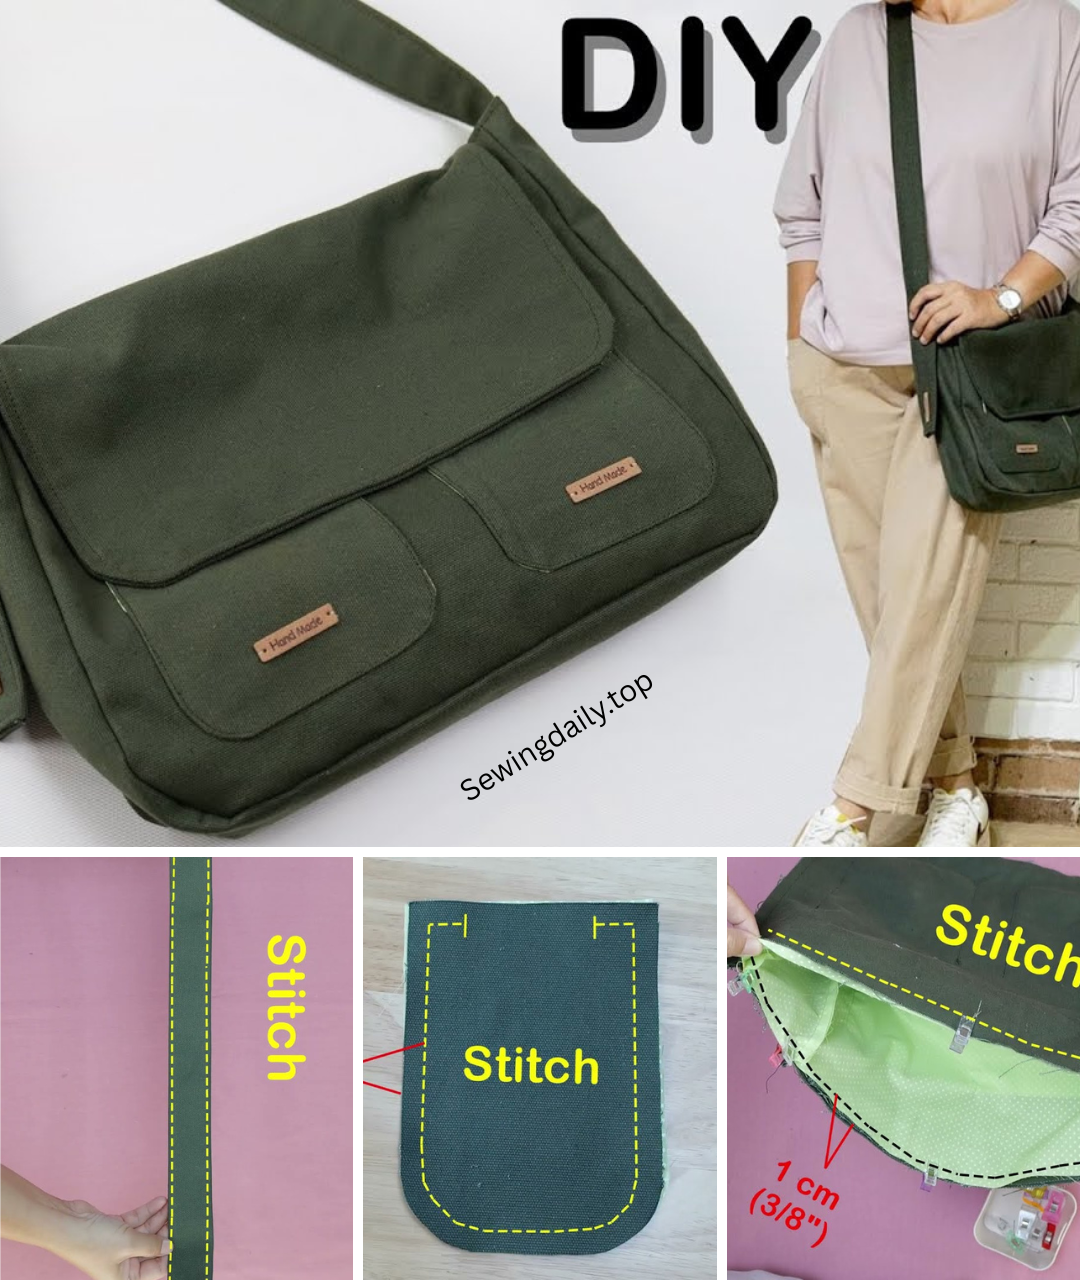
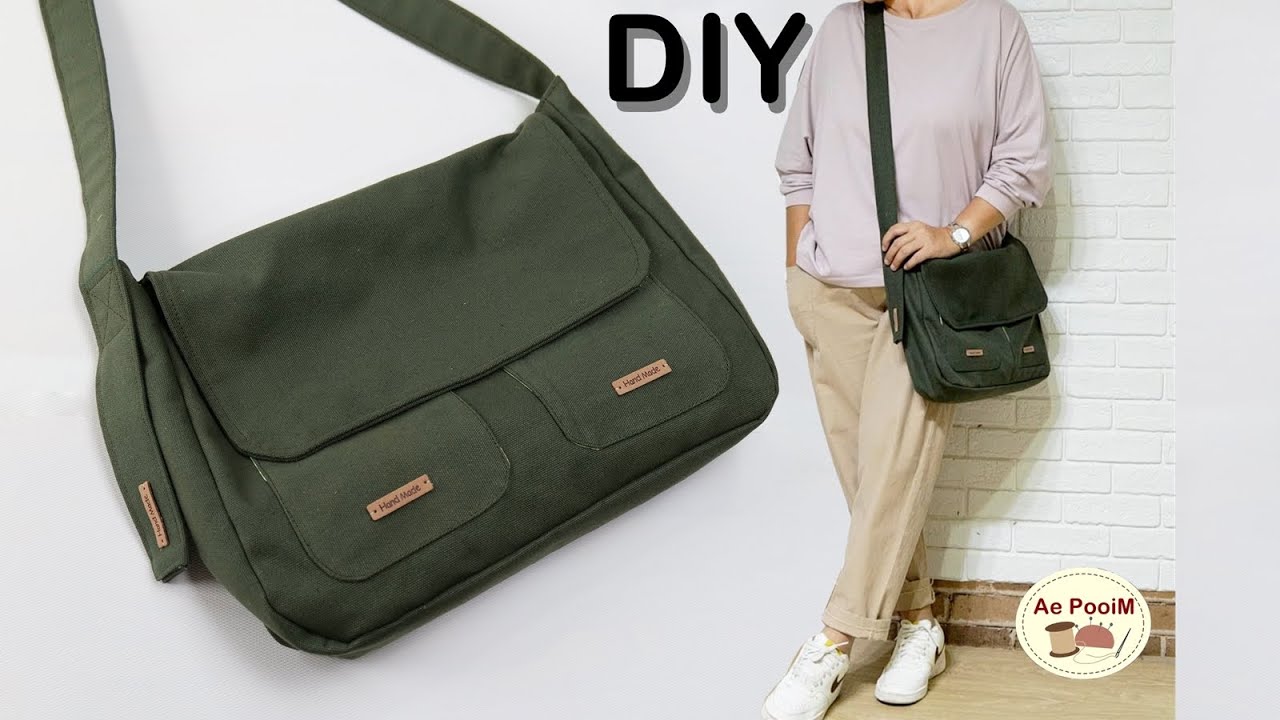
Stitch Your Own Style: A DIY Unisex Crossbody Bag
Crossbody bags are the ultimate hands-free accessory, celebrated for their convenience and comfort. When designed with a unisex aesthetic, they become a go-to bag for anyone, regardless of gender. This project focuses on creating a bag that’s both durable and stylish, with a streamlined design that appeals universally, perfect for carrying daily essentials like a phone, wallet, keys, and a small notebook.
Why Sew a Unisex Crossbody Bag?
- Versatility: Designed to be suitable for everyone, making it a great gift or personal staple.
- Practicality: Keeps hands free and essentials secure, ideal for commutes, travel, or errands.
- Customization: Choose fabrics, hardware, and pocket configurations that match any personal style.
- Sustainability: A rewarding way to upcycle materials or use fabrics you love, reducing waste.
Choosing Your Materials
The key to a great unisex bag lies in durable, appealing fabrics and sturdy hardware.
- Exterior Fabric (1/2 yard / 0.45 meters): Opt for robust, medium to heavy-weight fabrics like canvas, waxed canvas, denim, twill, corduroy, or a sturdy upholstery fabric. Earth tones, classic blues, grays, blacks, and subtle patterns work well for a unisex appeal.
- Lining Fabric (1/2 yard / 0.45 meters): A medium-weight cotton like quilting cotton, broadcloth, or a lighter canvas is ideal. Choose a color or subtle pattern that complements your exterior fabric.
- Interfacing (1/2 yard / 0.45 meters): Heavyweight fusible interfacing (e.g., Pellon SF101, Decovil Light) is highly recommended. It gives your bag structure, prevents sagging, and ensures it holds its shape beautifully.
- Zipper (1): A 10-12 inch (25-30 cm) nylon coil zipper for the main compartment. Nylon is durable and easy to sew.
- Hardware:
- D-rings (2): 1-inch (2.5 cm) or 1.5-inch (3.8 cm) internal diameter, matching your strap width.
- Swivel Clasps (2): To match your D-rings.
- Strap Adjuster Slide (1): To match your D-rings.
- Thread: All-purpose polyester thread in a color that matches or subtly contrasts with your fabrics.
- Tools:
- Sewing machine (with a zipper foot)
- Fabric scissors or rotary cutter and mat
- Measuring tape or ruler
- Fabric marker or tailor’s chalk
- Pins or fabric clips
- Iron and ironing board
- Safety pin or loop turner (for strap)
Understanding the Bag Dimensions and Cutting List
This guide will create a versatile medium-sized crossbody bag, approximately 9 inches wide x 10 inches tall x 2 inches deep (23 cm x 25.5 cm x 5 cm). Feel free to adjust these dimensions to suit your preferences.
- Main Bag Panels (Cut 2 each):
- Exterior Fabric: 10″ W x 11″ H (25.5 cm x 28 cm)
- Lining Fabric: 10″ W x 11″ H (25.5 cm x 28 cm)
- Heavyweight Fusible Interfacing: 9″ W x 10″ H (23 cm x 25.5 cm) – Fuse centered on wrong side of exterior fabric.
- Side/Bottom Gusset (Cut 1 each):
- Exterior Fabric: 3″ W x 23″ L (7.6 cm x 58.5 cm)
- Lining Fabric: 3″ W x 23″ L (7.6 cm x 58.5 cm)
- Heavyweight Fusible Interfacing: 2″ W x 22″ L (5 cm x 56 cm) – Fuse centered on wrong side of exterior fabric.
- Zipper Panel Strips (Cut 2 each):
- Exterior Fabric: 10″ W x 2″ H (25.5 cm x 5 cm)
- Lining Fabric: 10″ W x 2″ H (25.5 cm x 5 cm)
- Strap Connector Tabs (Cut 2):
- Exterior Fabric: 4″ W x 2″ H (10 cm x 5 cm)
- Heavyweight Fusible Interfacing: 3″ W x 1″ H (7.6 cm x 2.5 cm)
- Adjustable Strap Piece (Cut 1):
- Exterior Fabric: 4″ W x 50″ L (10 cm x 127 cm) – Adjust length for desired crossbody fit.
- Heavyweight Fusible Interfacing: 3″ W x 49″ L (7.6 cm x 124.5 cm)
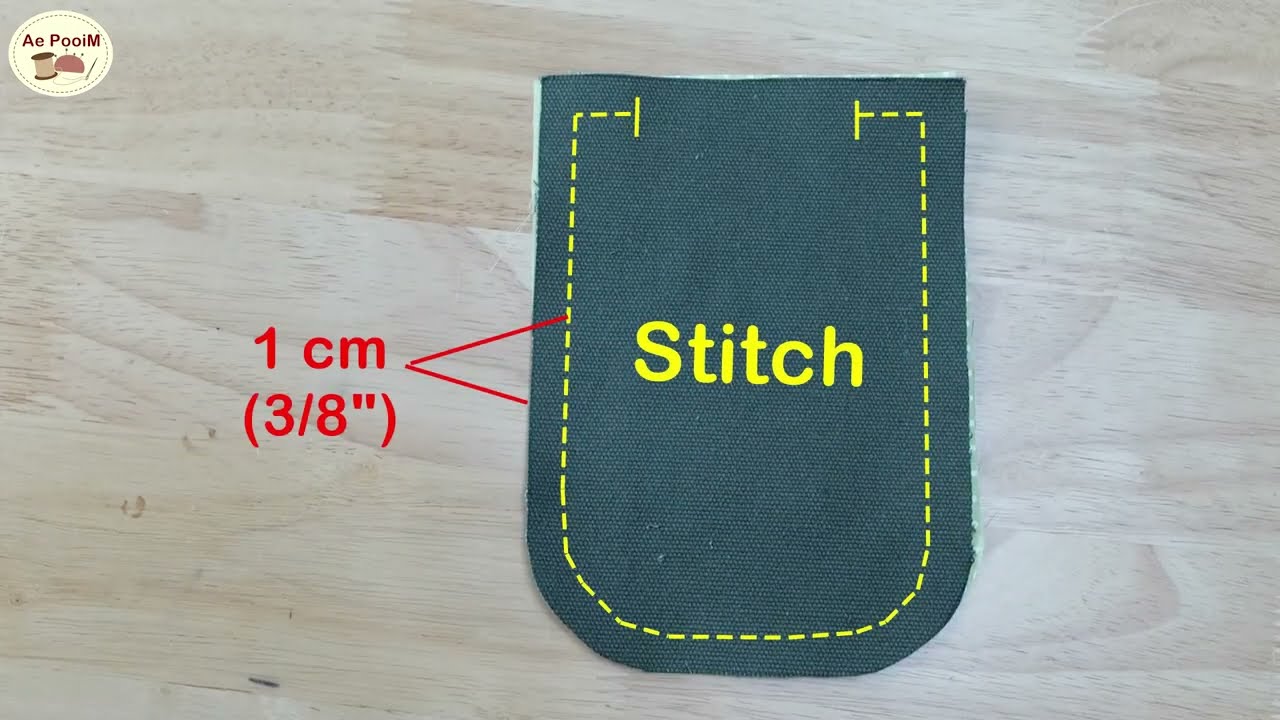
Note: All seam allowances are 1/2 inch (1.25 cm) unless otherwise stated.
Step-by-Step Sewing Instructions:
1. Prepare Your Fabric Pieces
- Cut all fabric pieces according to the dimensions provided.
- Fuse interfacing: Center and fuse the heavyweight interfacing to the wrong side of all exterior fabric pieces (Main Bag Panels, Gusset, Zipper Panel Strips, Strap Connector Tabs, Adjustable Strap Piece). Press firmly to ensure good adhesion.
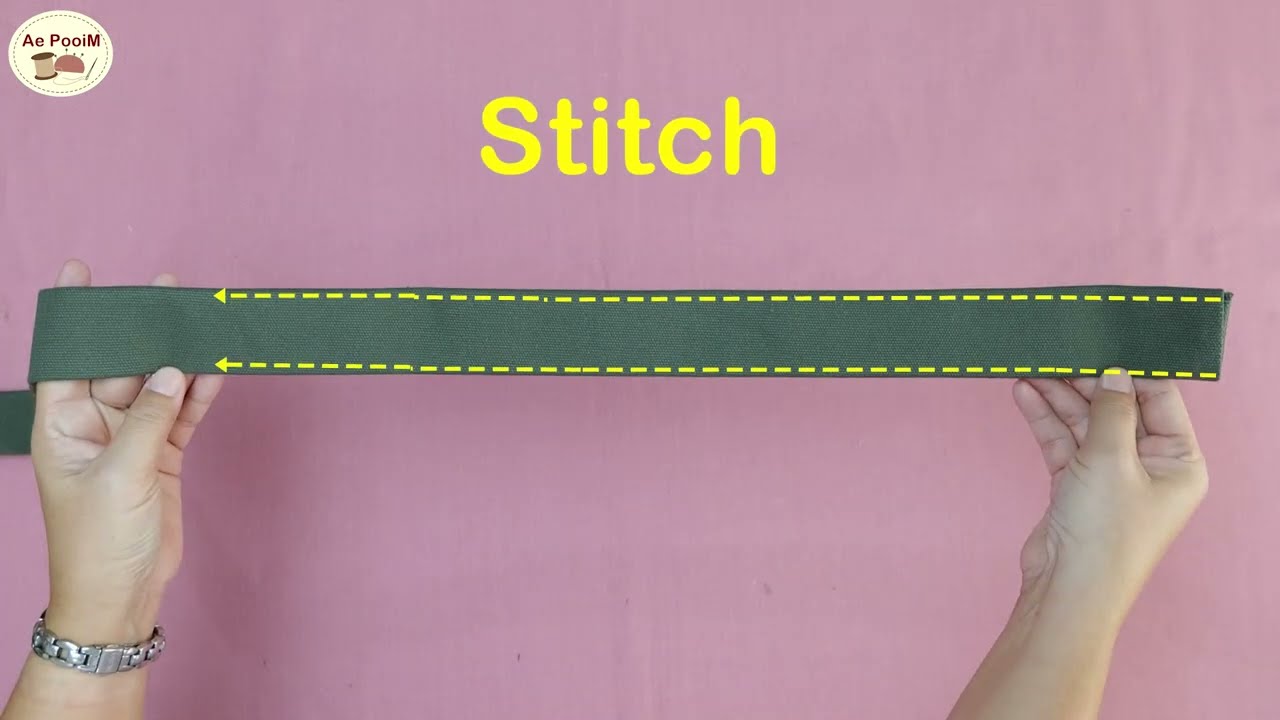
2. Assemble the Adjustable Strap
- Take your quilted adjustable strap piece. Fold it in half lengthwise, wrong sides together, and press.
- Open it up. Fold each long raw edge inwards to meet the center crease you just made. Press firmly.
- Now, fold the entire strap in half again along the original center crease, enclosing all raw edges. Press well. Your strap should now be 1 inch (2.5 cm) wide.
- Topstitch along both long edges of the strap, about 1/8 inch (0.3 cm) from the edge, for a neat and durable finish.
- Attach hardware:
- Thread one end of the strap through one swivel clasp. Fold the end over by about 1 inch (2.5 cm) and stitch it down securely, forming a loop around the clasp. Stitch a rectangle with an “X” through it for extra strength.
- Take the other end of the strap and thread it through the strap adjuster slide, going over the middle bar. Pull through about 2 inches (5 cm).
- Thread the remaining swivel clasp onto this end of the strap.
- Now, loop this strap end back through the strap adjuster slide, going under the middle bar. This creates your adjustable loop.
- Fold the raw end over by about 1 inch (2.5 cm) and stitch it down securely, forming a loop around the adjuster slide. Stitch a rectangle with an “X” through it.
3. Prepare the Strap Connector Tabs
- Take each strap connector tab piece. Fold it in half lengthwise, wrong sides together, so it measures 2″ W x 2″ H (5 cm x 5 cm). Press.
- Open it up. Fold the long raw edges in to meet the center crease. Press. Now fold the entire piece in half along the original center crease. Press again. You should have a sturdy strip measuring 1″ W x 2″ H (2.5 cm x 5 cm) with all raw edges enclosed.
- Topstitch along both long edges, 1/8 inch (0.3 cm) from the edge.
- Thread one D-ring onto each tab. Fold the connector in half around the D-ring, creating a loop with the D-ring at the top. The raw ends should be aligned. Baste the raw ends together with a 1/8 inch (0.3 cm) seam allowance.
4. Assemble the Zipper Panel
- Take one Exterior Zipper Panel Strip (10″ W x 2″ H). Place your main zipper right side down along one of the long edges. Align the top edge of the zipper tape with the top edge of the fabric. Pin in place.
- Place one Lining Zipper Panel Strip (10″ W x 2″ H) on top of the zipper and the exterior strip, right side down, aligning all raw edges. The zipper is now sandwiched between the exterior and lining pieces. Pin.
- Using your zipper foot, stitch along this edge (1/2 inch / 1.25 cm seam allowance), sewing through all three layers (exterior, zipper tape, lining).
- Press the fabric pieces away from the zipper teeth, so the exterior and lining are pulled flat. Topstitch along the folded edge, 1/8 inch (0.3 cm) from the zipper teeth, through all layers.
- Repeat steps 1-4 for the other side of the zipper, attaching the remaining exterior and lining zipper panel strips. You should now have a continuous zipper panel with exterior fabric on one side and lining fabric on the other.
5. Assemble the Bag Bodies (Exterior and Lining)
- Exterior Bag:
- On your Exterior Main Bag Panels, mark the center of the top and bottom edges.
- On your Exterior Gusset piece, mark the center of each short end and the center of the long edges.
- Take one Exterior Main Bag Panel. At its top corners, attach a strap connector tab at each side, aligning its raw ends with the top raw edge of the panel. The D-ring should point downwards into the bag. Baste in place within the 1/2 inch (1.25 cm) seam allowance.
- Align the center mark of the gusset’s long edge with the center mark of the bag panel’s bottom edge, right sides together. Pin, starting from the center and working your way around the bottom corners and up the sides. Match the raw edges precisely.
- Stitch the gusset to the panel with a 1/2 inch (1.25 cm) seam allowance. Go slowly around the curves, clipping the gusset’s seam allowance if needed to ease it around the curve. Backstitch at the start and end.
- Repeat this process for the other Exterior Main Bag Panel.
- Turn the exterior bag right side out and gently push out the seams and corners. Press well.
- Lining Bag:
- Repeat the exact same steps for your Lining Fabric Gusset and Lining Panels, creating the lining bag body.
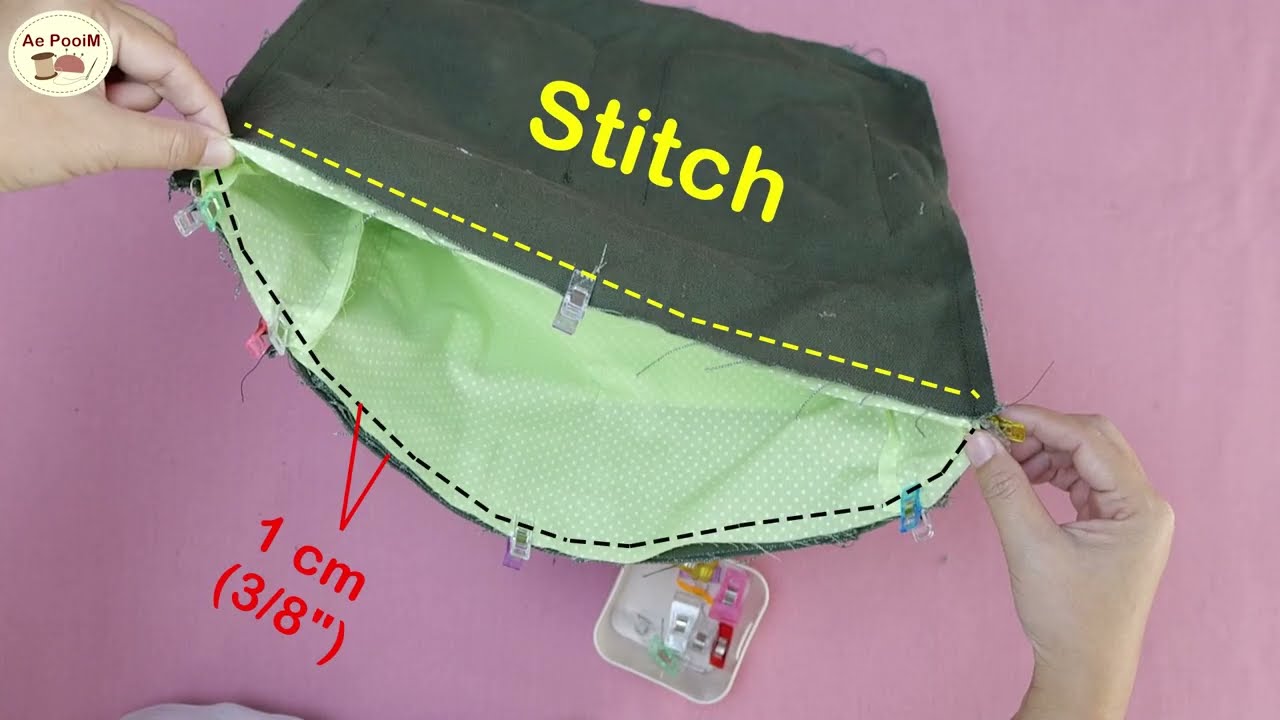
- Important: When sewing the second lining panel to the lining gusset, leave a 4-5 inch (10-12.7 cm) opening along the bottom of the lining gusset. This opening will be used to turn the bag right side out later. Backstitch securely at the beginning and end of this opening.
6. Combine Bags with Zipper Panel
- With your exterior bag right side out, find the center of its top opening on both the front and back. Mark these.
- Find the center of the exterior side of your zipper panel.
- Align the center of the exterior side of the zipper panel with the center front of the exterior bag’s top opening, right sides together. Pin the entire exterior perimeter of the zipper panel to the top opening of the exterior bag.
- Stitch the zipper panel to the exterior bag with a 1/2 inch (1.25 cm) seam allowance.
- Repeat for the lining bag: With your lining bag wrong side out, align the center of the lining side of the zipper panel with the center front of the lining bag’s top opening. Pin the entire lining perimeter of the zipper panel to the top opening of the lining bag.
- Stitch the zipper panel to the lining bag with a 1/2 inch (1.25 cm) seam allowance.
7. Final Assembly and Finishing Touches
- Reach into the opening you left in the bottom of the lining. Carefully pull the entire bag through this opening until it’s right side out.
- Gently push out all corners and curves to create a neat shape.
- Press the entire bag, especially the top seam where the zipper panel meets the main bag.
- Close the opening in the lining: Press the raw edges of the opening inwards by 1/2 inch (1.25 cm). Stitch the opening closed either by machine (topstitch very close to the edge) or by hand using an invisible ladder stitch for a cleaner finish.
- Push the lining down into the bag. Press the top edge of the bag again.
- Topstitch: For a professional finish and added durability, topstitch around the entire top opening of the bag, about 1/8 to 1/4 inch (0.3-0.6 cm) from the edge. This secures the lining to the exterior and prevents it from rolling out.
- Attach the swivel clasps of your adjustable strap to the D-rings on the bag.
Customization Ideas for a Truly Unisex Bag:
- Pockets: Add simple patch pockets to the interior lining panels before assembling the lining bag for better organization. A single, wide pocket can hold a phone or small notebook.
- Hardware Finishes: Choose hardware in antique brass, gunmetal, or matte black for a more universally appealing look.
- Minimal Embellishments: Keep external embellishments minimal, focusing on the quality of the fabric and stitching.
- Color Blocking: Use two complementary solid fabrics for a sophisticated, modern look. For example, a dark gray main body with a black gusset.
You’ve now created a durable, stylish, and functional unisex crossbody bag, perfect for anyone’s daily adventures! What’s the first place you’ll take your new handmade bag?
Video tutorial: