 by
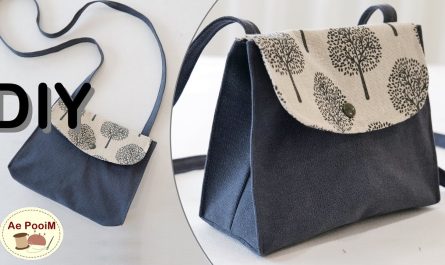
by This bag is designed with a fold‑over flap (that folds down about halfway on the front), includes one or two exterior pockets, plus interior lining with pocket(s), an optional key leash, and a strap you can wear cross‑body or over shoulder. The design balances rugged denim aesthetic with clean finishing.
Finished Dimensions
- Width (bottom): 12 in (≈30.5 cm)
- Height (body, not including flap): 10 in (≈25.5 cm)
- Depth (gusset/bottom): 4 in (≈10 cm)
- Flap drop (folds down): 6 in (≈15 cm)
- Strap drop: adjustable; idea is approx 24‑28 in (≈60‑70 cm) when worn cross‐body; you can shorten for shoulder use.
Materials & Tools
| Item | What to use / size | Notes |
|---|---|---|
| Old jeans | One pair, medium/heavy denim; use areas with large panels (thighs, seat) | Use pockets (back/front) etc. for feature details. |
| Lining fabric | Cotton duck, canvas, quilting cotton (~½ yd) | For lighter lining; if pocket heavy, use stronger fabric. |
| Fusible interfacing | Medium weight for flap and bottom base | Adds structure so bag holds its shape. |
| Thread | Heavy‐duty denim or polyester thread; contrast color works well | Strong stitches needed for stress points. |
| Magnetic snap or turn lock | One set | For flap closure. Optional buckle or leather strap. |
| Strap hardware (optional) | Slide adjuster; D‑rings; clasp for key leash | For adjustable strap + internal key tether. |
| Sewing machine needles | Denim / jeans size (90/14 or higher) | For passing through thick layers. |
| Misc tools | Scissors, rotary cutter, ruler, pins or clips, chalk or fabric marker, iron, seam ripper | Standard kit. |
Pattern Pieces & Cutting
Below are all the pattern pieces you will need. Lay out your denim panels first (old jeans) to decide where to place pockets and panels; pockets you want to reuse should be left intact, or only partially trimmed.
| Piece | Quantity | Size (inches) | Source (denim or lining) |
|---|---|---|---|
| Exterior – Front Body Panel | 1 | 12 × 10 | Denim |
| Exterior – Back Body Panel | 1 | 12 × 10 | Denim |
| Bottom / Base Panel | 1 | 12 × 4 | Denim |
| Side Gussets | 2 | 10 × 4 | Denim |
| Flap Panel | 1 | 12 × 6 | Denim |
| Strap | 1 | ~ 50 × 2.5 (adjustable) | Denim or webbing |
| Optional Exterior Pocket(s) | e.g. 1 back pocket piece, or patch pocket ~ 6×6 in | Using denim pocket or cut from denim | |
| Lining – Front Body | 1 | 12 × 10 | Lining |
| Lining – Back Body | 1 | 12 × 10 | Lining |
| Lining – Bottom | 1 | 12 × 4 | Lining |
| Lining – Side Gussets | 2 | 10 × 4 | Lining |
| Flap Lining | 1 | 12 × 6 | Lining |
| Interior Pocket | 1 | e.g. 6 × 8 | Lining (optional) |
| Key Leash Strap | 1 | ~6 × 1.5 | Lining or scrap; with D‑ring or clasp |
Step‑by‑Step Construction
Step 1: Prepare the Materials
- Wash old jeans (if not already washed) to remove shrinkage and dirt.
- Remove pocket bags if using them elsewhere; clean up seams.
- Cut out all pieces as per the table above. Be careful with matching grain so bag hangs well (denim’s warp/weft matters).
- Fuse interfacing:
- to the bottom/base piece (exterior) to stiffen base.
- to the flap panel (exterior) to prevent sagging.
Step 2: Exterior First Assembly
- Base & Side Gussets: Sew side gussets to the long edges of the base panel. You’ll first attach one side gusset to one long side, then the other; press seams toward gusset or base for neatness.
- Front & Back Panels:
- Sew front body panel to base/gussets: align bottom edge to base’s long edge, sides to side gussets.
- Then attach back body panel similarly. Now you have a “box” shape.
- Add Exterior Pockets & Details
- If using existing jean back pocket, position it on front body panel. Top align or measure downward (e.g., 2 in from top edge).
- Patch pockets: hem top edge, topstitch, attach sides and bottom, reinforce corners.
- Optional: belt loops, rivets, decorative topstitching on flap edges etc.
Step 3: Lining & Interior Work
- Construct lining box similarly: attach lining bottom + side gussets + lining front/back panels. Leave top edges open.
- Interior Pocket & Key Leash
- On one lining front/back piece, mark pocket position (e.g. 3 in below top edge, centered or offset). Hem top edge, topstitch, then stitch sides and bottom.
- For key leash: attach small strap (from scrap) to lining side seam before you assemble lining body; include a D‑ring or clasp at end.
Step 4: Flap
- Construct flap: if you want lining in flap, sandwich a piece of lining flap to the exterior flap (right sides together), sew around edges (leave bottom of flap open), turn and press. Otherwise, simply finish raw edges and topstitch.
- Add closure hardware:
- On flap exterior side: attach magnetic snap/turn‑lock.
- On front body (exterior), measure so that when flap folds down, it meets properly, and attach the matching part of closure.
Step 5: Strap
- Strap construction:
- If making from denim: cut strap piece, fold lengthwise, fold raw edges under or use a folded tube method; topstitch along both edges.
- If adjustable: install slide adjuster hardware; ends of strap should have reinforced stitching, maybe using small denim accent pieces.
Step 6: Join Exterior & Lining
- Insert Strap Ends: Position strap ends on exterior body side seams (inside edge of side gussets), pin or baste in place. Ensure orientation is correct, no twist.
- Assemble Exterior + Lining:
- Exterior right side out; lining inside‑out.
- Insert exterior into lining so that exterior’s right side touches lining’s right side; strap ends sandwiched between.
- Align top edges and side seams, clip/pin all around.
- Sew Top Edge: Sew around top edge with seam allowance (~½ in); catch all layers.
- Turn Bag: Pull right side through opening (or pull exterior through lining if leaving lining inside‑out). Push lining into body; press top edge flat.
- Close Lining Gap: If you left a gap in lining (for turning or positioning), hand‑stitch or machine‑stitch it closed invisibly.
Step 7: Finishing Touches
- Topstitching: Topstitch around top edge ~¼ in from edge to stabilize, give clean finish. Topstitch flap perimeter and optionally bottom‑front base seam.
- Edge Treatment: Trim any bulky seam allowances; if needed, grade seams or trim corners to reduce bulk at side bottom corners.
- Test & Adjust: Hang strap, test closure flap, check if bag holds shape. If flap is saggy, you can add an extra interfacing or thin stabilizer.
Design Variations & Custom Options
- Size Adjustment: Want the bag larger for laptop? Increase width to 14‑16 in, depth to 5‑6 in; flap proportionally longer.
- Closure Variations: Instead of magnetic snap, use buckle straps, leather straps, a zipper under the flap (for extra security).
- Decoration: Embroidery, patches, painted denim, contrast stitching.
- Mixed Denim Shades: Use different parts of jeans (lighter / darker) for front vs. back vs. flap.
- Multi‑Compartment Inner Lining: Add zipper pocket, multiple slip pockets, or even a removable insert.
- Alternate Strap Styles: Use chain, leather, webbing; or add hardware to detach strap so it can convert to clutch style.
Care Instructions
- Spot clean as much as possible; denim can bleed, so wash inside out in cold water if needed.
- Use mild detergent; avoid harsh bleach.
- Air dry or tumble low heat; reshape while damp for bag to hold form.
- Store stuffed (newspaper or soft fabric) so it keeps shape, especially flap.
Summary
By following this pattern and guide, you’ll turn old jeans into a stylish fold‑over shoulder or cross‑body bag — fully lined, with pockets inside and out, and a sturdy strap. The flap adds functionality and aesthetic interest; the lining and finishing give polish; the reuse gives sustainability.
Video tutorial: