by
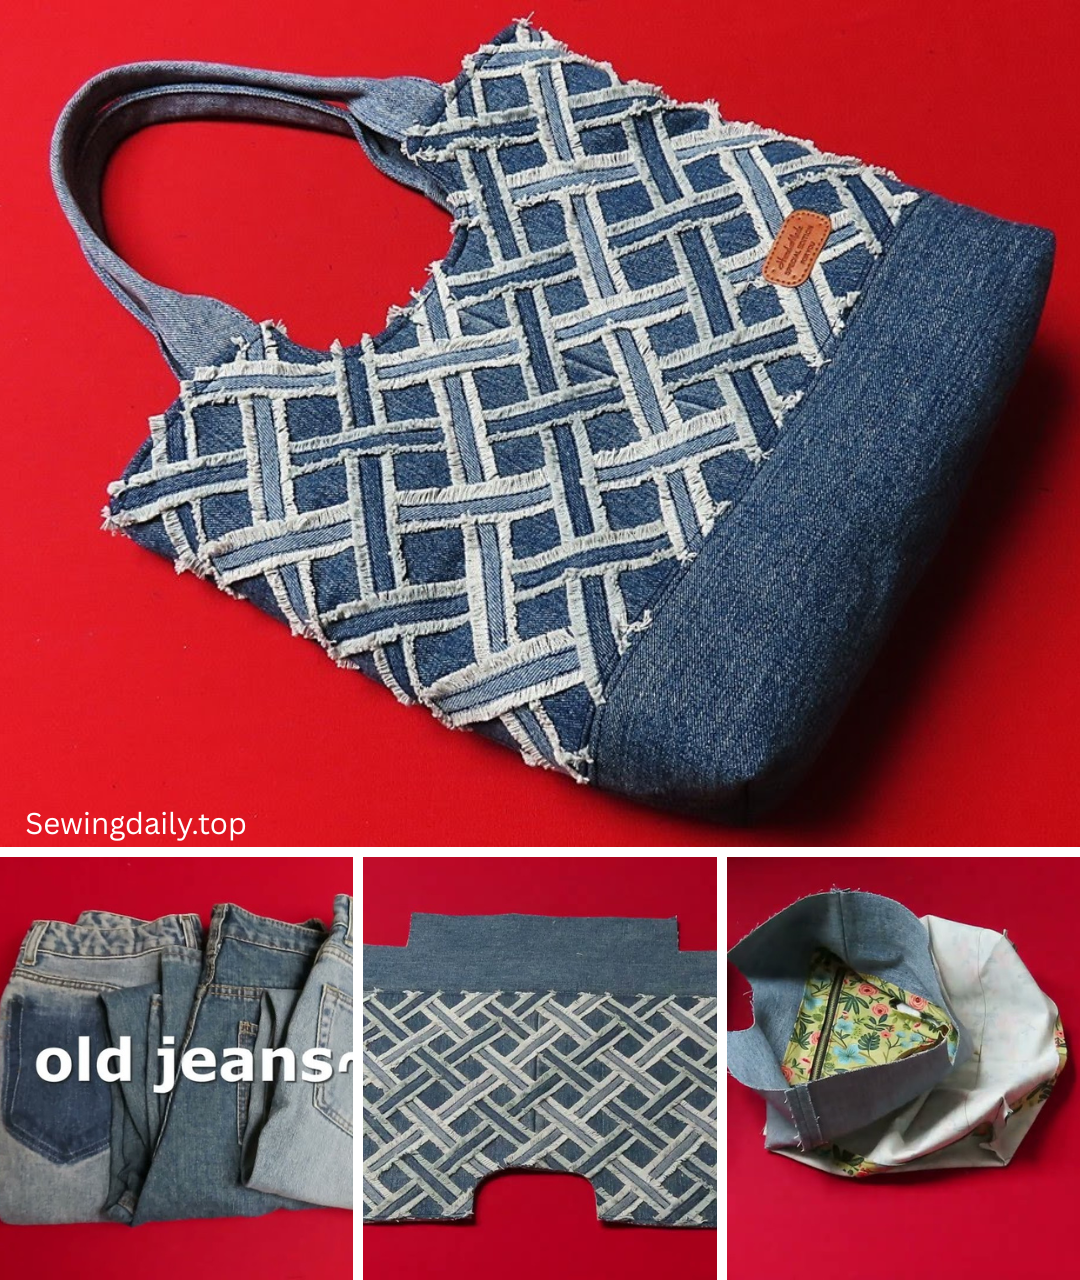
by Got a pair of old jeans you love but can’t wear anymore? Don’t toss them! You can transform that durable denim into a stunning, luxury tote bag. This isn’t just any DIY project; it’s an opportunity to create a high-quality, sustainable accessory that rivals designer pieces. The secret lies in elevating the denim with thoughtful details, premium hardware, and precise construction, turning everyday material into something truly special.
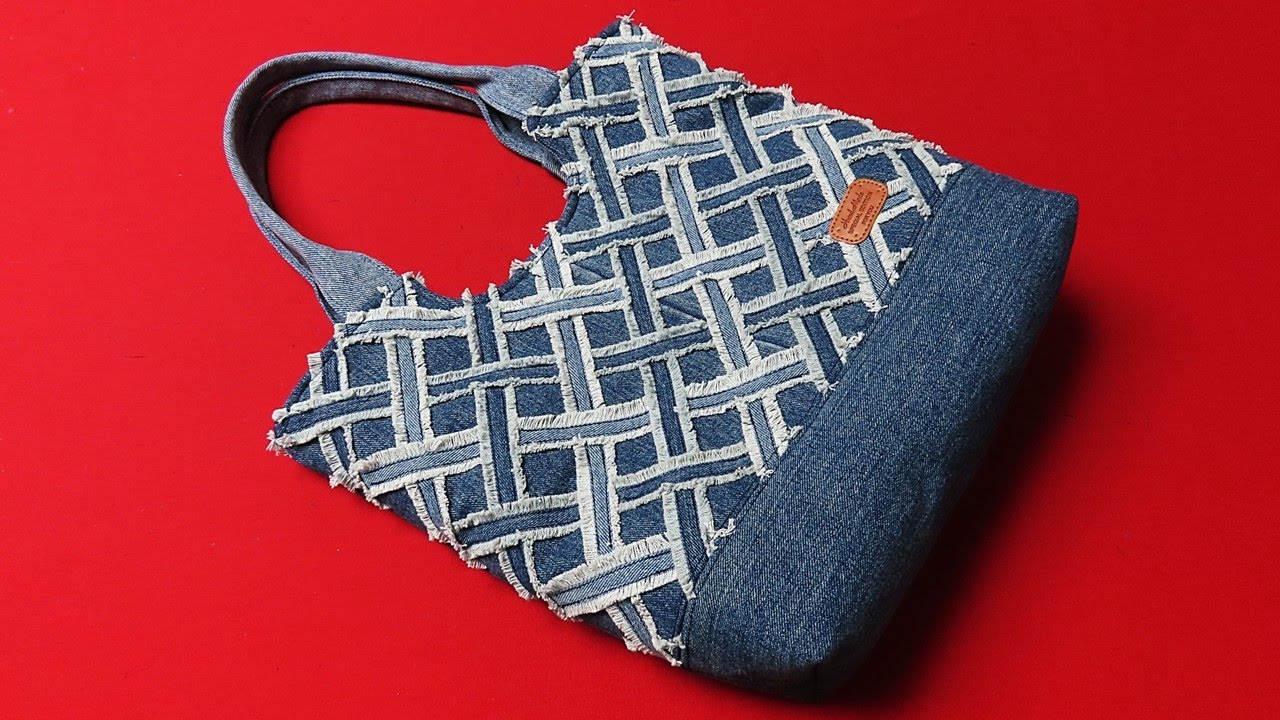
From Denim to Designer: Sewing a Luxury Tote Bag from Old Jeans
The humble denim of your old jeans holds incredible potential. With a touch of creativity, meticulous sewing, and a focus on luxurious details, you can elevate it into a sophisticated and durable tote bag. This project is about more than just upcycling; it’s about crafting a bespoke accessory that speaks to your unique style and commitment to sustainable fashion.
Why Transform Jeans into a Luxury Tote?
- Sustainable Chic: Give new life to discarded denim, reducing waste and embracing eco-friendly fashion.
- Unmatched Durability: Denim is incredibly tough, ensuring your tote will withstand years of use.
- Unique Aesthetic: The inherent texture and subtle variations of denim create a one-of-a-kind look that can’t be replicated with new fabric.
- Customization is Key: You control every detail, from the lining to the hardware, making a bag that perfectly suits your needs and taste.
- The “Wow” Factor: People will be amazed when they realize your chic tote was once a pair of jeans!
Elevating Your Denim: Material Selection for a Luxury Feel
The difference between a basic denim tote and a luxury one lies in the details. Invest in quality components.
- Old Jeans:
- High-Quality Denim: Look for jeans made from sturdy, premium denim (think heavier weight, minimal stretch). The more substantial the denim, the more luxurious your finished bag will feel. A darker wash or raw denim can provide a more sophisticated base.
- Condition: Choose sections of the jeans that are free from excessive wear, holes, or stains, especially for the main body panels. The legs offer large, clean sections.
- Lining Fabric:
- Silk, Satin, Cotton Sateen, or Heavyweight Linen: Opt for a fabric with a beautiful drape and feel. A contrasting color or a subtle, elegant pattern can add a pop of luxury when the bag is opened. You’ll need about 1 yard (0.9 meters).
- Interfacing:
- Heavyweight Fusible Interfacing (e.g., Pellon 70 Peltex II Ultra Firm or Decovil Heavy): This is CRUCIAL for giving your bag structure, body, and a high-end feel. It prevents slouching and adds crispness. You’ll need about 1 yard (0.9 meters).
- Hardware: This is where you can truly elevate the bag.
- High-Quality Metal Zippers: Heavy-duty brass or antique brass zippers for the main compartment and any internal/external pockets. Choose smooth-gliding zippers.
- Solid Metal D-rings, Swivel Clasps, and Strap Adjuster: In finishes like antique brass, gunmetal, or polished nickel. Match the finish throughout.
- Metal Bag Feet (Optional): Adds protection to the bottom and a professional touch.
- Magnetic Snap or Turn Lock (Optional): For an interior closure if not using a top zipper.
- Webbing for Straps (Optional):
- Heavyweight Cotton, Leather, or Seatbelt Webbing: For sturdy, comfortable straps that complement the denim. You’ll need about 1.5 to 2 yards (1.4 to 1.8 meters). Alternatively, you can craft straps entirely from denim with interfacing.
- Thread:
- Heavy-Duty Polyester or Topstitching Thread: For visible topstitching on denim (think gold, cream, or black for classic denim contrast).
- All-Purpose Polyester Thread: To match your lining and for construction seams.
- Tools:
- Robust Sewing Machine: Capable of handling multiple layers of thick denim and interfacing.
- Jeans Needles (Size 100/16 or 110/18): Essential to prevent broken needles and skipped stitches.
- Walking Foot: Highly recommended for feeding thick, slippery, or multiple layers evenly.
- Rotary Cutter with a New Blade, Quilting Ruler, and Large Cutting Mat: For precise, straight cuts through heavy fabric.
- Heavy-Duty Fabric Scissors.
- Tailor’s Chalk or Fabric Marker.
- Plenty of Strong Pins or Fabric Clips (Wonder Clips are great for denim).
- Iron and Ironing Board (with a pressing cloth for delicate lining).
- Tailor’s Clapper: For crisp, flat seams on denim.
- Hump Jumper / Jean-A-Ma-Jig: To help sew over thick denim seams.
- Seam Ripper: For inevitable mistakes.

Designing Your Luxury Tote: Elements to Consider
- Size and Shape: A classic rectangular tote with a flat bottom (boxed corners) is ideal. Aim for a generous size that can carry a laptop, books, or groceries.
- Pockets: Strategically placed internal and external pockets are key for functionality and luxury. Think about a zippered internal pocket, slip pockets for a phone/wallet, and perhaps an exterior slip pocket from a repurposed jean back pocket.
- Closure: A full top zipper closure provides security and a finished look.
- Strap Style: Comfortable shoulder straps that are sturdy enough for a loaded bag. Consider making them adjustable with hardware.
Step-by-Step Construction: A Luxury Tote from Jeans
This guide outlines the process for a structured, zippered tote. Adapt dimensions and features as desired.
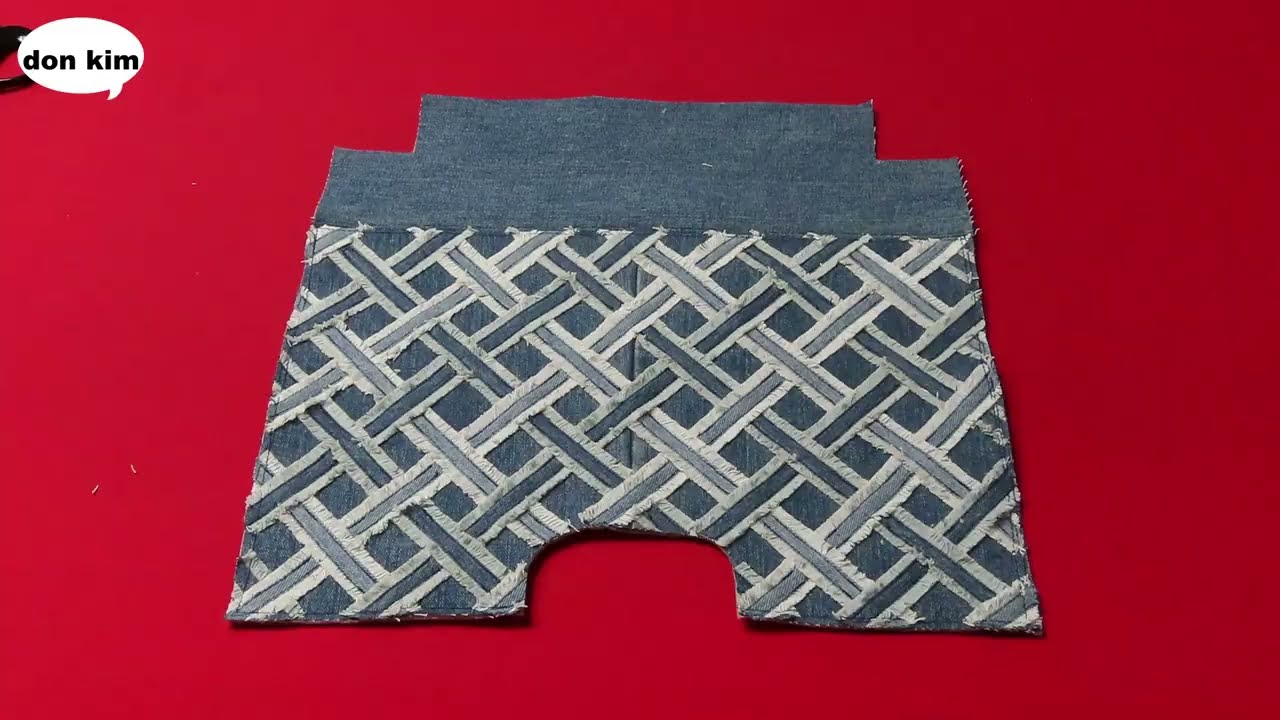
1. Deconstruct Your Jeans
- Cut Legs: Cut off the jeans legs straight across, just below the crotch seam.
- Open Seams: Carefully cut open the inseam and outseam of each leg to get large, flat pieces of denim.
- Salvage Pockets: If you want to reuse back pockets, carefully cut them away, leaving a seam allowance.
- Press: Iron all denim pieces flat.
2. Cut & Fuse Fabric Pieces
For a tote approximately 15″ W x 12″ H x 6″ D (38cm W x 30.5cm H x 15cm D):
- Main Exterior Panels (Cut 2): From denim, 16″ W x 13″ H (40.6 cm x 33 cm).
- Exterior Bottom Panel (Cut 1): From denim, 16″ W x 7″ H (40.6 cm x 17.8 cm).
- Lining Panels (Cut 2): From lining fabric, 16″ W x 13″ H.
- Lining Bottom Panel (Cut 1): From lining fabric, 16″ W x 7″ H.
- Zipper Placket Panels (Cut 2): From denim, 16″ W x 2.5″ H (40.6 cm x 6.3 cm).
- Zipper Placket Lining (Cut 2): From lining fabric, 16″ W x 2.5″ H.
- Strap Connectors (Cut 2): From denim, 4″ W x 3″ H (10 cm x 7.6 cm).
- Strap Fabric (Cut 2): From denim or webbing, 3″ W x 30″ L (7.6 cm x 76 cm). (Adjust length as needed.)
- Interfacing: Cut pieces for all Exterior Panels, Exterior Bottom Panel, Zipper Placket Panels, and Strap Fabric, matching their dimensions.
- Fuse Interfacing: Adhere the heavy-duty fusible interfacing to the wrong side of all denim pieces designated for structure (main panels, bottom, zipper plackets, strap connectors, straps). Press firmly and evenly.
Note: All seam allowances are 1/2 inch (1.25 cm) unless otherwise stated.
3. Prepare the Straps
- Denim Straps: If using denim, fold each strap piece in half lengthwise, right sides together, and stitch along the long raw edge. Turn right side out (a loop turner helps). Press flat, centering the seam. Topstitch along both long edges with heavy-duty thread for a crisp, finished look.
- Webbing Straps: If using webbing, simply cut to length.
- Hardware (Optional): If making adjustable straps, attach D-rings, strap adjusters, and swivel clasps as desired to your finished straps. (Refer to a detailed bag strap tutorial for exact steps).
4. Construct External Pockets (Optional)
- Jean Back Pocket: Place a salvaged jean back pocket onto one of your interfaced Exterior Main Panels. Pin securely. Topstitch all around the existing pocket stitching lines (three sides, leaving the top open) using heavy-duty thread.
- Other Patch Pockets: If adding new patch pockets, hem the top edge, press under side and bottom edges, position, and topstitch to the Exterior Main Panel.
5. Assemble the Exterior Bag
- Attach Side Panels to Bottom: Take your Exterior Bottom Panel and one Exterior Main Panel. Pin them right sides together along one 16-inch edge. Stitch with a 1/2 inch (1.25 cm) seam allowance. Press seam open using a clapper for flatness. Repeat for the other Exterior Main Panel on the opposite long edge of the bottom panel.
- Stitch Side Seams: Fold the assembled piece so the two Exterior Main Panels are right sides together, aligning their side edges. Pin and stitch the two side seams. Press seams open.
- Attach Strap Connectors: On the top raw edge of the assembled exterior bag, measure in 3-4 inches (7.6-10 cm) from each side seam on both the front and back. Place the raw edges of your Strap Connectors here, with the D-ring (if using) pointing downwards into the bag. Baste in place within the seam allowance.
6. Assemble the Lining Bag
- Internal Pockets: Before assembling, stitch any internal pockets (zippered or slip pockets) to your Lining Panels. Refer to specific pocket tutorials for these.
- Stitch Lining Panels to Bottom: Repeat Step 5.1 for your Lining Panels and Lining Bottom Panel.
- Stitch Side Seams: Repeat Step 5.2 for the lining.
- Important: Leave an Opening! When stitching one of the lining side seams, leave a 5-6 inch (12.7-15 cm) opening in the middle of the seam. This will be used to turn the bag right side out. Backstitch securely at the beginning and end of the opening.
7. Assemble the Zipper Placket
- Take one Exterior Zipper Placket Panel and one Lining Zipper Placket Panel. Place them right sides together, aligning one 16-inch edge.
- Sandwich your main zipper between these two pieces: place the zipper right side down on the Exterior Zipper Placket Panel, aligning its top edge with the fabric edge. Then place the Lining Zipper Placket Panel on top, aligning its edge with the zipper and exterior fabric. Pin.
- Using a zipper foot, stitch through all layers along the pinned edge.
- Press the fabric away from the zipper teeth. Topstitch close to the zipper along the newly formed seam on both the exterior and lining sides.
- Repeat steps 7.1-7.4 for the other side of the zipper with the remaining Zipper Placket Panels. You should now have a long strip with the zipper in the middle, exterior fabric on one side, and lining fabric on the other.
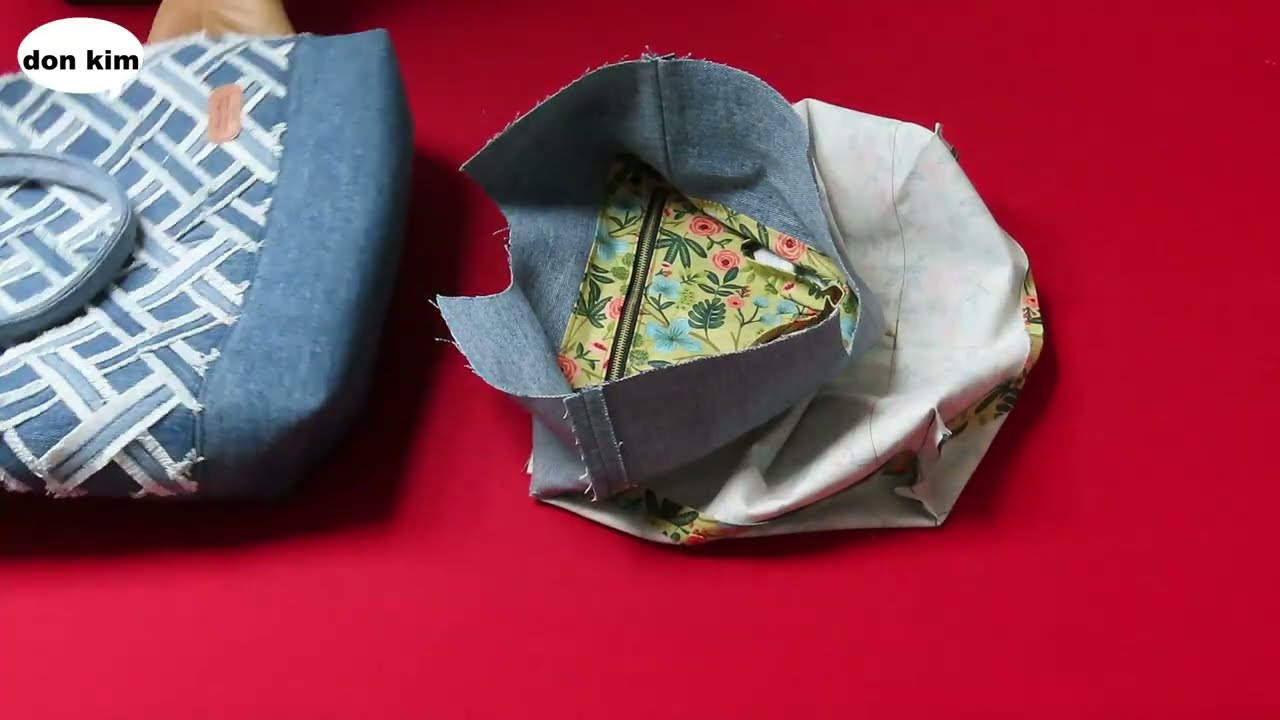
8. Combine Exterior, Lining, and Zipper Placket
- Open the main zipper about halfway.
- Keep the exterior bag right side out. Find the center front and center back of its top opening.
- Take your assembled zipper placket. Find its center points on the exterior side.
- Align the center exterior of the zipper placket with the center front of the exterior bag’s top opening, right sides together. Pin the entire exterior edge of the zipper placket to the top opening of the exterior bag. Stitch all around with a 1/2 inch (1.25 cm) seam allowance.
- Now, take the lining bag (still wrong side out). Align the center of the lining side of the zipper placket with the center front of the lining bag’s top opening. Pin the entire lining edge of the zipper placket to the top opening of the lining bag. Stitch all around with a 1/2 inch (1.25 cm) seam allowance.
9. Final Assembly & Finishing Touches
- Reach into the opening you left in the side seam of the lining. Carefully pull the entire bag through this opening until it’s right side out.
- Gently push out all corners and seams to create a neat, defined shape.
- Press the entire bag, especially the top seam where the zipper placket connects.
- Close the lining opening: Press the raw edges of the opening inwards by 1/2 inch (1.25 cm). Stitch the opening closed either by machine (topstitch very close to the edge) or by hand using an invisible ladder stitch for a seamless finish.
- Push the lining down into the bag. Press the top edge again.
- Topstitch: For a professional finish and added durability, topstitch around the entire top opening of the bag, about 1/8 to 1/4 inch (0.3-0.6 cm) from the edge. This secures the lining and gives a crisp look.
- Attach Straps: Loop the prepared straps through the D-rings on the strap connectors. If not using D-rings, stitch the straps directly to the top edge of the bag (reinforce with a box or ‘X’ stitch).
- Add Bag Feet (Optional): Follow the manufacturer’s instructions to attach metal feet to the bottom of your bag.
Your luxury tote bag, born from old jeans, is complete! This stunning piece is not only a testament to your sewing skills but also a functional and stylish accessory that embodies sustainable fashion. How will you customize yours to make it truly unique?