by
by Hello, sustainability superstars and denim enthusiasts! Ready to turn those sentimental old jeans into a sturdy, stylish accessory? I’m excited to share the pattern for the Heritage Panel Tote—a spacious, rectangular bag that features a clever four-panel construction and utilizes the pre-finished edges of denim for a professional look.
Inspired by a fantastic tutorial on easily sewing a bag from old jeans, this design emphasizes strength and simplicity. It features a squared bottom for stability, built-in straps that loop around the bag for extra support, and optional integrated pockets using the original jean features.
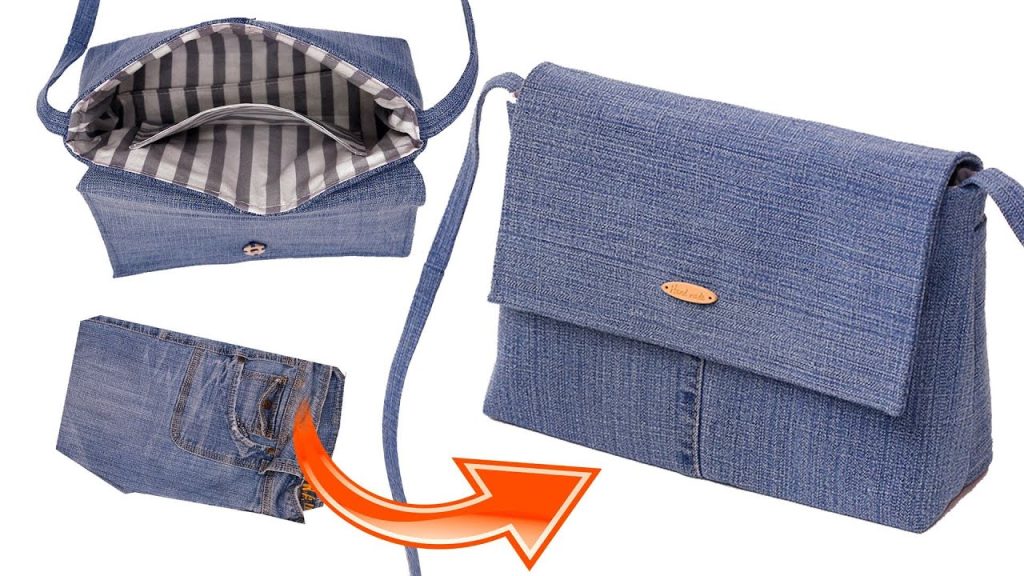
Grab those old jeans, your strong thread, and let’s create a durable, fashionable market bag!
Why You’ll Love Making This Bag:
- Strategic Upcycling: Uses the pre-existing hems and waistband of jeans to reduce raw edges and enhance durability.
- Structural Support: The straps run along the sides and bottom of the bag, distributing weight for heavy items.
- Easy Construction: Relies on straightforward rectangular assembly and boxing corners for structure.
- Customizable: Easily integrate the original back pockets of the jeans for instant, usable exterior storage.
What You’ll Need:
- Fabric Source: 2–3 pairs of old jeans (select a uniform shade of denim for a cohesive look).
- Lining Fabric: 1 yard of lightweight cotton or canvas lining fabric.
- Fusible Interfacing: 1/2 yard of heavy-weight fusible interfacing (for the bottom panel).
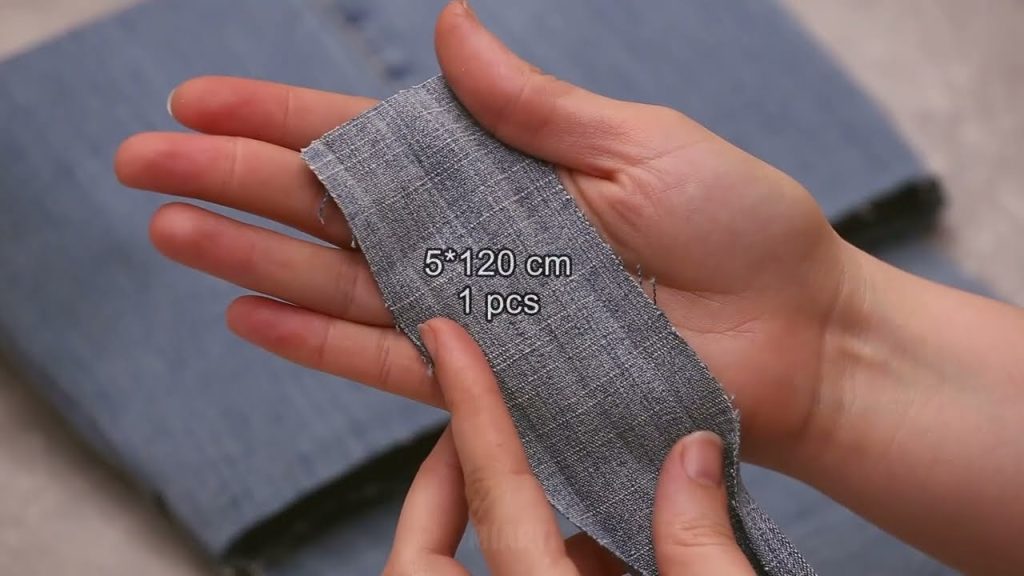
- Webbing/Straps: 3 yards (2.7 meters) of 1.5-inch wide cotton or nylon webbing (or use denim strips cut from the jeans).
- Hardware (Optional): Magnetic snap or large toggle closure.
- Tools:
- Sewing Machine (with a denim or heavy-duty needle).
- Seam Ripper (essential for dismantling the jeans).
- Iron, Ruler, and Fabric Marker/Chalk.
- Heavy-duty thread (topstitching thread recommended).
- Pins and heavy-duty clips.

Measurements & Cutting List
The final bag size will be approximately 14 inches wide x 15 inches high x 4 inches deep. All measurements include a 1/2-inch (1.2 cm) seam allowance, unless noted.
| Piece | Fabric | Dimensions (Width x Height) | Quantity | Notes |
| A: Main Body Panels | Denim | 15 in. x 16 in. | 2 | Front and back. Use the finished jean bottom hem as the top edge (cut the finished hem line at 15 in.). |
| B: Side Gusset Panels | Denim | 5 in. x 16 in. | 2 | Sides of the bag. |
| C: Bottom Panel | Denim | 15 in. x 5 in. | 1 | Interfaced for structure. |
| D: Lining Main | Lining Fabric | 19 in. x 31 in. | 1 | This is one large rectangle that folds to form the lining body and sides. |
| E: Straps | Webbing/Denim | 54 in. x 1.5 in. | 2 | Long straps that run under the bag. |
Note on Main Panels: Cutting the main body panels (A) from the jeans’ legs, using the original bottom hem as the top edge of the bag, eliminates the need for hemming the top opening!
Construction: Building the Heritage Panel Tote
Part 1: Preparing Denim Pieces and Straps
- Dismantle Jeans: Cut and seam-rip the jeans to harvest flat denim panels from the legs.
- Fuse Interfacing: Apply heavy-weight fusible interfacing to the wrong side of the (C) Bottom Panel.
- Prepare Straps (E): If using denim instead of webbing, cut two strips of denim (54 in. x 4 in.). Fold the raw edges in, then fold in half, and topstitch along all edges to create two finished straps that are 1.5 inches wide.
Part 2: Assembling the Outer Shell
- Sew Side Panels (B): Take the two (A) Main Body Panels and the two (B) Side Gusset Panels. Sew the side seams together, alternating Front (A) to Side (B) to Back (A) to Side (B). Use a 1/2-inch seam allowance to create a long rectangular tube.
- Attach Bottom (C): Pin the (C) Bottom Panel to the bottom perimeter of the panel tube. Match the corner seams and pin frequently. Sew carefully around the four corners to attach the base. The outer shell is now complete.
- Attach Pockets (Optional): If desired, cut out and sew the original back pockets of the jeans onto the center of the Front (A) Panel now, using topstitching thread.
Part 3: Attaching the Integrated Straps
- Pin Straps: Lay the Outer Shell flat. Take one (E) Strap. Pin it vertically up the front, under the bottom, and up the back. The strap should wrap the entire bag.
- The strap should be centered on the bag and centered on the bottom panel.
- The ends of the strap should extend about 8-10 inches above the top edge of the bag.
- Stitch Straps: Sew the straps securely to the bag using heavy-duty thread. Stitch a box or X-box pattern where the straps meet the top hem for reinforcement. Sew the straps to the side panels and across the bottom panel. Repeat for the second strap.
Part 4: Final Assembly with Lining
- Sew Lining Shell (D): Take the (D) Lining Main rectangle. Fold it in half (19 in. x 15.5 in.), right sides together.
- Sew the two short side seams (15.5 inches long).
- Crucial: Leave a 6-inch (15 cm) unstitched opening along the middle of the bottom seam for turning the bag later.
- Box Lining Corners: On the bottom corners of the Lining Shell, measure 2.5 inches (6 cm) square and cut out the squares. Sew the corresponding seams closed to create the boxed corners.
- Nest and Sew: Turn the Outer Shell right-side out (with straps attached). Insert the Outer Shell into the Lining Shell (still inside out), aligning the top raw edges perfectly (right sides facing). Ensure the straps are tucked neatly inside. Pin all around the top perimeter.
- Final Seam: Sew the top seam all the way around with a 1/2-inch seam allowance.
- Turn Right-Side Out: Reach into the 6-inch opening in the lining bottom. Gently pull the entire bag through this hole.
- Close and Topstitch: Stitch the turning hole in the lining closed. Tuck the lining neatly inside the Outer Bag. Press the top edge flat and perform a final topstitch around the entire top opening to secure the lining and create a clean finish.
- Join Straps: Holding the bag upright, bring the corresponding strap ends together and secure them with a final row of topstitching to form the handle loops.
Congratulations! Your Heritage Panel Tote is complete—a sturdy, stylish, and sustainable market bag that utilizes the best of your old denim!
Video tutorial: