by
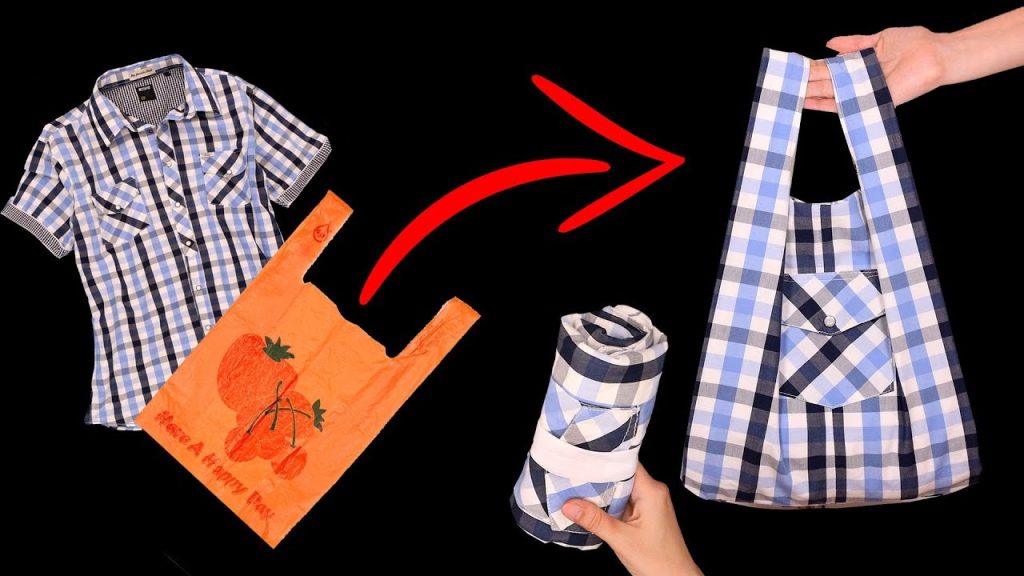
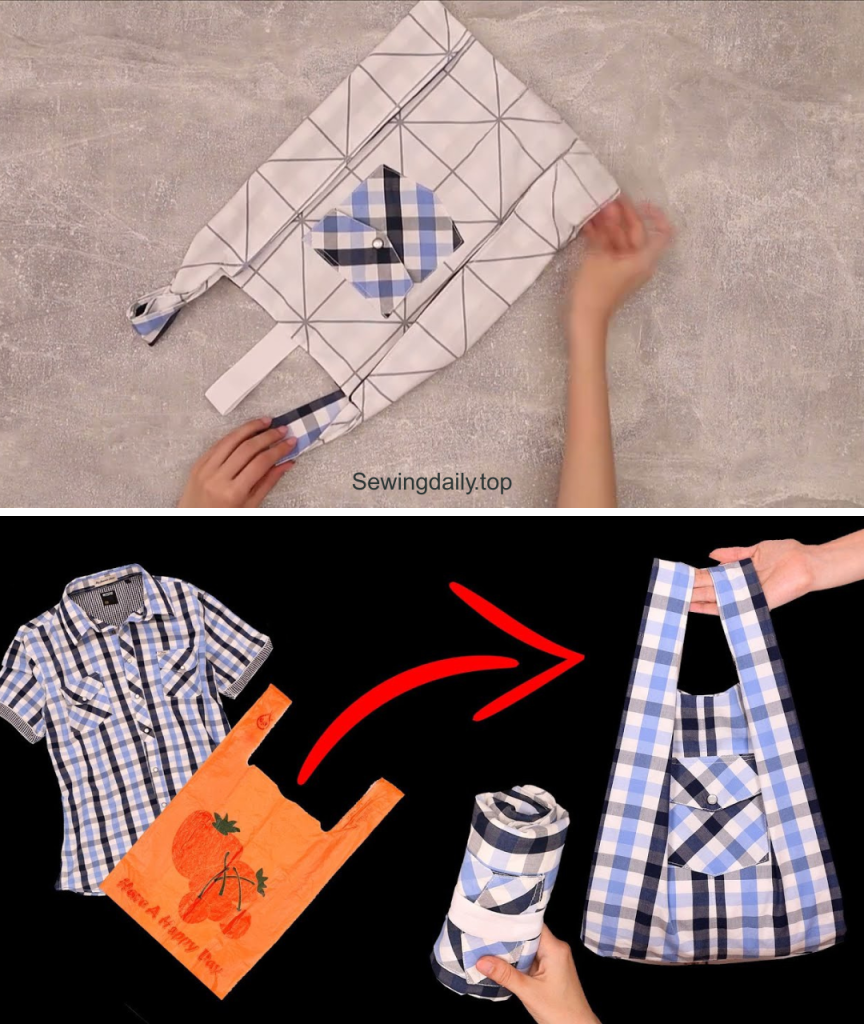
by In a world increasingly aware of environmental impact, reusable shopping bags have become more than just a trend — they’re a necessity. One of the easiest and most sustainable ways to make your own shopping bag is to repurpose an old shirt. It’s a fun, beginner-friendly sewing project that breathes new life into clothes you might otherwise discard.
This guide will take you through every step of sewing your own shopping tote bag from an old shirt, complete with tips, variations, and sustainability benefits.
✂️ Why Make a Shopping Bag from an Old Shirt?
Before diving into the “how,” let’s talk about the “why”:
- Sustainability: Reduces textile waste and your use of plastic bags.
- Cost-effective: No need to buy new fabric — use what you already have.
- Custom and unique: Your shirt becomes a one-of-a-kind bag.
- Beginner-friendly sewing: Great for those learning to sew or looking for a quick project.
🧵 What You’ll Need
Materials:
- 1 old shirt (preferably cotton, denim, or a thicker fabric for durability)
- Thread (matching or contrasting — your choice)
- Scissors or rotary cutter
- Pins or fabric clips
- Sewing machine (or needle for hand sewing)
- Ruler or measuring tape
- Fabric chalk or washable marker
Optional: Interfacing or lining fabric if you want to reinforce the bag
👕 Choosing the Right Shirt
Look for:
- Sturdy material: Button-up shirts, denim shirts, or thick t-shirts work best.
- Minimal wear: Avoid shirts with holes, stains, or very thin fabric unless you’re going for a rustic look.
- Size: A larger shirt gives you more material and results in a bigger bag.
✂️ Step-by-Step Instructions
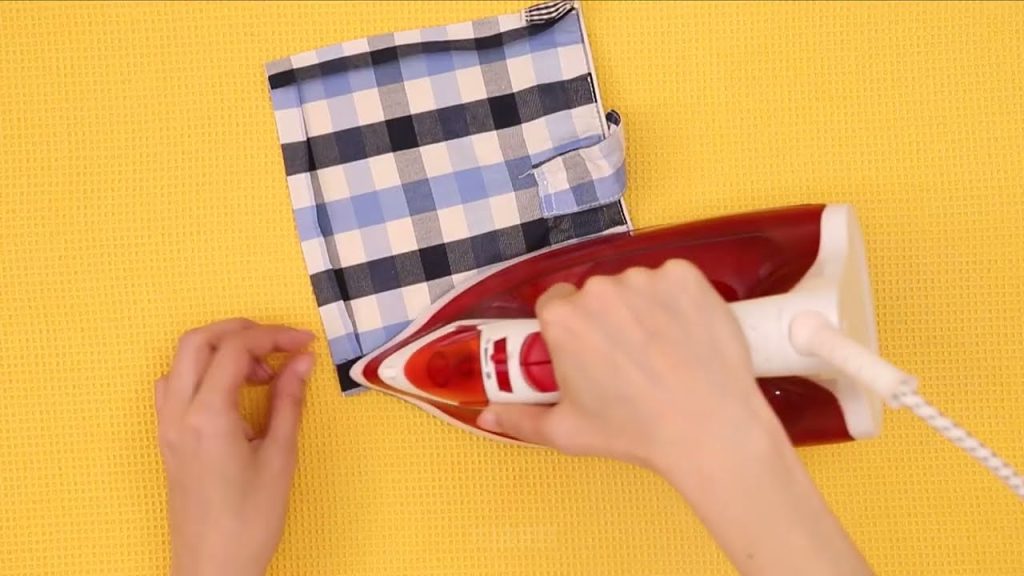
✅ Step 1: Prepare the Shirt
- Wash and iron the shirt if needed.
- Lay it flat on your cutting surface.
- Cut off the sleeves just inside the seam. These will be the bag’s handles or can be repurposed later.
- Cut off the collar and neckline area to create the top opening of the bag. If the shirt has buttons, you can leave them for style or remove and sew the placket shut.

✅ Step 2: Cut the Bag Body
- Turn the shirt inside out.
- Decide on the height of your bag (from bottom hem upward). Mark a straight line using a ruler and fabric chalk.
- Cut across both layers of the shirt at that line. You should now have a tube of fabric — the basic shape of your bag.
✅ Step 3: Sew the Bottom of the Bag
You have two options here:
Option A: Straight Bottom
- Simply sew a straight seam across the bottom edge.
- Use a straight stitch and backstitch at each end for strength.
- For extra durability, do a second row of stitching or use a French seam.
Option B: Boxed Corners (Optional)
To create a flat bottom so the bag can stand upright:
- Pinch each bottom corner so the side seam and bottom seam align, forming a triangle.
- Measure about 2–3 inches from the point, mark a line, and sew across it.
- Cut off the excess triangle, leaving about ½-inch seam allowance.
- Repeat for the other corner.
✅ Step 4: Finish the Top Opening
- Fold the top edge of the shirt inward about ½ inch, then fold again to encase the raw edge (this is a double fold hem).
- Pin in place and sew all the way around with a straight stitch.
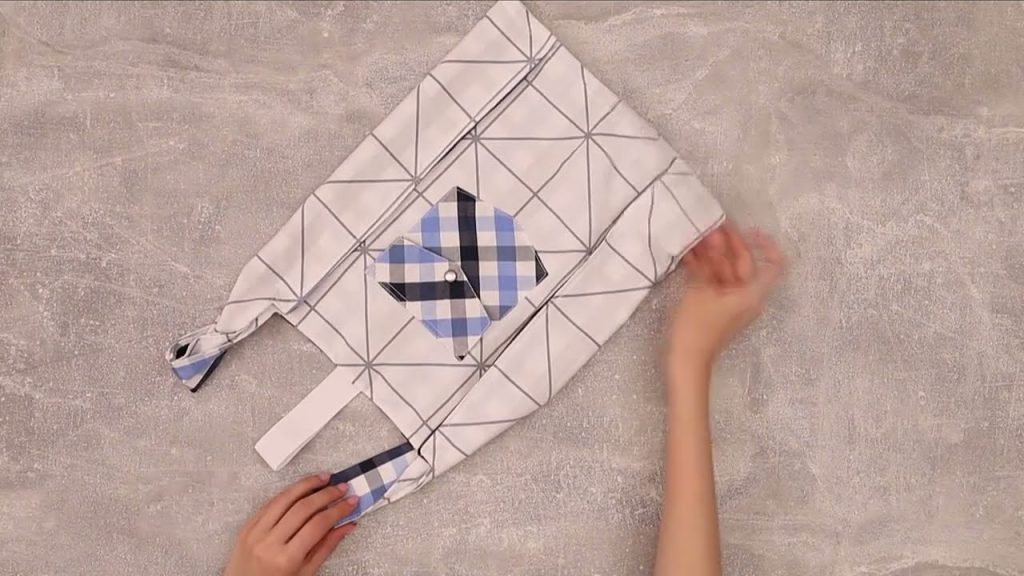
✅ Step 5: Make and Attach Handles
You can make handles from:
Option A: Shirt Sleeves
- Cut long strips from the sleeves.
- Fold each strip lengthwise, right sides together, and sew down the long edge.
- Turn right-side-out, press flat, and topstitch if desired.
- Attach to the inside or outside of the bag opening, sewing a square and “X” for strength.
Option B: Extra Shirt Fabric
- Cut two long rectangles (about 2.5” x 20”) from the remaining shirt fabric.
- Follow the same process: fold, sew, turn, press, and attach.
Option C: No-Sew Handles (T-shirt style)
If you’re using a stretchy t-shirt, you can cut handle slits into the fabric and skip sewing entirely. But for a button-up shirt, sewn handles are best.
✅ Step 6: Finishing Touches
- Trim any loose threads.
- Check all seams and reinforce if needed.
- Turn the bag right-side-out.
- Optional: Add a pocket using fabric from the sleeve or chest pocket from the shirt.
🎨 Customization Ideas
- Add a patch or embroidery to personalize your bag.
- Use fabric paint or stencils to decorate.
- Add a lining for extra strength and a pop of color.
- Sew a magnetic snap or button for closure.
- Use two shirts for a reversible bag.
🌍 Eco-Friendly Impact
By sewing a bag from an old shirt, you:
- Save ~15 plastic bags per month (average grocery use)
- Reduce textile waste (1 shirt = up to 2.5 pounds of CO₂ saved)
- Contribute to a circular economy by reusing materials
🧺 Care Instructions
- Machine wash cold with similar colors
- Air dry to preserve fabric and seams
- Iron as needed
🧵 Final Thoughts
Creating a shopping bag from an old shirt is more than just a sewing project — it’s a statement. A statement that says you care about reducing waste, extending the life of materials, and embracing creativity in your everyday life.

Whether you’re new to sewing or an experienced maker, this simple project can be completed in under an hour and offers endless room for customization.
So grab that old shirt from the back of your closet, dust off your sewing kit, and turn yesterday’s fashion into tomorrow’s grocery bag. 🌿👜
Video tutorial: