 by
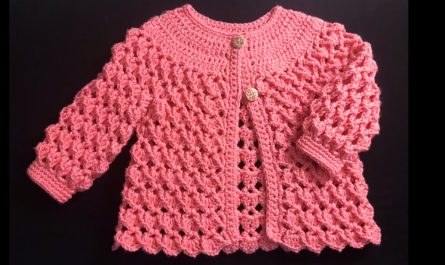
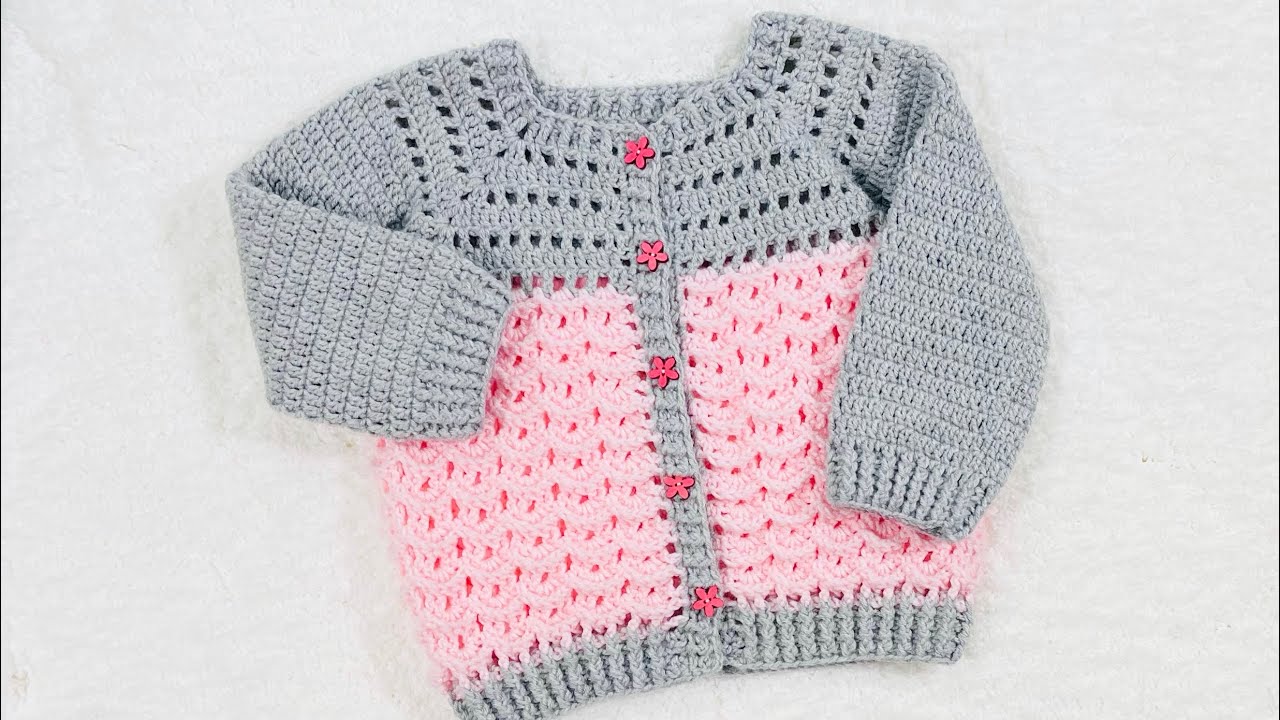
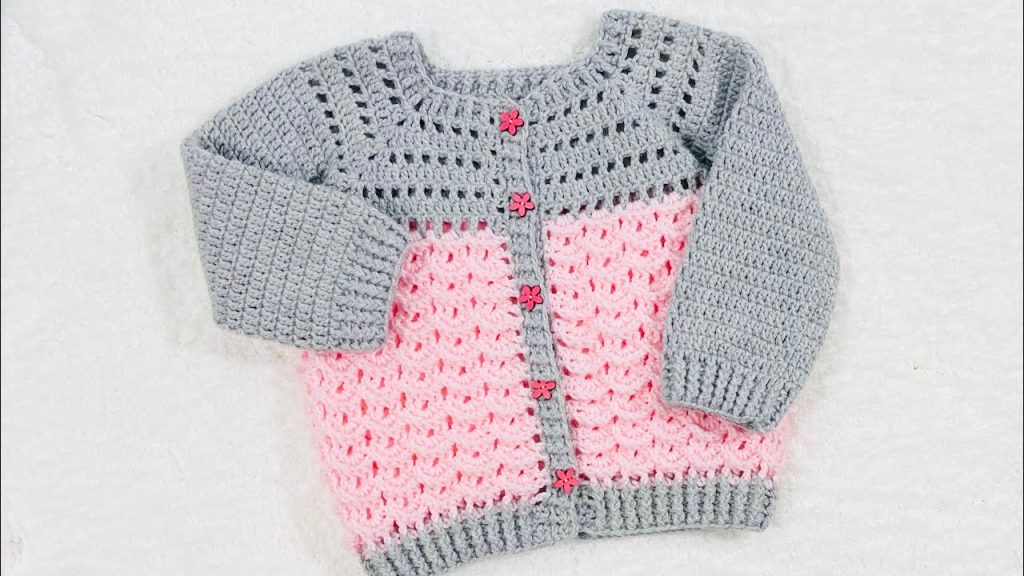
by Imagine a little girl feeling extra special in a beautiful, handmade cardigan that’s both cozy and stylish. This detailed tutorial, inspired by the fantastic “Easy crochet cardigan sweater for girls 4-6 years + more sizes” video by Crochet for Baby, will guide you through creating a charming and versatile cardigan or jacket. Featuring a lovely blend of double crochet, fan stitches, and a comfortable ribbed border, this project is perfect for keeping little girls warm and chic.
Whether you’re looking to crochet for a 4-6 year old, or adapt it for sizes from 1-2 years up to 10-12 years, this pattern offers clear, step-by-step instructions to create a cherished piece for a special child in your life.
Why This Cardigan Will Be a Go-To Favorite
This cardigan is more than just a piece of clothing; it’s a labor of love with several irresistible qualities:
- Charming Texture: The combination of double crochet and fan stitches creates an engaging and appealing fabric.
- Adaptable Sizing: While the tutorial focuses on 4-6 years, the pattern is designed to be easily adjustable for a wide range of children’s sizes, from toddlers to pre-teens.
- Skill-Building Project: Practice crucial garment-making skills like yoke construction, sleeve division, ribbed cuffs, and neat edging.
- Thoughtful Gift: A handmade cardigan is a deeply personal and treasured gift for birthdays, holidays, or simply as a token of affection.
- Comfort & Style: Made with soft yarn, it’s perfect for layering on cooler days, adding a touch of handmade elegance to any outfit.
Materials You’ll Need:
Having your materials gathered and ready before you start will ensure a smooth and enjoyable crocheting journey.
- Yarn: Approximately 300-500 grams of worsted weight (Number 4) yarn. The creator mentions using Aran weight or 10-ply yarn.
- Tip: Choose a soft, child-friendly fiber like acrylic, superwash merino, or a cotton blend for comfort and ease of care.
- Crochet Hooks:
- Main Hook: 5 mm (H hook).
- Smaller Hook for Cuffs (Optional): 4.5 mm for a snugger cuff.
- Buttons: 6 buttons (the creator uses 15mm buttons, noting 12-15mm work well through stitch spaces).
- Stitch Markers: 4 stitch markers (highly recommended for marking corners of the yoke, especially in the early rows).
- Tapestry Needle: For weaving in ends and attaching buttons.
- Scissors
- Measuring Tape
The Heart of the Project: Sizing and Gauge
Achieving the correct size is crucial for a well-fitting garment. Don’t skip these steps!
- Check Your Gauge: Make a swatch using your chosen yarn and the main double crochet stitch pattern. Chain about 20 stitches and work several rows of double crochet. Block your swatch and then measure it. Count how many stitches and rows are in a 4×4 inch (10×10 cm) square. If your gauge is off, adjust your hook size (larger hook for looser gauge, smaller hook for tighter gauge).
- Refer to Sizing Chart: The creator offers information in the description box on how to adapt the pattern for sizes from 1-2 years up to 10-12 years. The tutorial itself focuses on a 4-6 year old size, with specific measurements provided at the end.
Stitch Guide (Common Abbreviations):
- ch: chain
- sc: single crochet
- hdc: half double crochet
- dc: double crochet
- sl st: slip stitch
- fpdc: front post double crochet
- bpdc: back post double crochet
- fphdc: front post half double crochet
- bphdc: back post half double crochet
- sk: skip
- st(s): stitch(es)
- ch-sp: chain space
- fan: (2 dc, ch 1, 2 dc in indicated space) – This is the corner stitch pattern.
- dc decrease: double crochet 2 together (dc2tog)
Step-by-Step Tutorial: Crocheting Your Cardigan
This cardigan is worked from the top down, starting with the yoke. The two beginning chains in each row never count as a stitch.
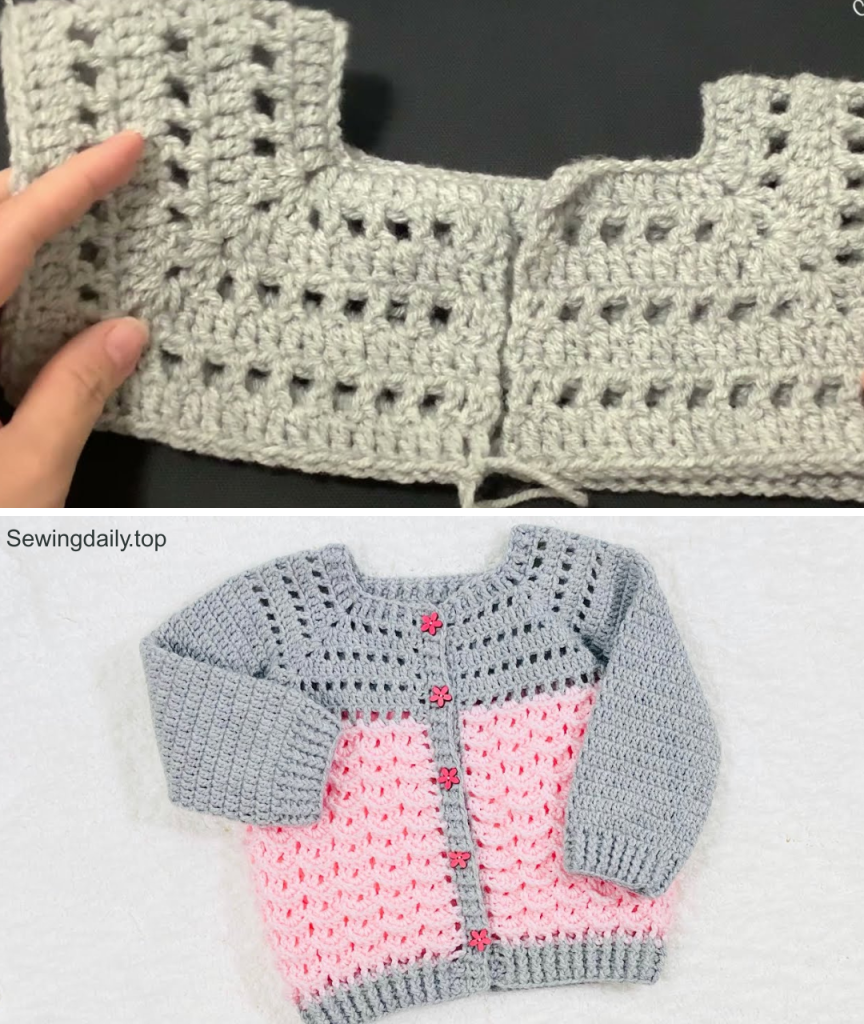
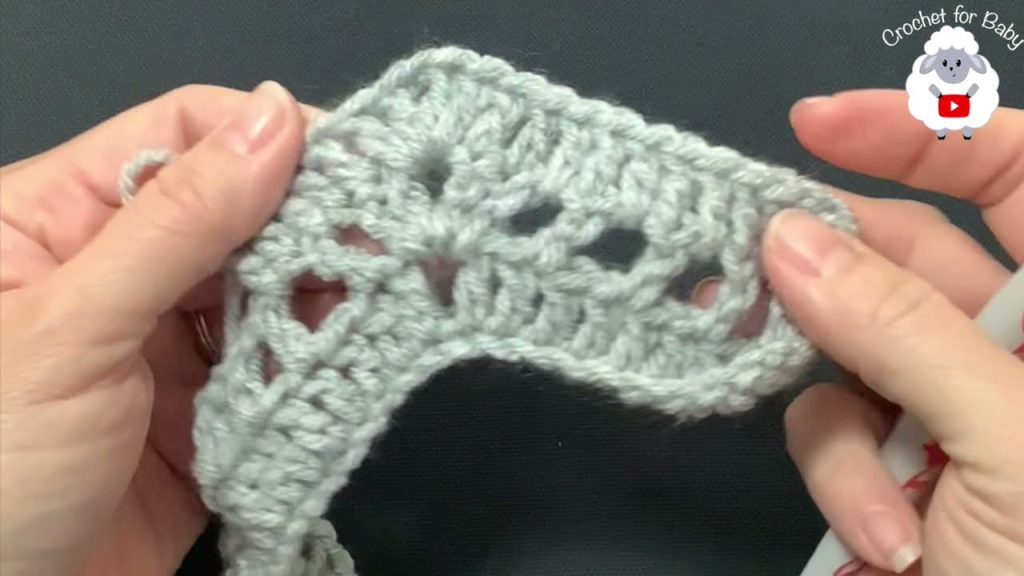
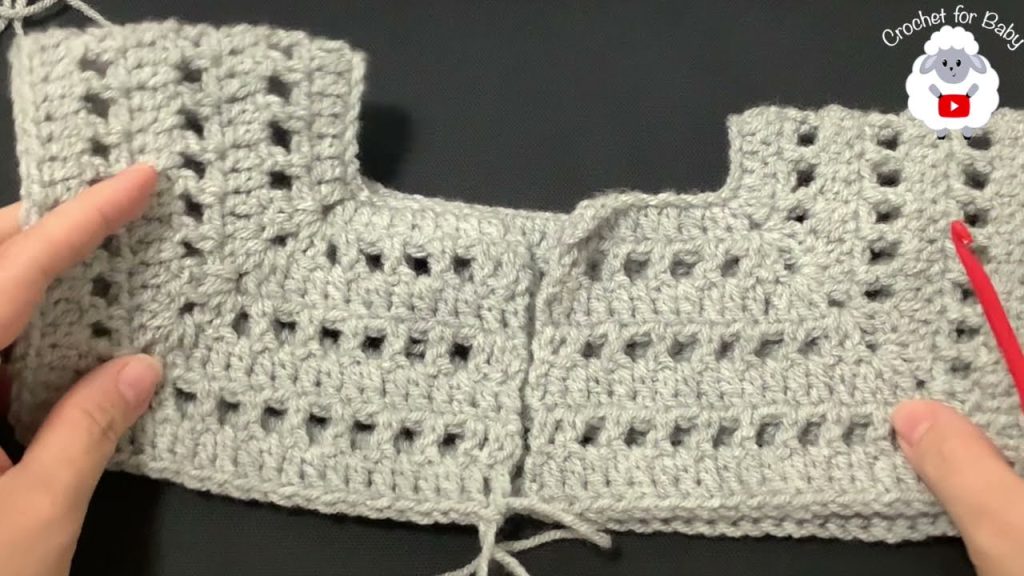
Phase 1: The Yoke – Foundation and Divisions
The yoke forms the upper part of the cardigan, separating the front panels, sleeves, and back, with increasing corners.
- Starting Chain (Main Color): With your 5mm hook, chain 69 stitches. This chain should measure about 43 cm (17 inches).
- Row 1 (Yoke – Double Crochets & Corners):
- Dc in the 3rd ch from the hook (this does not count as a stitch).
- Front Panel 1: Dc in the next 8 chains (total 9 dc for this front panel).
- Corner 1: Ch 1, dc in the next chain.
- Sleeve 1: Dc in the next 14 chains (total 15 dc for this sleeve).
- Corner 2: Ch 1, dc in the next chain.
- Back Panel: Dc in the next 18 chains (total 19 dc for the back).
- Corner 3: Ch 1, dc in the next chain.
- Sleeve 2: Dc in the next 14 chains (total 15 dc for this sleeve).
- Corner 4: Ch 1, dc in the next chain.
- Front Panel 2: Dc in the next 8 chains (total 9 dc for this front panel).
- Total 67 dc in this row. Ch 2, turn.
- Row 2 (Yoke – Chain Spaces & Fans):
- Dc in the first 2 dc.
- (Ch 1, sk 1 dc, dc in next dc) – repeat 3 times.
- Ch 1, sk 1 dc. In the first ch-1 space (Corner 1), work a fan (2 dc, ch 1, 2 dc).
- (Ch 1, sk 1 dc, dc in next dc) – repeat 7 times for Sleeve 1. Ch 1, sk 1 dc.
- In the next ch-1 space (Corner 2), work a fan.
- (Ch 1, sk 1 dc, dc in next dc) – repeat 9 times for Back Panel. Ch 1, sk 1 dc.
- In the next ch-1 space (Corner 3), work a fan.
- (Ch 1, sk 1 dc, dc in next dc) – repeat 7 times for Sleeve 2. Ch 1, sk 1 dc.
- In the next ch-1 space (Corner 4), work a fan.
- (Ch 1, sk 1 dc, dc in next dc) – repeat 3 times. Dc in the last 2 dc.
- Total 65 dc in this row. Ch 2, turn.
- Row 3 (Yoke – Solid DC & Fans):
- Dc in each dc and each ch-1 space across.
- Corners: In each ch-1 space of the fan, work a fan (2 dc, ch 1, 2 dc).
- Total 99 dc in this row. Ch 2, turn.
- Rows 4-7 (Yoke – Repeating Pattern & Increasing):
- Repeat Row 2 (chain spaces & fans) for Row 4. (Total 65 dc).
- Repeat Row 3 (solid dc & fans) for Row 5. (Total 131 dc).
- Repeat Row 2 for Row 6. (Total 81 dc).
- Repeat Row 3 for Row 7. (Total 163 dc).
- Your yoke should now be complete, measuring about 13 cm (5.25 inches) across the shoulder and 30 cm (11.75 inches) wide.
Phase 2: Separating Sleeves and Starting the Body
This phase shapes the garment, creating the armholes and beginning the main body. We’ll mark a special stitch on the back for an adjustment later.
- Row 1 (Body – Shells, Chain Spaces, & Division):
- Ch 2, turn. Work the front panel in (dc, ch 1, sk 1 dc, dc in next dc) pattern. (13 dc in this front panel).
- Armhole Creation: In the first corner, work (dc, ch 1, dc). Ch 1, skip 39 dc (for Sleeve 1). In the second corner, work (dc, ch 1, dc).
- Continue back panel in (dc, ch 1, sk 1 dc, dc in next dc) pattern. (25 dc in back panel).
- Mark Adjustment Point: Place a stitch marker on the 13th dc of the back panel.
- Skip Sleeve 2: In the third corner, work (dc, ch 1, dc). Ch 1, skip 39 dc (for Sleeve 2). In the fourth corner, work (dc, ch 1, dc).
- Finish front panel 2 in (dc, ch 1, sk 1 dc, dc in next dc) pattern. (13 dc in this front panel).
- Total 51 dc in this row.
- Row 2 (Body – Shells & Adjustment):
- Change to pink yarn (or contrasting color) by finishing the last dc of Row 1 with the new color.
- Ch 1, turn. Sc in first dc.
- Shell (4 dc) in each ch-1 space. Sc in the sc between shells.
- Adjustment: When you reach the marked 13th dc on the back panel, work a sc on top of this marked dc, skipping the ch-1 space before and after it. This ensures you end with a shell in the correct place.
- Total 24 shells in this row. Ch 3, turn.
- Row 3 (Body – Fpdc Shells):
- Fpdc around the first 2 dc of each shell, (ch 1), fpdc around the next 2 dc of the same shell. Sc in the sc between shells.
- Finish with a dc in the last sc. Ch 1, turn.
- Rows 4-20 (Body – Repeating Pattern):
- Repeat Row 2 (shells) for Row 4.
- Repeat Row 3 (fpdc shells) for Row 5.
- Continue alternating these two rows until you have a total of 20 pattern rows for the body. The creator finishes on a fpdc shell row.
Phase 3: Bottom Ribbing and Front Edging
This section adds a neat ribbed border to the bottom and creates the finished front edges.
- Rows 1-5 (Bottom Ribbing):
- Continue with the main color or switch to a desired ribbing color. Ch 1, turn. Hdc in first st.
- Alternate between fphdc and bphdc around each hdc. Skip ch-1 spaces.
- Repeat this for 5 rows total. Finish with an hdc in the second chain.
- Front Edging (Sc):
- Continue with the ribbing color. Ch 1, turn.
- Sc evenly along the side edge of the front panel, 2 sc per hdc row, 1 sc per sc row.
- Total 48 sc for this front panel. Ch 1, turn.
- Front Edging (Fphdc/Bphdc):
- Ch 1, turn. Hdc in first sc.
- Alternate between fphdc and bphdc around each hdc for 3 rows total.
- Total 48 hdc per row. Finish the last hdc in the top of the last hdc.
Phase 4: Neckline Ribbing
This gives a beautiful, finished look to the collar area.
- Neckline Ribbing (Fphdc/Bphdc):
- Continue from the front panel edging. Ch 1.
- Work hdc evenly around the neckline, alternating fphdc and bphdc around appropriate stitches/chains. The goal is a neat, round edge.
- Total hdc will vary depending on your tension. Finish with a sl st to join.
Phase 5: Sleeves
Each sleeve is worked in rounds from the armhole down, with careful shaping.
- Row 1 (Sleeve – Foundation & Decreases):
- Join yarn (5mm hook) under the sleeve, to the left of the single crochet that formed the armhole division.
- Ch 2, dc in the same space.
- Gap Closure: Make a partial dc in the gap, then a partial dc on top of the first dc of the sleeve, dc2tog to close (this counts as 1 dc).
- Decreases: Make 2 dc2tog over the next 4 dc.
- Dc in each remaining dc around the sleeve opening until the last 5 dc.
- Decreases: Make 3 dc2tog over the next 6 dc.
- Make 1 dc in the space next to the single crochet.
- Total 37 dc in this row. Join with a sl st to the first dc.
- Rows 2-21 (Sleeve Body – Straight DC):
- Ch 2, dc in the same stitch.
- Dc in each dc around (37 dc per row). Join with a sl st to the first dc.
- Repeat this for 20 more rows, for a total of 21 rows of dc.
- Rows 22-25 (Sleeve Cuff – Ribbing):
- Change to 4.5mm hook (optional). Ch 1, dc in first st.
- Alternate between fphdc and bphdc around each hdc (37 stitches per row).
- Repeat this for 4 rows total. Join with a sl st to the first fphdc.
- Sleeve Decorative Edging:
- Join contrasting yarn (if desired) to the cuff. (Ch 3, sk 1 hdc, sl st in next hdc). Repeat around the cuff. Join with sl st, fasten off, and weave in ends.
Phase 6: Final Assembly and Details
- Weave in All Ends: Use your tapestry needle to neatly weave in all loose yarn tails throughout the cardigan.
- Attach Buttons: Sew the 6 buttons to the designated side of the cardigan. The spaces between the rows on the opposing front panel will serve as the buttonholes.
- Blocking (Optional): Gently wet the finished cardigan, shape it to the correct measurements, and lay it flat to dry. This helps to even out stitches and enhance the drape of the fabric.
Your beautiful, handmade “Easy Crochet Cardigan Sweater” is now complete! This cozy and cute jacket is sure to be a treasured garment for any little girl. The finished measurements for the 4-6 year size are approximately 43 cm (17 inches) from neckline to sleeve end, 30.5 cm (12 inches) from underarm to sleeve end, 13 cm (5 inches) sleeve width, 44 cm (17.25 inches) overall length, and 36 cm (14.25 inches) chest width.
Remember that this pattern can be adapted for smaller or larger sizes, with information available in the video’s description box.
Happy crocheting, and enjoy watching your little one look adorable in this charming creation!
Video tutorial: