by
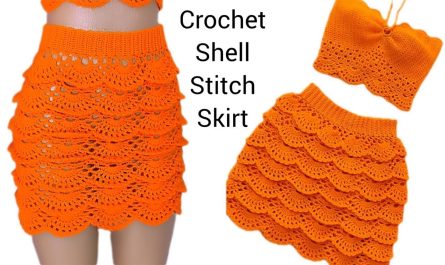
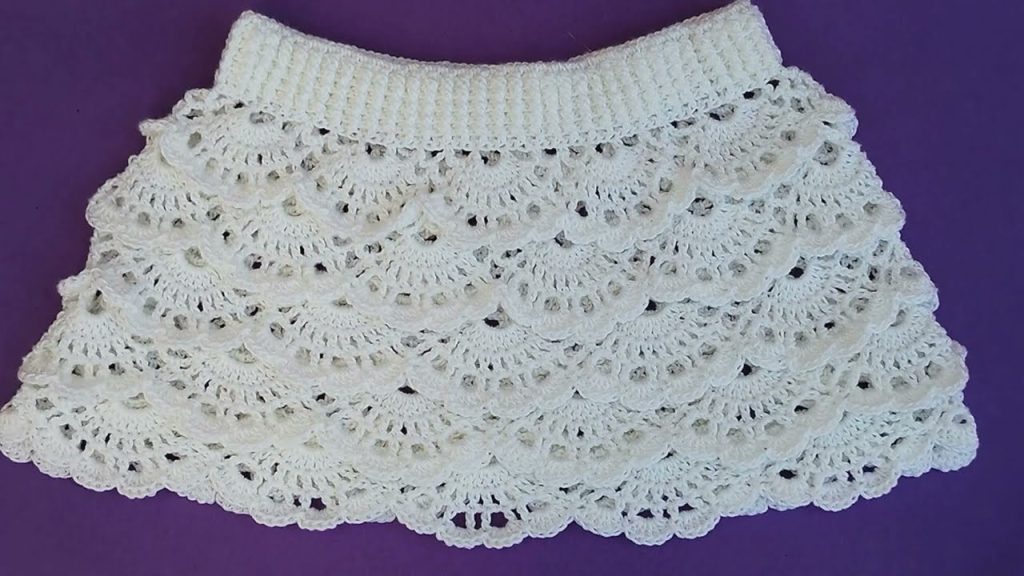
by Crochet fashion is back in a big way, and nothing screams summer style more than a breezy, handmade crochet skirt. If you’re looking for a beginner-friendly project that delivers both comfort and style, the crochet shell stitch skirt is the perfect choice.
With its romantic, scalloped texture and flowy silhouette, the shell stitch skirt flatters all body types and can be customized for any size or length—from flirty minis to elegant maxis. Whether you’re heading to the beach, brunch, or just lounging at home, this skirt will become a staple in your handmade wardrobe.
Let’s dive into a step-by-step tutorial that walks you through everything you need to create your own Easy Crochet Shell Stitch Skirt—for all sizes.
✨ What Makes the Shell Stitch Skirt So Great?
- ✅ Beginner-friendly: Uses basic crochet stitches
- ✅ Fully customizable: Adjust to any size, height, and body shape
- ✅ Stylish and breathable: Perfect for spring and summer
- ✅ Works with most yarn weights: From light cotton to soft acrylic blends
- ✅ One-piece construction: Made in the round, no complex shaping
📐 Sizing Overview
This pattern is “made to measure”, so you won’t need a traditional written pattern for sizing. Instead, you’ll use your body measurements to create a custom fit.
You’ll need to measure:
- Waist circumference – where you want the waistband to sit
- Hip circumference – the fullest part of your hips
- Desired skirt length – mini, midi, or maxi
🧰 Materials You’ll Need
| Item | Details |
|---|---|
| Yarn | Cotton or cotton-blend yarn (DK or worsted weight) |
| Hook | 4.0 mm (G) to 5.5 mm (I), depending on yarn |
| Measuring Tape | For accurate sizing |
| Scissors | For trimming ends |
| Stitch Markers | Optional but helpful |
| Tapestry Needle | For weaving in ends |
| Elastic or Drawstring | Optional waistband closure |
Yarn Estimates (Approximate)
| Skirt Length | Small–Medium | Large–XL | Plus Sizes |
|---|---|---|---|
| Mini (16”) | 500–600 yds | 700–800 yds | 900–1000 yds |
| Midi (22”) | 700–800 yds | 900–1000 yds | 1100–1200 yds |
| Maxi (30”+) | 900–1000 yds | 1100–1300 yds | 1400+ yds |
🧶 Stitch Abbreviations & Techniques
| Stitch | Abbreviation | Description |
|---|---|---|
| Chain | ch | Creates the foundation and turning chains |
| Slip Stitch | sl st | Joins rounds or stitches |
| Single Crochet | sc | Used in waistband and finishing |
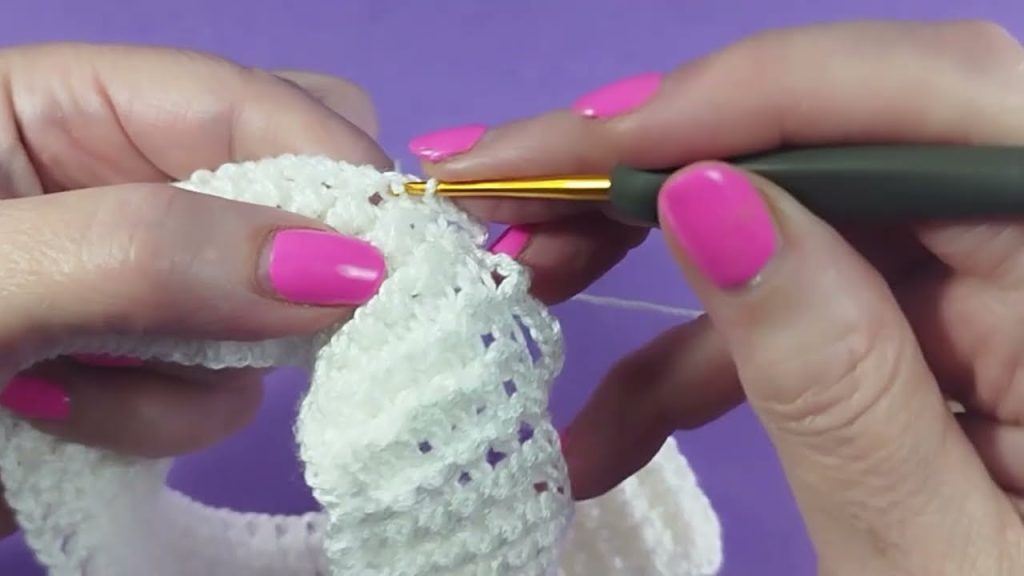
| Double Crochet | dc | Main stitch used in shell pattern |
| Shell Stitch | – | 5 dc into the same stitch/space |
🪡 Step-by-Step Instructions
🔹 Step 1: Measure and Chain
- Measure your waist or high hip—wherever you want your skirt to sit.
- Chain a foundation that fits snugly but not tight around that area.
- Use a stitch multiple of 6 + 1 extra stitch to make the shell stitch pattern work.
- Example: Waist is 34” → If your gauge is 4 stitches per inch, you’d chain 136 + 1 = 137.
TIP: Wrap the chain around your waist to check the fit before joining.
- Join the last chain to the first with a slip stitch, being careful not to twist.
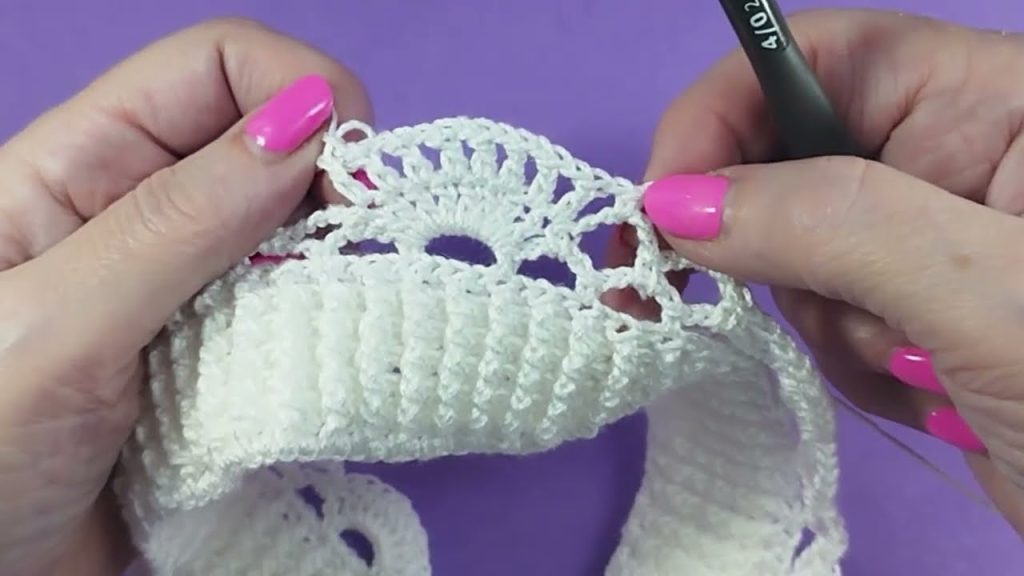
🔹 Step 2: Waistband (Optional – for Elastic or Drawstring)
If you want a structured waistband, follow these steps:
- Work 5–6 rounds of single crochet (sc) in the round.
- Mark the beginning of each round if you’re not joining.
- Optional: Add chain spaces in one round to create holes for a drawstring (e.g., sc in 10, ch 1, skip 1, repeat).
If you’re adding elastic, fold the waistband down and sew it into a casing, leaving a small gap to insert the elastic. Then sew the gap closed.
🔹 Step 3: Start Shell Stitch Pattern
Now for the fun part!
Round 1:
- Skip 2 sts, 5 dc in next st, skip 2 sts, sc in next st, repeat around.
- Join with a sl st to the first dc.
Round 2:
- Shell (5 dc) in each sc from the previous round, sc in the 3rd dc of each shell, repeat.
- Continue this round for the entire skirt body.
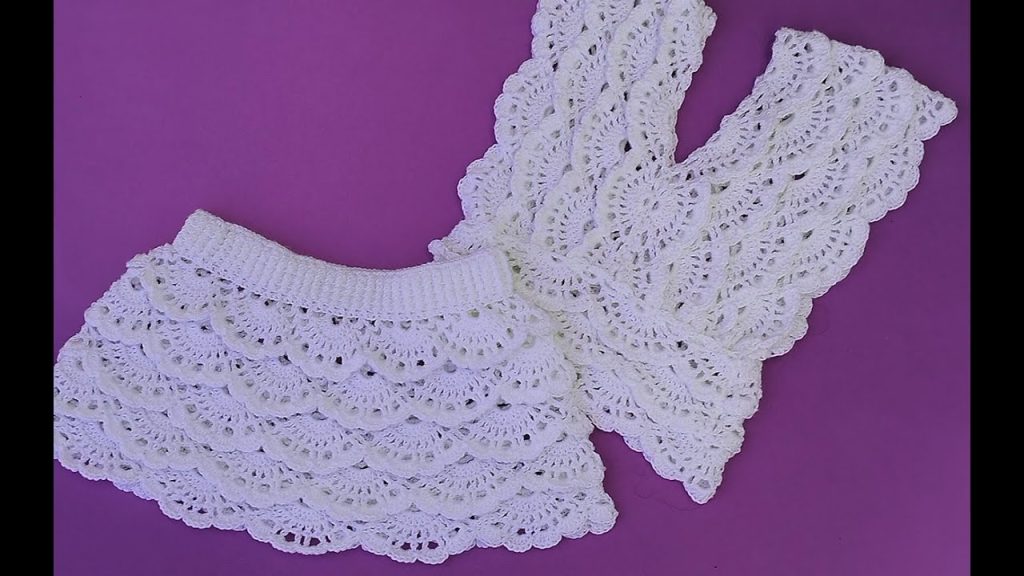
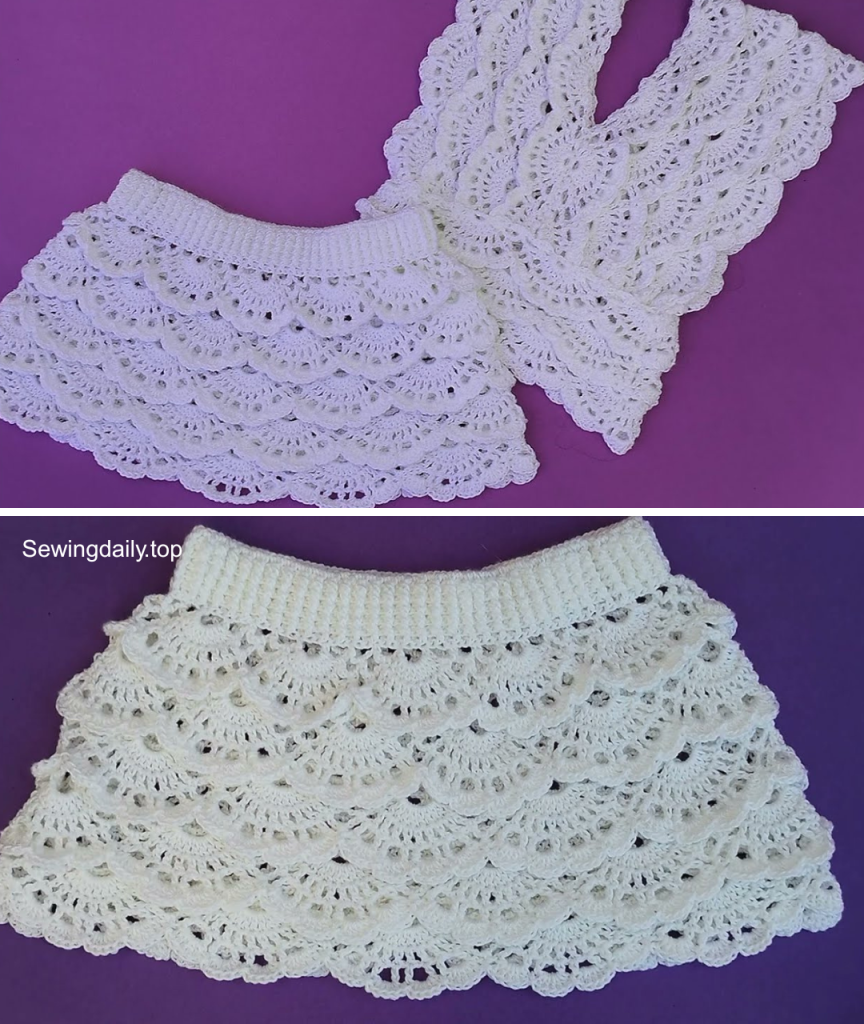
Visual Reference: Each shell sits on top of a sc, and each sc sits on top of the center of a shell.
🔹 Step 4: Adjusting Fit and Flare
The beauty of this pattern is its natural drape and slight flare from the shell stitch itself. But you can adjust for a looser or tighter fit:
- To increase flare: Add extra shells in between every 5–6 rounds.
- To keep it fitted: Continue without increasing.
Try the skirt on every few rounds to check fit and make adjustments if needed.
🔹 Step 5: Crochet to Desired Length
- Mini: 14–16 rounds
- Midi: 22–28 rounds
- Maxi: 35+ rounds
Just keep repeating the shell stitch round until the skirt is the length you want!
🔹 Step 6: Finishing the Hem
Once you reach the desired length, finish with one or more of these options:
Option A: Simple Edge
- Work 1–2 rounds of single crochet (sc) to clean up the edge.
Option B: Scalloped Edge
- Skip 1 st, 5 dc in next st, skip 1, sc in next, repeat around.
Option C: Picot Trim
- Sc in next st, ch 3, sl st in 1st ch, sc in next st, repeat.
🔹 Step 7: Weave in Ends & Block
- Use a tapestry needle to weave in all loose yarn ends.
- Gently block the skirt (optional but recommended), especially if your yarn curls. Lay it flat, spritz with water or steam block to help it drape properly.
🧵 Optional Customizations
🎨 Color Variations
- Stripes or ombré using self-striping yarn
- Two-tone hem or waistband
- Rainbow or gradient theme
✂️ Style Adjustments
- High-waisted look: Make waistband taller
- A-line flare: Gradually increase stitch count
- Maxi skirt: Use flowy cotton or bamboo yarn
👜 Add-Ons
- Side slits
- Lining (especially for open stitch work)
- Crochet belt or drawstring
💬 Frequently Asked Questions (FAQs)
Q: Can I use a different yarn weight?
A: Yes, but adjust your hook and gauge. DK or worsted weight works best for beginners.
Q: Will this skirt stretch?
A: Cotton yarn has minimal stretch, but shell stitch has natural give. Using elastic in the waistband helps with stability.
Q: Can I line the skirt?
A: Definitely. You can hand sew or machine sew a lightweight lining, especially if using open lacework.
Q: Is it beginner-friendly?
A: Yes! If you can double crochet and count stitches, you’re good to go.
🧼 Care Instructions
- Hand wash in cold water or use a delicate machine cycle
- Lay flat to dry
- Avoid heavy blocking unless necessary
🎉 You Did It!
You’ve just created a beautiful, stylish, and made-to-fit crochet shell stitch skirt. Whether you wear it to the beach, brunch, or a music festival, this versatile piece will turn heads—and best of all, you made it yourself.
Don’t stop here! Use this same method to make matching shell stitch tops, dresses, or even rompers. Once you’ve mastered the shell stitch, the possibilities are endless.
Video tutorial: