 by
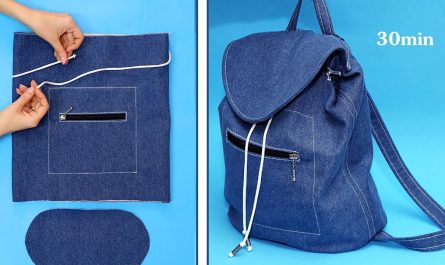
by A sustainable, chic upcycle project turning old jeans into a fold‑under flap shoulder bag with compartments for organization and strong styling details.
What You’ll Make
A medium‑size shoulder bag with a fold‑under front flap, multiple external pockets (including original jean pockets), an interior lining with pockets, and a long strap. The fold‑under flap gives it a clean, modern look, while the rugged denim adds texture. Great for daily use — carrying a tablet, notebook, wallet, phone.

Finished Bag Dimensions (approximate)
| Measurement | Size |
|---|---|
| Bag body width (bottom) | 13 in (≈ 33 cm) |
| Bag body height (excluding flap) | 10 in (≈ 25 cm) |
| Depth/gusset (bottom) | 4 in (≈ 10 cm) |
| Flap drop (when folded over) | 6 in (≈ 15 cm) |
| Strap drop (from top of body to shoulder) | 24 in (≈ 61 cm) — enough for cross‑body or shoulder wear |
Materials & Tools
| Item | What to Use / Size | Notes |
|---|---|---|
| Old Jeans | One pair, preferably medium‑to‑heavy denim | Use areas with large flat panels (thighs, seat) for body pieces |
| Lining Fabric | Cotton, canvas, or similar strong cloth; about ½ yard (~45×20 in) | Should contrast or complement denim |
| Fusible Interfacing | Medium weight | To stiffen flap and bottom base so bag keeps shape |
| Thread | Heavy‑duty / denim / upholstery thread; matching & contrast colors | Use contrast for decorative topstitching if desired |
| Sewing Machine Needles | Denim / Jeans needle (90/14 or stronger) | To handle thick denim layers without breaking |
| Magnetic Snap, Turn‑Lock, or Buckle | One set | For front flap closure; choice gives different styles |
| Strap Hardware (optional) | Slide adjuster, D‑rings, swivel hooks if desired | If making adjustable strap or detachable strap ends |
| Tools | Scissors, rotary cutter, ruler, chalk / fabric marker, pins / clips (clips especially for thick layers), iron & ironing board, seam ripper | Standard sewing tools |
Pattern Pieces & Cutting Plan
Here are all the fabric pieces to cut, with suggested sizes. You can adjust by ±1‑2 in for larger or smaller bag.
| Piece | Qty | Size (inches) | From Denim or Lining | Special Notes |
|---|---|---|---|---|
| Exterior – Front Panel | 1 | 13 × 10 | Denim | If reusing jean pocket(s), plan placement here |
| Exterior – Back Panel | 1 | 13 × 10 | Denim | |
| Bottom / Base Panel | 1 | 13 × 4 | Denim | Reinforce with interfacing underneath |
| Side Gussets | 2 | 10 × 4 | Denim | These give the depth / shape |
| Flap Panel | 1 | 13 × 6 | Denim | With interfacing for stiffness |
| Strap | 1 | ~ 52 × 2½ | Denim (or denim + webbing) | Reinforce ends; optional adjustability |
| Optional Exterior Pocket Patch | 1‑2 | ~ 6 × 6 | Denim or pocket pieces from jeans | For extra storage or decoration |
| Lining – Front / Back Panels | 2 | 13 × 10 each | Lining Fabric | |
| Lining – Bottom & Side Gussets | same as exterior bottom & gussets | 13 × 4 and 10 × 4 | Lining | |
| Flap Lining | 1 | 13 × 6 | Lining | Sandwich flap interior if you want both sides clean |
| Interior Pocket | 1 | ~ 7 × 8 | Lining | For phone, keys, wallet |
| Key Leash / Small Strap Inside | 1 | ~ 6 × 1½ | Scrap or lining fabric with hardware | Keeps keys secure inside |

Cutting & Layout Tips
- Lay out your jeans flat; cut along existing seams if possible to get large panels (seat, thighs).
- Retain any usable jean pockets (back pockets, coin pockets) — great for exterior features.
- Mark the location of pocket placements, flap center, strap joins using chalk.
- Pre‑wash linen/lining fabric (if it shrinks) and interfacing (if needed) to avoid post‑sewing distortion.
- Fuse interfacing to flap (exterior flap piece) and to bottom base (exterior base) to help the bag keep shape.
Step‑by‑Step Construction
Step 1: Prepare Exterior Pieces & Pockets
- Remove / Prep Jean Pockets: If using original back pockets, carefully unpick and clean up edges. Leave seam allowance if needed.
- Patch Pocket(s):
- Hem or edge finish the top edge (fold ½ in, press, fold again, topstitch).
- Position patch pocket(s) on front panel as desired — e.g. two symmetrical pockets, or one pocket plus belt loop detail. Reinforce top corners with backstitching or small bar tacks.
- Apply Interfacing:
- On flap panel (exterior), fuse interfacing to wrong side.
- On the bottom base panel (exterior), fuse interfacing underneath so the bag bottom is sturdy.
Step 2: Construct Exterior Body
- Sew Bottom to Side Gussets:
- Take bottom panel, align side gussets to its short ends, sew (right sides together). Press seams open or toward gusset for less bulk.
- Attach Front & Back Body Panels:
- Sew front panel to long edge of base/gusset assembly; then attach back panel the same way. Now exterior is a box shape.
- Attach Flap (optional if you want flap sewn in permanently):
- If flap is attached permanently: at top back edge of back panel, align flap piece (right side of flap to right side of back panel top edge), sew across full width. Leave lining flap separate if using lining in flap (will be sewn later). Otherwise flap is free‑hanging.
Step 3: Lining & Interior Pockets
- Make Lining Body:
- Repeat the construction: bottom + side gussets + front & back lining panels. Leave top edges open.
- Interior Pocket:
- On one lining front/back panel, mark where you want the pocket (say 2‑3 in below lining top edge, centered or offset).
- Hem pocket top, edge finish, then sew sides & bottom of pocket. Reinforce corners.
- If including a key leash, attach small strip + hardware near side seam of lining.
Step 4: Strap Construction
- Strap:
- Cut strap piece. If using denim, you may fold or create a tube for strength. Turn and press, topstitch edges.
- If you want adjustable strap: insert slider hardware; ensure strap length is such that drop is ~24 in (or your preference).
- Attach Strap Ends:
- Position strap ends at the top corners of the exterior body, toward side gussets. Make sure the strap sits flat and evenly.
- Reinforce with strong stitching (box + X pattern) or bar tacks. Use optional belt loop accents or decorative patches over strap ends.
Step 5: Closure and Flap Finishing
- Attach Closure Hardware:
- On flap front (exterior), mark center, attach one half of magnetic snap / turn‑lock / buckle.
- On the front body panel (exterior), mark matching point so flap folds over neatly and attaches securely; attach mating part.
- Finish Flap (if lined):
- If you have separate lining flap piece: place exterior flap and lining flap right sides together, sew around sides & bottom (leave top edge open). Turn right side out, press, topstitch edges. Then attaching closure is easier & inside looks clean.
Step 6: Join Exterior & Lining, Final Assembly
- Insert Lining into Exterior:
- Exterior: right side out.
- Lining: inside out.
- Insert exterior into lining so right sides touch; strap ends sandwiched inside between lining & exterior at side seams.
- Align & Sew Top Edge:
- Pin/clip around top edges, align side seams & gussets. Sew all layers around top with seam allowance (~½ in). Make sure you catch both layers and strap ends.
- Turn Bag Right Side Out:
- Through opening in lining (if you left a gap) or all at once if you constructed it so you can pull through.
- Push lining inside bag, smooth edges. Press top edge flat, especially around flap and strap connections.
- Close Lining Gap:
- Use hand stitch (slip stitch) or machine stitch close to edge to close the turning gap in lining.
- Topstitch Finishing:
- Topstitch around bag top edge (~¼ in from edge) for structure & clean look.
- Topstitch flap edges, pocket edges; reinforce high stress points like strap joins & bottom corners.
Design Variations & Style Ideas
- Color Contrast Flap & Strap: Use a lighter wash denim or even a different fabric (canvas, leather) for flap or strap for contrast.
- Multiple Exterior Pocket Layouts: Two pockets, a mix of patch and original jean pockets; or zip pocket on exterior for phone.
- Alternate Closure Styles: Instead of magnetic snap, try buckle straps, metal clasp, or even hidden zipper under flap for security.
- Adjust Size: Increase width and depth if you want it to carry more; shrink if you want a smaller chic bag. Keep proportions.
- Decorative Stitching & Patches: Use denim seams, rivets, top‑stitched accents; or add embroidery, applique, painted designs.
- Additional Compartments: Add divider inside, or a zippered liner, or smaller inner pockets for bottle, pens, etc.
Care & Finishing Notes
- Trim all bulky seam allowances inside so that bag lies flat and doesn’t rub.
- Press seams well; use a steam iron to ease thick denim.
- Reinforce areas under strain: strap ends, flap closure, lower back where bag may rest against body.
- To clean: spot clean as needed; wash inside‑out, cold water; re‑shape while damp; avoid harsh detergents that fade denim.
- Store with some stuffing so bag holds its shape, especially flap doesn’t crease badly.
Summary
This “Urban Fold‑Under Denim Shoulder Bag” pattern gives you a useful, stylish, and sustainable bag: the fold‑under flap makes it elegant, the jean pockets and patchwork add personality, and the sturdy construction ensures it lasts. Upcycling denim not only reduces waste, it lets you make something truly unique.
Video tutorial: