by
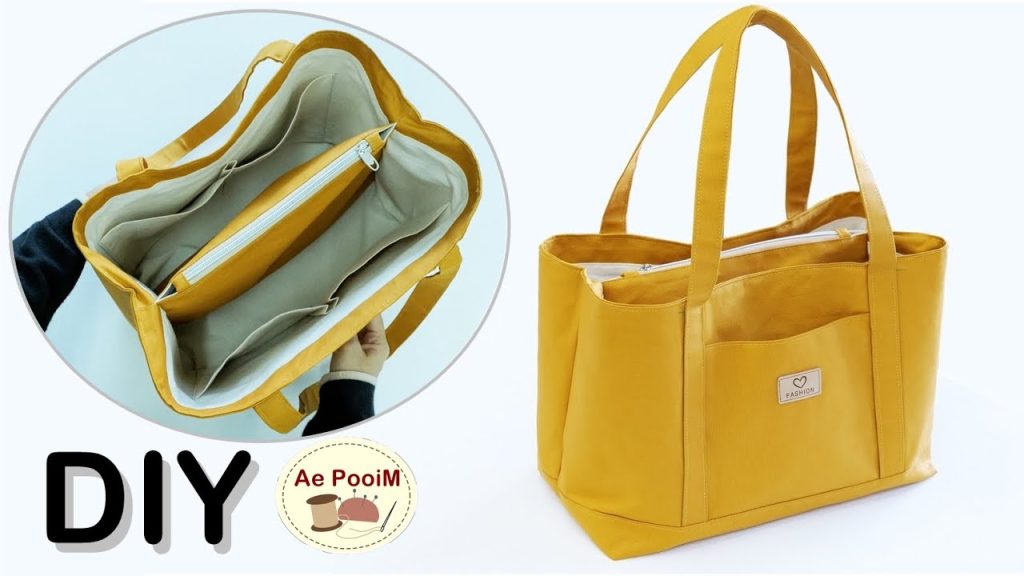
by A well-organized tote bag is a game-changer for daily life. It’s not just about carrying your essentials; it’s about knowing exactly where everything is. Adding an inner zippered divider pocket elevates a standard shoulder tote into a highly functional and secure everyday companion. This design keeps your valuables safe and prevents your bag from becoming a chaotic abyss. While it involves a few more steps than a basic tote, the added utility is well worth the effort.

Why Sew a Tote with an Inner Zippered Divider?
- Superior Organization: Separate your laptop from your lunch, or keep your wallet and keys secure in their own zippered compartment.
- Enhanced Security: The zippered pocket provides peace of mind for valuables, protecting them from spills or accidental loss.
- Professional Finish: An internal divider adds a touch of sophistication and craftsmanship to your handmade bag.
- Customization: Choose fabrics, hardware, and dimensions that perfectly suit your needs and style.
- Skill Growth: This project is fantastic for building confidence with zippers, structure, and more advanced bag-making techniques.
What You’ll Need:
- Exterior Fabric: 1 yard (0.9 meters) of sturdy fabric like canvas, duck cloth, denim, or upholstery fabric. Choose a medium to heavy weight for durability.
- Lining Fabric: 1 yard (0.9 meters) of quilting cotton, cotton twill, or a durable light-to-medium weight fabric.
- Interfacing:
- Heavyweight Fusible Interfacing: 1 yard (0.9 meters) for the main bag body (e.g., Pellon 70 Peltex II, Decovil Heavy). This is crucial for structure.
- Medium-Weight Fusible Interfacing: 1/2 yard (0.45 meters) for the inner zippered divider and any other internal slip pockets (e.g., Pellon SF101, Pellon 926F).
- Zipper for Divider Pocket: One 9-inch (23 cm) nylon coil zipper.
- Main Bag Closure (Optional): One 16-inch (40 cm) nylon coil zipper for the top of the bag, or a large magnetic snap.
- Webbing for Straps: 2 yards (1.8 meters) of 1.5-inch (3.8 cm) wide cotton or polyester webbing for comfortable shoulder straps.
- Thread: Strong, all-purpose polyester thread to match your fabrics. Heavy-duty or topstitching thread for visible seams on the exterior.
- Tools:
- Sewing machine with a walking foot (highly recommended for thick layers) and a zipper foot.
- Rotary cutter with a new blade, long quilting ruler, and large cutting mat.
- Fabric marker or tailor’s chalk.
- Plenty of strong pins or fabric clips (Wonder Clips are excellent for thick fabrics).
- Iron and ironing board.
- Tailor’s clapper (for crisp seams).
- Seam ripper (just in case!).
Understanding the Bag Design & Cutting Dimensions:
This tutorial creates a finished tote bag approximately 16 inches wide x 12 inches tall x 5 inches deep. The inner zippered divider pocket will run down the center.
- Main Exterior Panels (Cut 2): 17″ W x 13″ H (43.2 cm x 33 cm) from Exterior Fabric.
- Main Lining Panels (Cut 2): 17″ W x 13″ H (43.2 cm x 33 cm) from Lining Fabric.
- Heavyweight Fusible Interfacing (Cut 2): 17″ W x 13″ H. Fuse to wrong side of Main Exterior Panels.
- Inner Zippered Divider Pocket (Cut 2): 17″ W x 10″ H (43.2 cm x 25.4 cm) from Lining Fabric.
- Medium-Weight Fusible Interfacing (Cut 2): 17″ W x 10″ H. Fuse to wrong side of Inner Zippered Divider Pocket pieces.
- Straps (Cut 2): 28″ L (71 cm) from webbing.
Note: All seam allowances are 1/2 inch (1.25 cm) unless otherwise stated.
Step-by-Step Sewing Instructions:
1. Prepare & Fuse Fabric Pieces
- Cut all fabric pieces according to the dimensions.
- Fuse interfacing:
- Fuse the heavyweight fusible interfacing to the wrong side of your Main Exterior Panels. Press firmly to ensure good adhesion.
- Fuse the medium-weight fusible interfacing to the wrong side of your Inner Zippered Divider Pocket pieces.
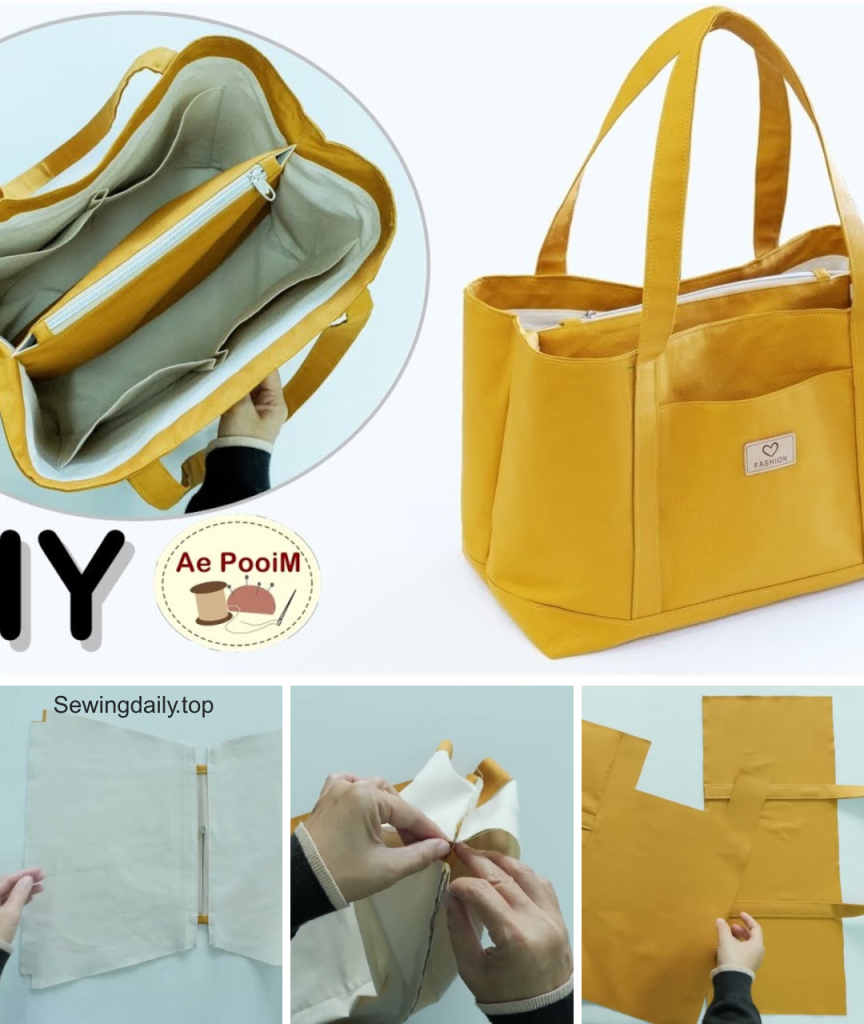
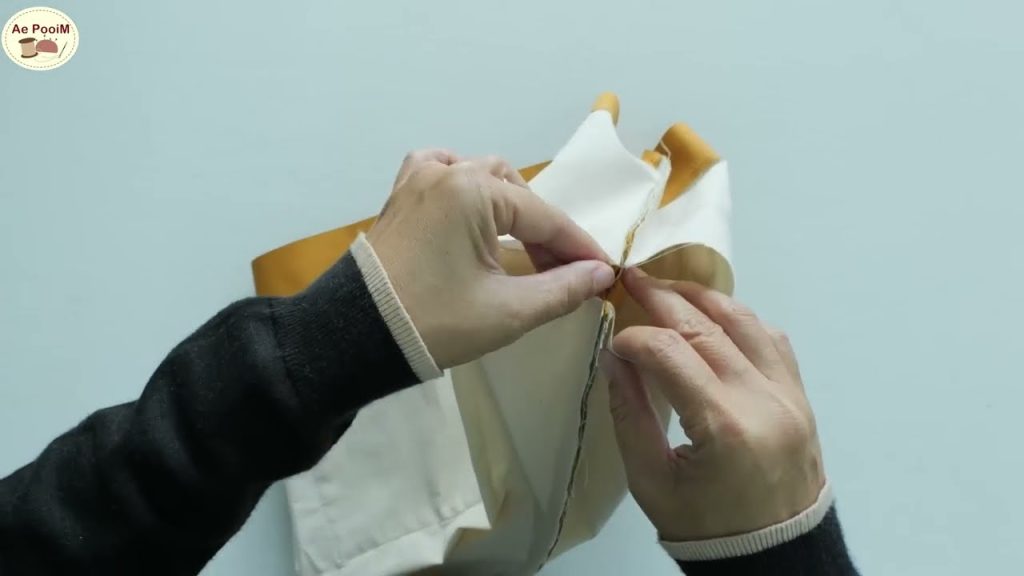
2. Construct the Inner Zippered Divider Pocket
This is the core of your organization!
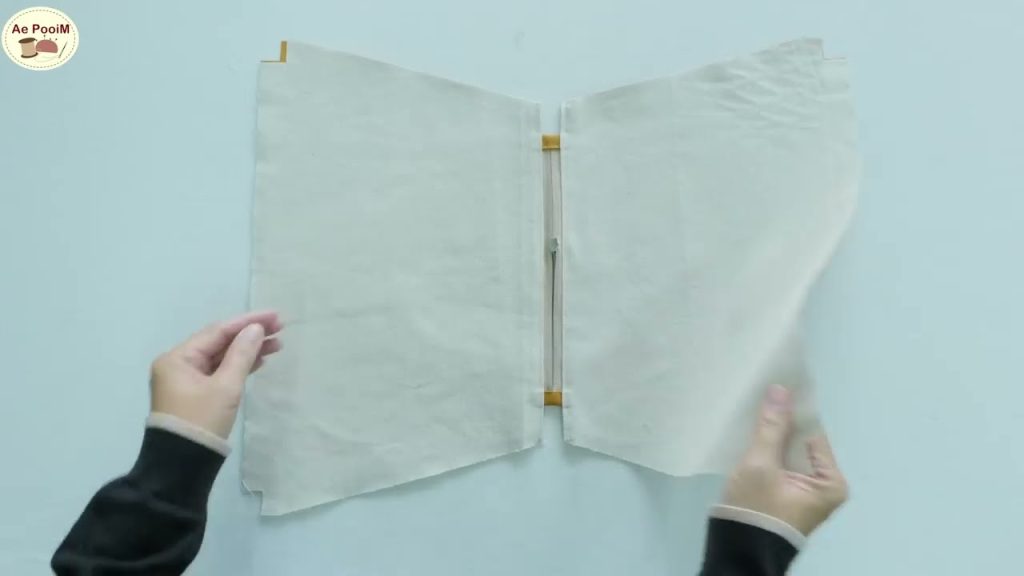
- Prepare Zipper Opening: Take one interfaced Inner Zippered Divider Pocket piece. On one 17-inch long edge, mark a rectangle for your zipper opening. For a 9-inch zipper, center a 9.5-inch long line, about 1.5 inches down from the top edge. Draw another parallel line 0.5 inches below it, and connect the ends to form a box. Draw a line down the center of this box, ending in a ‘Y’ shape at each end, about 1/2 inch from the box’s ends.
- Attach Zipper to First Panel:
- Place the zipper right side down over the drawn rectangle on your interfaced pocket piece, centering the zipper over the box. Tape or pin in place.
- Stitch precisely along the drawn box lines, pivoting sharply at the corners.
- Carefully cut along the center line and the ‘Y’s, through both the fabric and the zipper tape, stopping close to the stitches at the ends of the ‘Y’s.
- Push the zipper tape through the opening to the wrong side of the fabric. Press the fabric neatly away from the zipper teeth on all sides.
- Topstitch around the zipper opening, about 1/8 inch (0.3 cm) from the edge, to secure the zipper and give it a clean finish.
- Complete the Pocket:
- Place the second interfaced Inner Zippered Divider Pocket piece right side down on your work surface.
- Place the first pocket piece (with the zipper attached) on top, right side up, aligning all edges.
- Fold the top of the pocket down so that the bottom raw edge of the piece with the zipper attached meets the bottom raw edge of the second pocket piece.
- Stitch the pocket together: first, stitch across the top raw edge of the pocket (above the zipper), then stitch down both sides and across the bottom, using a 1/2 inch (1.25 cm) seam allowance. This forms the pocket bag. Trim excess fabric from corners.
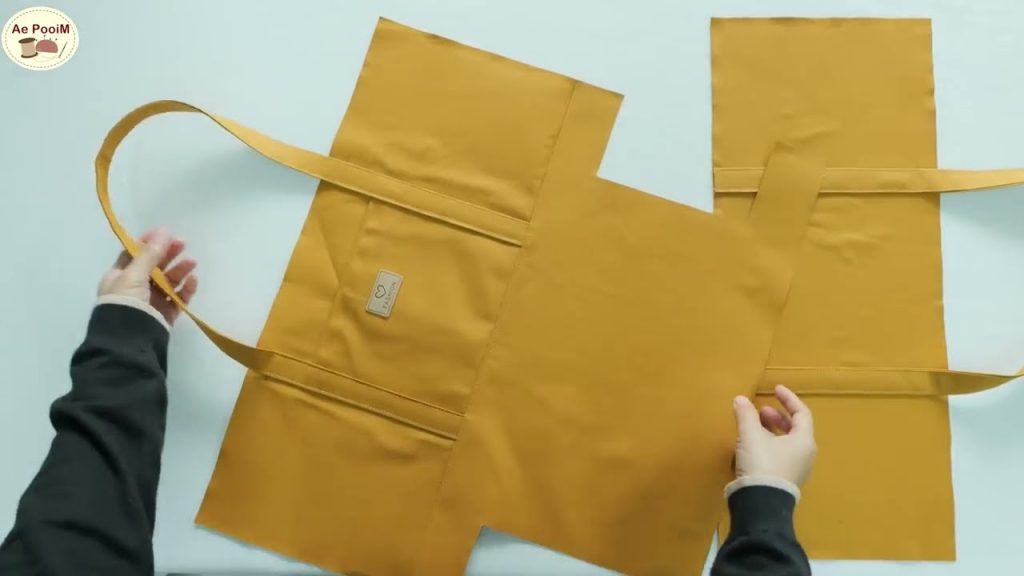
3. Prepare & Attach the Straps
- Straps: Take your two webbing straps. Carefully melt the cut ends of the webbing with a lighter (briefly!) to prevent fraying.
- Mark Strap Placement on Exterior Panels: On each Main Exterior Panel, find the exact center of one 17-inch long edge (this will be the top). Measure 4.5 inches (11.4 cm) in from each side edge and mark. These marks indicate where the outer edge of your straps will be placed.
- Attach Straps: Place the raw ends of one webbing strap on the right side of one Main Exterior Panel at the marked points. The strap should be pointing downwards onto the fabric. Pin in place. Repeat for the other strap on the second Exterior Panel.
- Secure Straps: Stitch the straps to the exterior panels with a 1/4 inch (0.6 cm) seam allowance. For extra strength, stitch a box with an “X” through it at each strap attachment point.
4. Assemble the Exterior Bag
- Place the two Main Exterior Panels (with straps attached) right sides together, aligning all edges.
- Pin along the two side edges and the bottom edge.
- Stitch these three edges using a 1/2 inch (1.25 cm) seam allowance. Backstitch at the beginning and end of each seam.
- Boxed Corners: At each bottom corner, flatten the corner so the side seam meets the bottom seam, forming a triangle. Measure 2.5 inches (6.3 cm) from the tip of the triangle and draw a line perpendicular to the seam. Stitch directly along this line. Trim the excess corner, leaving a 1/2 inch (1.25 cm) seam allowance. This creates a 5-inch deep box bottom.
- Finish all raw seam allowances with a zigzag stitch or serger.
5. Assemble the Lining Bag (with Divider)
- Attach Divider to Lining Panels:
- Find the exact center of one 17-inch long edge of one Main Lining Panel.
- Find the exact center of the top (zippered) edge of your assembled Inner Zippered Divider Pocket.
- Place the zipper pocket on top of the lining panel, aligning their center marks and the top edge of the zippered pocket with the center of the lining panel.
- Stitch the zippered pocket to the lining panel by stitching a line straight down the middle of the pocket (perpendicular to the zipper) from the top edge to the bottom edge. This will create two large slip pockets on the lining panel, with the zippered pocket running down the middle. This is what creates the main compartments of your tote.
- Sew Lining Side and Bottom Seams:
- Place the two Main Lining Panels (one with the attached zippered divider) right sides together, aligning all edges.
- Pin along the two side edges and the bottom edge.
- Stitch these three edges using a 1/2 inch (1.25 cm) seam allowance. Backstitch at the beginning and end of each seam.
- Important: Leave an Opening! When sewing one of the lining side seams, leave a 5-6 inch (12.7-15 cm) opening in the middle of the seam. This is crucial for turning the bag right side out later.
- Boxed Corners: Repeat the boxed corner steps (from 4.4) for the lining bag.
- Finish all raw seam allowances with a zigzag stitch or serger.
6. Combine Exterior and Lining Bags
- Keep the exterior bag right side out.
- Keep the lining bag wrong side out.
- Carefully insert the exterior bag into the lining bag, so their right sides are facing each other. The straps should be tucked between the layers.
- Align the top raw edges of both bags perfectly. Match the side seams and corner seams. Pin securely all around the top opening.
- Main Closure Zipper (Optional): If adding a top zipper, you would insert it here, sandwiching it between the exterior and lining layers. (This requires a more advanced zipper installation method; for a beginner-friendly approach, you might opt for a magnetic snap or leave it open.)
- Stitch around the entire top opening with a 1/2 inch (1.25 cm) seam allowance. Backstitch at the start and end.
7. Finish the Tote Bag
- Reach into the opening you left in the side seam of the lining. Carefully pull the entire bag through this opening until it’s right side out.
- Gently push out all corners and seams to create a neat, defined shape. Use a point turner or a blunt stick if needed.
- Press the entire bag thoroughly, especially the top seam.
- Close the lining opening: Press the raw edges of the opening inwards by 1/2 inch (1.25 cm). Stitch the opening closed either by machine (topstitch very close to the edge) or by hand using an invisible ladder stitch for a seamless finish.
- Push the lining down into the bag. Press the top edge of the bag again.
- Topstitch: For a professional finish and added durability, topstitch around the entire top opening of the bag, about 1/8 to 1/4 inch (0.3-0.6 cm) from the edge. This secures the lining to the exterior and prevents it from rolling out. If you didn’t add a top zipper, you could add a magnetic snap here at the center top.
Customization & Embellishment Ideas:
- External Pockets: Add a patch pocket or a zippered pocket to the exterior of the bag before assembly.
- Key Fob/D-ring: Add a small loop with a D-ring near the top inside seam to clip keys or a sanitizer bottle.
- Fabric Choice: Play with contrasting colors and textures for the exterior and lining. A bold print on the lining can be a fun surprise!
- Embroidery/Appliqué: Personalize the exterior with embroidery, fabric paint, or a sewn-on appliqué.
Your functional and stylish shoulder tote bag with an inner zippered divider pocket is now complete! Enjoy the satisfaction of carrying a bag that perfectly organizes your world and showcases your sewing skills. What will you load into your beautifully organized tote first?
Video tutorial: