by
by Welcome to the ultimate upcycling adventure! If you watched the video and were inspired to turn a pair of old, tired jeans into a trendy, functional accessory, you’re ready for The Urban Explorer Mini-Backpack pattern.
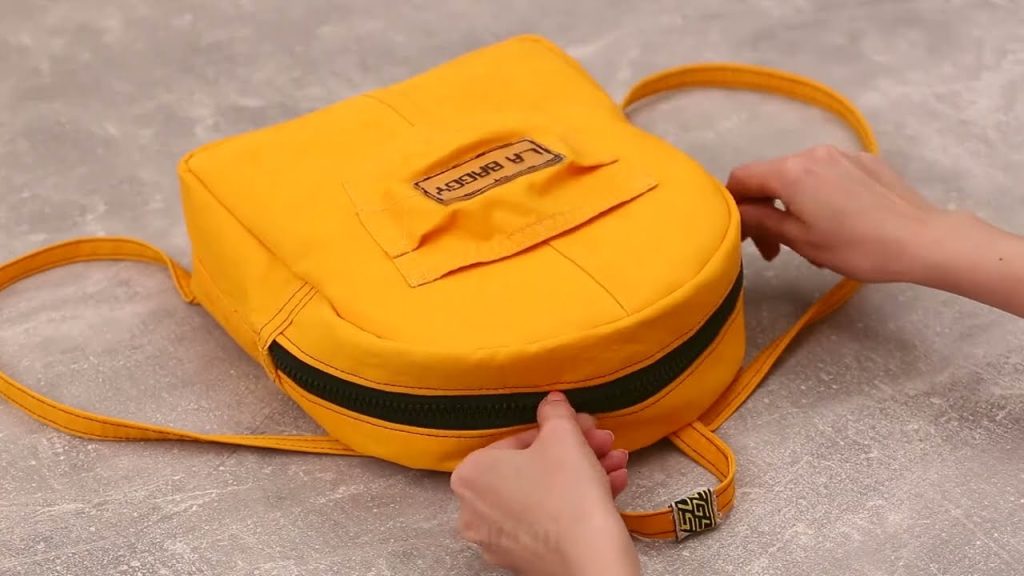
This design is a sophisticated take on the denim mini-backpack, focusing on sturdiness, practicality, and maximum use of your jeans’ unique features—like pockets and seams. We’ll build a boxy, fully-lined backpack with a zippered closure and adjustable straps, perfect for carrying your daily essentials while showcasing your commitment to sustainable style.

Grab your sharpest scissors and that old pair of jeans (or three!)—it’s time to stitch!
✂️ Project Quick Details
| Feature | Detail |
| Skill Level | Intermediate (Requires zipper and hardware installation) |
| Finished Size (Approx.) | 9 inches wide x 11.5 inches tall x 4 inches deep |
| Material Focus | Recycled Denim (from jeans or jackets) |
| Seam Allowance | 1/2 inch (1.25 cm) unless otherwise noted |
🧵 Materials & Tools Checklist
To make one Urban Explorer Mini-Backpack, you will need:
- Fabric A (Main Body): One or two pairs of old jeans (or a similar amount of sturdy, non-stretch denim fabric).
- Fabric B (Lining): 1/2 yard of lightweight woven cotton or canvas.
- Interfacing (Recommended): 1 yard of heavy-duty fusible interfacing (needed to stabilize the denim and lining).
- Zipper: One 16-inch or longer nylon coil zipper (cut to fit later).
- Hardware Kit:
- 2 x 1-inch (25mm) rectangle rings.
- 2 x 1-inch (25mm) adjustable sliders/tri-glides.
- 2 x 1-inch (25mm) D-rings (for the hanging loop).
- Notions:
- Heavy-duty thread (for denim seams).
- Denim sewing machine needle (size 100/16 or 110/18).
- Standard sewing machine and zipper foot.
- Rivet/grommet tool (optional, for strap reinforcement).

📐 Cutting Instructions (Pattern Pieces)
Before Cutting: Deconstruct your jeans. Cut off pockets and seams you wish to use as decorative accents. Iron all fabric pieces flat. Apply fusible interfacing to the entire back of the Denim Main Body pieces.
| Piece Name | Fabric | Quantity | Dimensions (Width x Height) | Note |
| Main Panel | Denim | 2 | 10 inches x 12 inches | Front and Back of the bag. |
| Base/Side Strip | Denim | 1 | 4 inches x 30 inches | The continuous bottom and side gusset. |
| Lining Panel | Lining | 2 | 10 inches x 12 inches | Full lining pieces. |
| Lining Base/Side | Lining | 1 | 4 inches x 30 inches | Lining gusset. |
| Strap Connectors | Denim | 2 | 2 inches x 4 inches | For the bottom D-rings. |
| Strap Body | Denim | 2 | 3 inches x 40 inches | The main shoulder straps. |
| Hanging Loop | Denim | 1 | 2 inches x 8 inches | Top loop for hanging. |
| Front Pocket | Denim | 1-2 | Use original back pockets of jeans | Cut off pockets with a 1-inch margin for sewing. |
📝 Step-by-Step Sewing Pattern
(Seam Allowance is 1/2 inch unless stated otherwise.)
Part 1: Preparing Straps and Hardware Tabs
- Hanging Loop: Take the 2″ x 8″ loop piece. Fold it in half lengthwise (RS together), sew the long edge, turn right side out, and press. Topstitch both long edges. Set aside.
- Strap Connectors (Bottom D-Rings):
- Take the two 2″ x 4″ pieces. Fold each piece in half lengthwise (RS together) and sew the long edge. Turn RS out and press. Topstitch the long edges.
- Thread a rectangle ring through the center of each tab. Fold the raw ends together. These are your bottom attachment points. Set aside.
- Shoulder Straps:
- Take the two 3″ x 40″ pieces. Fold both long edges 1/2 inch toward the center and press. Fold the strip in half (raw edges enclosed) and press again.
- Topstitch down both long edges of each strap, 1/8 inch from the fold. Do not attach hardware yet. Set aside.
- Front Pocket (Optional): If using an original jean pocket, topstitch it onto the center of the Front Main Panel (Denim) now, reinforcing the top edge with a second row of stitching.
Part 2: Building the Main Shell
- Attaching Hardware Tabs:
- On the Back Main Panel (Denim), measure 1 inch up from the center bottom edge.
- Place the raw, folded ends of the two Strap Connectors (with rectangle rings) here, 2 inches apart from the center line. Baste (stitch temporarily) them securely in place.
- Assembling the Gusset: Sew the ends of the 4″ x 30″ Base/Side Strip (Denim) together (RS together) to form a loop. Press the seam open.
- Attaching Base to Back Panel: Pin the gusset loop to the Back Main Panel (Denim), aligning the gusset seam with the center bottom edge. Sew the perimeter with a 1/2 inch seam allowance. Clip curves carefully, if needed.
- Attaching Base to Front Panel: Pin the open edge of the gusset loop to the Front Main Panel (Denim). Sew the perimeter.
- Reinforcement: Turn the Main Shell RS out. Topstitch around the entire perimeter of the gusset (where it meets the front and back panels) for professional reinforcement and structure.

Part 3: The Zipper Casing and Top Closure
- Prepare Zipper Casing: The top opening of the shell is currently a loop. We will create two zipper casing strips from the remaining denim fabric. Cut two strips, 2.5 inches x 10 inches each.
- Sew Zipper: Lay the zipper (RS up) between the two casing strips (RS down), aligning the long edges. Sew one strip to one side of the zipper. Repeat for the second strip and the other side of the zipper. Press seam allowance away from the zipper teeth.
- Attach Casing to Shell: Pin one long edge of the assembled casing to the top raw edge of the Main Shell, matching the centers and side seams. Sew with a 1/2 inch seam allowance.
- Hanging Loop: Fold the Hanging Loop in half. Pin it centered on the seam line of the casing and the Main Shell, on the backside. Baste securely.
- Finish Casing: Fold the remaining raw edge of the casing to the inside, covering the seam allowance. Hand-stitch or machine topstitch the folded edge down, securing the casing around the entire top opening. (Leave the zipper open for the next step!)
Part 4: Assembling and Attaching the Lining
- Assemble Lining Gusset: Sew the ends of the Lining Base/Side Strip together to form a loop. Press seam open.
- Attach Lining Panels: Sew the lining gusset to the two Lining Panels (10″ x 12″) in the same way you assembled the main shell (Part 2, Steps 3 & 4), leaving a 6-inch opening unstitched on the side of the lining gusset—this is for turning the entire bag later.
- Attach Lining to Shell: With the Main Shell right side out, insert the Lining Shell (wrong side out) into the Main Shell.
- Pin and Sew: Pin the top raw edge of the Lining Shell to the bottom edge of the zipper casing you installed in Part 3. Sew them together with a 1/2 inch seam allowance.
- Turn the Bag: Reach through the 6-inch opening in the Lining, grab the Main Shell, and pull the entire bag assembly right side out.
- Close Opening: Stitch the 6-inch gap in the lining closed by machine or by hand using an invisible slipstitch. Tuck the lining neatly into the backpack.
Part 5: Final Strap Assembly and Adjustment
- Cut Straps: Take the two finished Strap Body pieces (3″ x 40″).
- Cut the first piece into a 10-inch segment (Top Strap) and a 30-inch segment (Adjustable Strap).
- Repeat for the second strap.
- Thread Sliders (Top Strap): Take the 10-inch Top Strap. Thread one end through a slider (tri-glide), going over the center bar. Sew that end back onto itself to secure it to the slider.
- Thread Rectangular Ring: Take the unsecured end of the 10-inch Top Strap. Thread it through the top D-ring (the one attached to the Strap Connector in Part 1) and secure it back onto itself.
- Thread Adjustable Strap: Take the 30-inch Adjustable Strap.
- Thread one end through the remaining open loop on the slider (tri-glide).
- Bring the end up to the rectangle ring at the top of the bag (the one attached to the Hanging Loop).
- Thread the end of the strap through the rectangle ring.
- Bring the end back down and thread it through the slider’s main channel.
- Secure the final raw end of the strap by folding it twice and stitching it securely.
Your Urban Explorer Mini-Backpack is complete!

💡 Customization & Pro-Tips
- Padded Straps: To make the straps more comfortable, cut two pieces of thin cotton batting to 1.5″ x 30″ and insert them into the center fold of the strap before topstitching (Part 1, Step 3).
- External Water Bottle Pocket: Before assembling the main shell, add a small elasticized pocket piece to the side gusset strip for functionality.
- Faux Leather Base: For a more rugged look, replace the denim Base/Side Strip (gusset) with a piece of durable faux leather or vinyl.
- Distressed Look: Use the raw edges of the denim and leave them exposed on the front pocket edges before stitching them down for a trendy, distressed aesthetic.
Video tutorial: