by
by This project is a fantastic way to enhance your sewing skills, from handling interfacing to creating a polished finish. Even if you’re new to bag making, the clear steps will guide you to a successful and satisfying result. Let’s transform simple fabric into your new favorite accessory!

Why This Tote Bag Will Be Your New Everyday Essential
This isn’t just any tote bag; it’s designed for both aesthetics and functionality.
- Spacious & Practical: Perfect for carrying groceries, books, craft supplies, or your daily essentials.
- Structured & Stylish: The use of interfacing (adhesive fabric) gives the bag a beautiful shape and prevents it from slouching.
- Customizable: Choose your favorite linen prints and colors to truly make it your own.
- Beginner-Friendly: While detailed, the steps are broken down to be manageable for those new to sewing bags.
- Sustainable Choice: Create a reusable bag that’s both fashionable and eco-conscious.
Materials You’ll Need:
Gathering your materials before you start ensures a smooth and enjoyable sewing experience. The video uses linen, and we’ll follow that lead for a crisp, elegant finish.
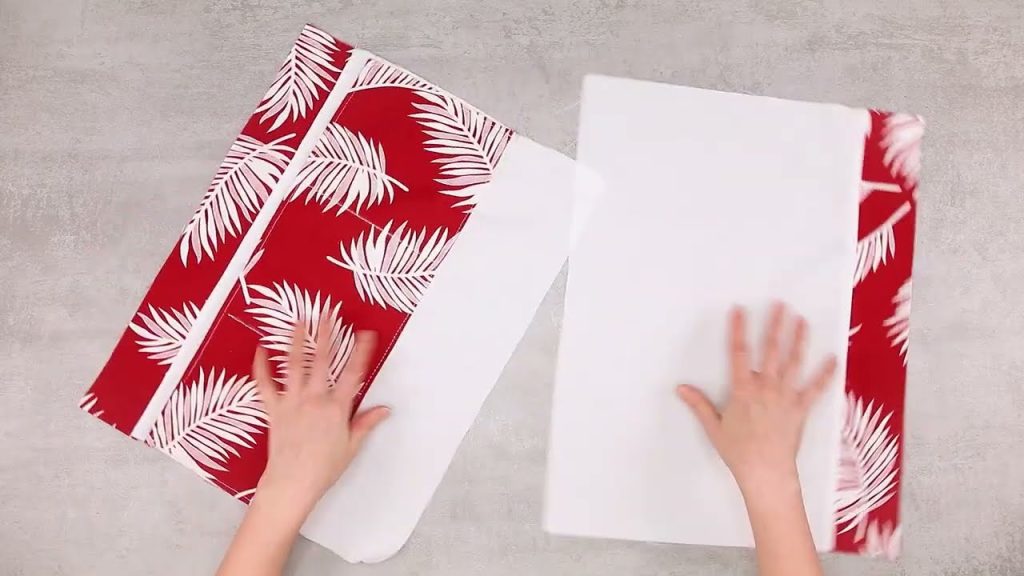
- Main Exterior Fabric (Linen): 2 pieces, each 45 cm x 35 cm. (This will be the main body of your bag)
- Lining Fabric (Linen): 2 pieces, each 45 cm x 35 cm. (For the interior of your bag)
- Adhesive Fabric (Medium-Weight Fusible Interfacing): 2 pieces, each 45 cm x 35 cm. (For the main body)
- Strap Fabric (Linen): 2 pieces, each 45 cm x 8 cm.
- Adhesive Fabric (Medium-Weight Fusible Interfacing): 2 pieces, each 45 cm x 8 cm. (For the straps)
- Magnet Button: 1 set.
- Matching Thread: Strong polyester thread.
- Basic Sewing Tools:
- Sewing machine
- Sharp fabric scissors or rotary cutter and mat
- Ruler or measuring tape
- Fabric marker or tailor’s chalk
- Pins or fabric clips
- Iron and ironing board
- Seam ripper (just in case!)

Step-by-Step Tutorial: Crafting Your Tote Bag
This tutorial will guide you through each stage, creating a bag that measures approximately 34cm wide, 28cm tall, and 10cm deep when finished. All seam allowances are 1 cm unless otherwise stated.
Phase 1: Preparing Your Fabric Panels
Accuracy in this phase will make the rest of your project flow beautifully.
- Fuse Interfacing to Main Exterior: Take one of your 45 cm x 35 cm main exterior linen pieces and lay it wrong side up. Center and press one piece of the 45 cm x 35 cm adhesive fabric (interfacing) to it, following the manufacturer’s instructions. This adds crucial structure. Repeat for the second exterior panel.
- Fuse Interfacing to Strap Fabric: Take one of your 45 cm x 8 cm strap linen pieces. Lay it wrong side up and press one piece of the 45 cm x 8 cm adhesive fabric (interfacing) to it. Repeat for the second strap piece.
- Prepare Exterior Panels: Fold each interfaced 45 cm x 35 cm exterior panel in half lengthwise (to 45 cm x 17.5 cm) and press firmly. This creates a center crease that will be helpful later.
Phase 2: Constructing the Straps
Strong, comfortable straps are essential for a good tote.
- Fold and Press Straps: Take one interfaced 45 cm x 8 cm strap piece. Fold it in half lengthwise, wrong sides together, and press. Open it up. Fold each long raw edge inward to meet the center crease you just made, and press firmly. Now, fold the entire strap in half again along the original center crease, enclosing all raw edges. Press firmly. Your strap should now be approximately 45 cm x 2 cm.
- Topstitch Straps: Pin the strap edges in place. Using your sewing machine, topstitch along both long edges of the strap, about 0.2 cm from the edge. This secures the strap and gives it a professional finish. Repeat for the second strap.
Phase 3: Shaping the Main Exterior Bag
Now we’ll create the 3D shape of your tote.
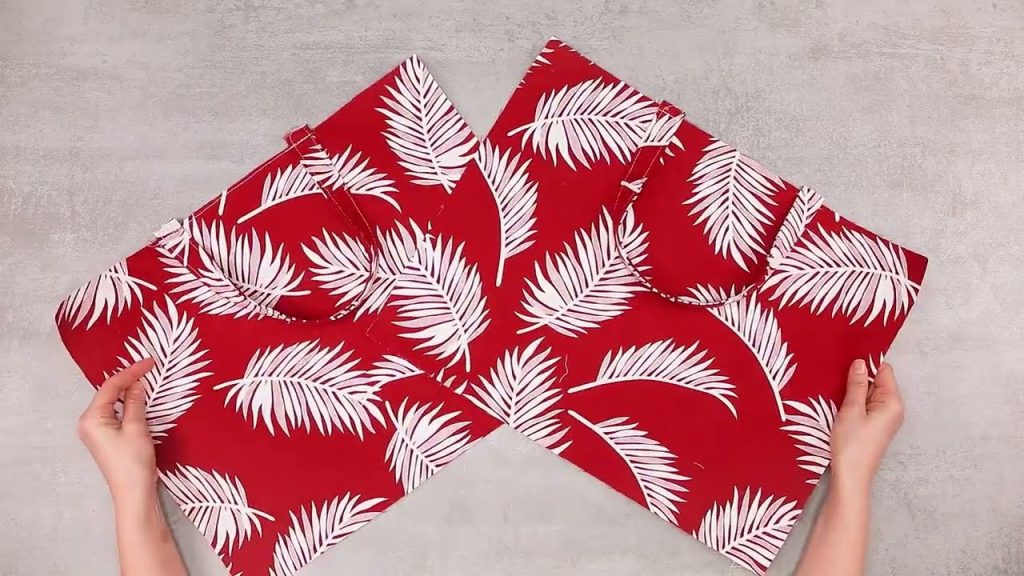
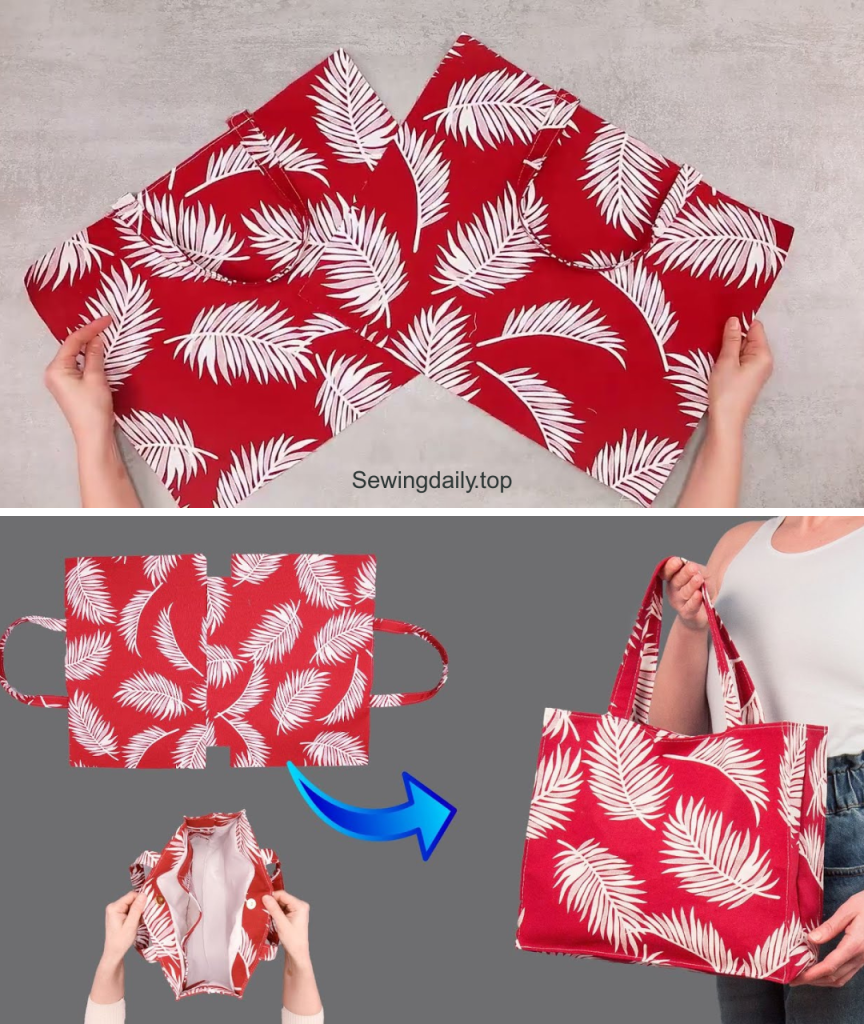
- Mark Boxed Corners on Exterior: Take one prepared (interfaced and pressed) 45 cm x 35 cm exterior panel. On both bottom corners, measure in 5 cm from the side and 5 cm up from the bottom and draw a 5×5 cm square. Cut out these squares. Repeat for the second exterior panel.
- Attach Straps to Exterior Panels: Take one exterior panel. Place your prepared strap on the right side of the fabric, aligning the raw ends of the strap with the top raw edge of the fabric. The strap should be pointing downwards into the bag. Position the outer edge of each strap 13 cm in from the side raw edge. Pin in place. Repeat for the second strap on the second exterior panel .
- Sew Exterior Side Seams: Place the two exterior panels (with straps basted) right sides together. Pin along the two side edges. Stitch these two sides with a 1 cm seam allowance. Press seams open.
- Sew Exterior Boxed Corners: To form the bottom, flatten each cut-out corner so the side seam meets the bottom fold, creating a straight line. Pin across this line and stitch with a 1 cm seam allowance. Repeat for the other corner. This creates a neat, 3D boxed bottom.
Phase 4: Constructing the Lining Bag
The lining will give your tote a clean interior and also hold the magnetic closure.
- Mark Boxed Corners on Lining: Take one 45 cm x 35 cm lining panel. On both bottom corners, measure in 5 cm from the side and 5 cm up from the bottom and draw a 5×5 cm square. Cut out these squares. Repeat for the second lining panel.
- Sew Lining Side Seams: Place the two lining panels right sides together. Pin along the two side edges. Stitch these two sides with a 1 cm seam allowance. Press seams open.
- Sew Lining Boxed Corners: Form the boxed bottom corners of the lining just as you did for the exterior bag.
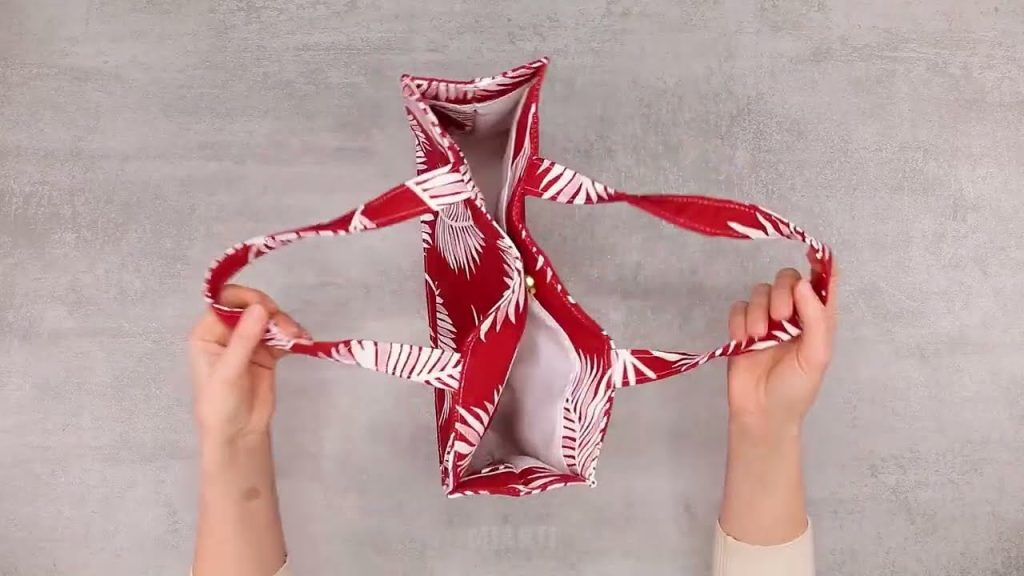
- Attach Magnetic Button (Lining): This step is important for your bag’s closure. On one lining panel, measure 11 cm down from the top raw edge and center a mark. Mark the placement for your magnetic button here. Create small slits for the prongs, insert the magnetic button hardware, and secure it with the washer and prongs. Repeat for the second half of the magnet button on the other lining panel, ensuring they align.
Phase 5: Combining Exterior and Lining
This is where your bag truly comes together!
- Insert Lining into Exterior: Keep your exterior bag right side out. Keep your lining bag wrong side out. Carefully slide the exterior bag inside the lining bag, so their right sides are facing each other. The straps should be tucked neatly between the layers.
- Pin Top Edges: Align the top raw edges of both bags perfectly, matching up the side seams. Pin securely all around the top opening.
- Stitch Top Opening: Stitch around the entire top opening with a 1 cm seam allowance. Important: Leave a 10-15 cm opening (approximately 4-6 inches) along one of the side seams or the back top edge of the lining. This is where you will turn the bag right side out.
- Turn the Bag: Reach into the opening you left in the lining. Carefully pull the entire bag through this opening until it’s right side out.
- Close the Lining Opening: Press the raw edges of the opening in the lining inwards. Stitch it closed very close to the edge. This can be done by machine or by hand for a cleaner finish.
- Push Lining In: Push the lining down into the exterior bag. Smooth out the interior.
Phase 6: Final Touches & Topstitching
These steps add durability and a polished finish.
- Press Top Edge: Give the entire top edge of the bag a good press with your iron, making sure the seam where the exterior and lining meet is crisp.
- Topstitch Top Edge: For a professional finish and added durability, topstitch around the entire top opening of the bag, about 0.5 cm from the edge. This secures the lining to the exterior and prevents it from rolling out.
- Form Gussets and Topstitch: Gently push in the side seams of your bag to create distinct gussets (the side panels of the bag). Topstitch along the edges of these gussets to give your bag a structured, boxy look. This also helps your bag maintain its shape.
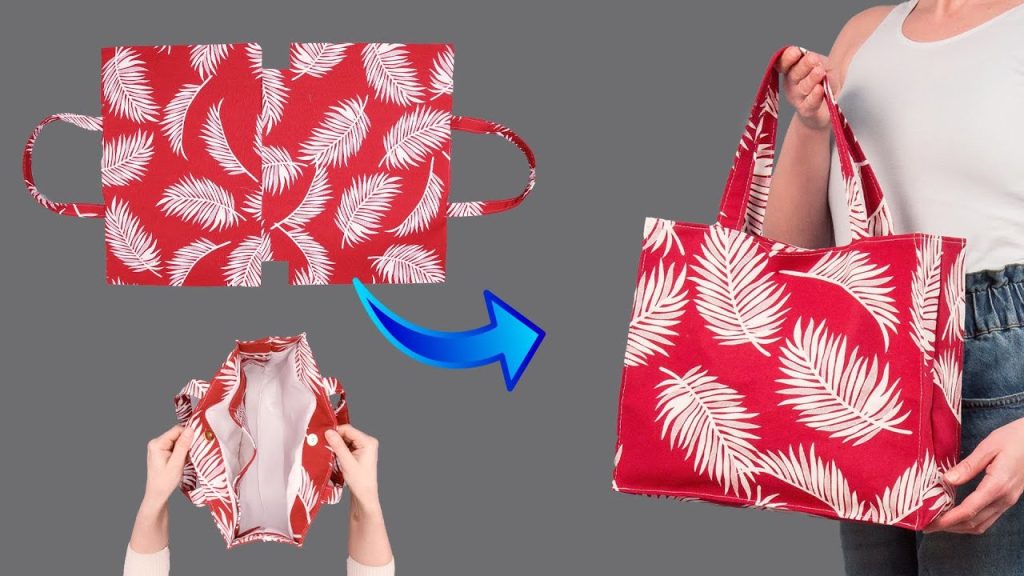
Your stylish and spacious Everyday Essential Tote Bag is now complete! This beautiful bag, with its crisp linen and smart design, is ready to accompany you on all your adventures. Whether it’s for shopping, a day out, or just keeping your world organized, you’ll love the functionality and the satisfaction of having made it yourself.
Enjoy your new handmade treasure!
Video tutorial: